
SharePoint Color Coded Calendar – The PayRoll Schedule
- SharePoint Color Coded Calendar – The PayRoll Schedule
- Screencast: Color Code a SharePoint Calendar – The PayRoll Schedule
- 7 Minute Screencast: Color code a SharePoint Calendar – Update
Update: Jim Bob has sent a 17 minute screencast of his solution which includes another way to assign colors.
After watching Mark Miller’s Screen-Cast, Color Code a SharePoint Calendar, I realized this was the perfect solution for transforming a payroll schedule on an Excel spreadsheet into a SharePoint Calendar to make it more visually appealing and user-friendly.
First Things First
Since I was beginning with a simple list of dates that was already color-coded, converting it to a calendar following Mark’s screen-cast was a snap!

Payroll Schedule in Excel
Of course, the first task was to create a SharePoint Calendar, in three easy steps:

1. Create

2. Create Calendar

3. New Calendar
Presto!

Basic Payroll Calendar
Show Me the Money
The basic calendar is nice and you can display lots of useful information using it this way. But the payroll calendar is something that folks will look at often and the most important question is When do I get paid?
So, let’s create some fields that will help us make Payday stand out, while providing color-coded information about some other important dates, as well.
Setting up the Columns
From the Payroll calendar we just created, click Settings > List Settings:

List Settings
Here, you will see I have already created some columns we will use to make our color-coded calendar.

Customize Columns
Let’s go through the basic columns and then we’ll expand on the more advanced ones:
- Pay Period: This is where we will store the number of the pay period. 1 is for the first payday of the year (though the pay period will most likely begin in the previous year), 2 is for the second, and so on. In our example, there are 26 pay periods per year, so when creating this column, I set a range of 1 to 26, just to avoid accidentally keying a wrong number.
- Start Time and End Time: These come with the Calendar list and we’ll put them to use for our calendar, as is.
- Title: This is the default field for every SharePoint list. We won’t be using it, so I made it not required.
- Location and Description: Again, we won’t be using these, but they’re standard calendar fields that cannot be deleted.
- Three other fields are standard calendar fields that will show up on the EditForm: All Day Event, Recurrence, and Workspace. For our purposes, we’ll use All Day Event and ignore the other two.
Advanced Fields
Now we move into the specific fields we’ll use to (a) make it easy for HR to update the calendar and (b) let their choices be automatically color-coded so the employees can easily find the information they need.
DateType
In the spreadsheet above, we have two dates for the Pay Period: Beginning of Pay Period and End of Pay Period. We’ll combine these into one event and use the Start Time and End Time to show the beginning and ending dates.
Thus we’ll have three choices for DateType: Pay Period, Payday, and HR Deadline. (HR Deadline is the deadline for making any changes that will appear on that pay period’s payday.)

Column: DateType
We will be using the CHOOSE function to FIND a common letter in our DateType choices that is in a different location for each choice. Each of the choices shown has a lower case a, but that won’t work for us, since it is in the same location (the second position) for two of our choices: Pay Period and Payday. So, we’ll use the lower case d, which appears in each choice, but in a different position for each one.
Note: If your choices are different, you will need to look for a common letter to FIND. Alternately, multi-word phrases might allow you to search for a space, or you could force a difference by adding a number at the beginning of each item. If your choices are different lengths, you could use the length, rather than searching for a character or number. Finally, you could add a calculated field that assigns a number to each record which you would then use for calculating colors. (For each of these options see the following posts, or see the comments on Christophe’s post referenced below.)
Color and BGColor
Next we’ll create two calculated fields, based on the DateType choice.
When I examine the Excel schedule above, I see that the capable folks in HR have already chosen some colors to help them differentiate dates. I’m going to use those same colors, converting them to their hexadecimal values.
To find the color they’ve used, I opened the color palette in Excel to see what they’re using. The easiest way to do this in Excel 2007 is to right-click on the field and follow the on-screen menus. In order versions, you can get to this by going to the Font menu (Edit -> Font) and clicking the font-color drop-down.

Determining color values
Clicking on More Colors… will bring up the Colors dialog box.

Custom Color Values
Click on the Custom tab and look at the Red, Green, and Blue values. These are decimal values and we need to convert them to one hexadecimal value (White, for instance is #FFFFFF in hexadecimal) per color.
Each RGB (Red, Green, Blue) hexadecimal value can be separated into three pairs of two-digit hexadecimal values which represent the Red, Green, and Blue values, respectively. Looking at our first color above, we need to convert the Red, Green, and Blue values from decimal (128, 0, 128, respectively) to three two-digit hexadecimal values. A quick and easy way to do this is using the Calculator application in Scientific view.

Scientific Calculator (Choose View -> Scientific)
Simply enter your decimal value (128, in this case) and click on the Hex radio button.
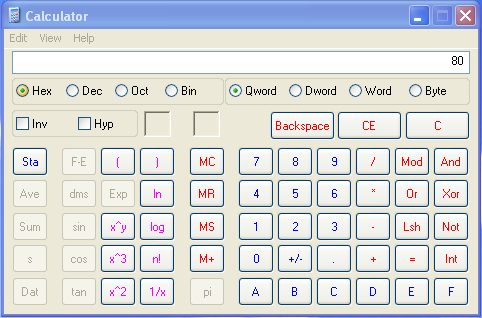
Hexadecimal equivalent of Decimal 128
This is your Red hex value (and Blue, too, in this example). Zero in decimal is zero in hex, too. So, your RGB value becomes #800080 (the # indicates that this should be read as a hex value).
NOTE: The highest two-digit hex value is FF. Decimal is a base 10 counting system, meaning there are ten digits [0-9] used to make all of the numbers in it. Hexadecimal is base 16, meaning there are sixteen digits [0-9, then A-F] used to make all of its numbers.
Doing this for the other two colors, we see that HR has chosen #800080 for Beginning of Pay Period, #008000 for Payday, and #800000 for Payroll/HR Deadline (4PM). We’ll use those same colors for our calculated Color column.
FIND and CHOOSE
Now, we need to determine which color to assign to each row based on the DateType. As stated before, the common letter that has a unique position in each DateType choice is lower case d. We’ll use the FIND function to locate that exact position.
I always have trouble remembering which arrays are zero-based and which are one-based. If you’re like me, I recommend taking an intermediate step to determine what value each of your choices will return. So, before completing the next step, I recommend setting your Color Formula to: =FIND("d",DateType,1) and then looking at the data in a list view. In our case, this will show that the "d" is in the 10th, 4th, and 7th positions, respectively, for Pay Period, Payday, and HR Deadline.
To make it easy to visualize, in the next step this number will be the total number of commas that come before each respective color in the CHOOSE function.
NOTE: If you miscalculate and end up with fewer CHOOSE options than the highest value FIND returns, you will get an error that will show #VALUE in this field. Simply take off the CHOOSE and perform the FIND for each choice (as recommended in the intermediate step two paragraphs above) and recalculate.

Column: Color
How this works: The FIND function looks for d in the DateType choice. It will return this number to CHOOSE function which will then set the Color to the value in that position in the CHOOSE function.
For example, in "Payday," the d is in the 4th position, so FIND returns 4. The CHOOSE function then becomes =CHOOSE(4,,,,"#008000",,,"#800000",,,"#800080). The fourth position has "#008000" so that becomes the value of Color for this row.
BGColor
We’ll use pretty much the same formula for BGColor, only we’ll set the background a little lighter but in the same hue as the text and border.
A simplified look at RGBs will show us that sliding all three values up by a corresponding amount will result in a similar hue, but much lighter as they approach white (#FFFFFF). For each of our colors, the RGB values are either half-way "on" (128 or #80) or "off" (0 or #00). If the Color value component is half-way (#80 is half of #FF) on, we’ll set the BGColor to all the way on (#FF); if it’s off, we’ll turn it most of the way on (#CC).
So, we’ll copy and paste our Color Formula to our BGColor Formula then change 80s to FFs and 00s to CCs (notice that hex values are NOT case-sensitive).

Column: BGColor
Some Assembly Required
Now we can put all of these element together in such a way that Christophe’s (Path to SharePoint) Text to HTML script can make the Content Editor Web Part do the color-coding we need. (Follow the link to get the code.)

Column: Display
Breaking this down, we’re creating a box around our text using the DIV tags (this is what Christophe’s code looks for), using the same Color value for the text and the border; and using the BGColor value for the background color of the box. Within the DIV itself, we’re combining the DateType and the Pay Period number as the text shown on the calendar for our event.
Entering the Data
We’re entering a good amount of data into this calendar, so let’s make it a little easier on ourselves by creating an appropriate Datasheet View of our list data.
From our Calendar, click on the View menu and choose Create View

Create View
Choose Datasheet View

Create View: Datasheet View
Choose to only display the fields you need for quickly entering the data. (I set mine up as a Private view. You might want to walk your editors through setting up a similar view so they can enter the next year’s data without your help.)

Edit View: Datasheet View Shown from Edit View so that selected fields are at the top for screen capture.

Payroll Calendar: Datasheet View
One day’s entry will look like this (if you have ordered your columns this way):

Payroll Calendar Event (Pay Period event)
A Calculated Effort
Now, the default view for a calendar shows the Title, but we didn’t even fill that in. We want it to show our calculated Display field instead.
To that, we’ll go to the View menu and click on Calendar -> Modify this View:

View -> Modify this View
Scroll down to Calendar Columns and notice that the default fields shown for each record are the Title and Location fields, which we left blank.

Calendar Columns
We want to change those to Display and DateType, respectively.

Changing the Calendar Columns
Click OK.
Almost There
Once you have all of your data entered, take a look at your Calendar.

Payroll Calendar – NOT Pretty
Even though we have all the data just the way we want it… we still have to tell SharePoint that we want the Display field to be considered HTML. We do that using Christophe’s code in the Content Editor Web Part. (He deserves the traffic and recognition for his code, so I’ll let you go get it from him. Once you have it, I’ll show you what to do with it.)
The Final Touch
From your Payroll Calendar, go to Site Actions -> Edit Page

Edit Page
Click on Add a Web Part at the top of the screen:
Add a Web Part
Under All Web Parts, choose Content Editor Web Part and click Add:

Content Editor Web Part
Click on open the tool pane:

Open the tool pane
Expand the Layout section and check Hidden:

Hide the CEWP
Then click Source Editor… and paste Christophe’s code in the box and click Save.
Drag the Payroll Calendar web part to the top, so the Content Editor Web Part is last on the page.
Click OK.
Click on Exit Edit Mode

Exit Edit Mode
Voila!

Color-Coded Payroll Calendar
NOTE: If you want to include this calendar as a web part on another page, simply make sure you add the CEWP to the end of that page, as well, with the same code from Christophe.
 Guest Author: Jim Bob Howard
Jim Bob Howard is a web designer / web master in the healthcare industry. He has been working with SharePoint only since March 2009 and enjoys sharing what he has learned. You can email him at [email protected].


Just a precision: for calendar views, the script is actually in this post:
http://pathtosharepoint.wordpress.com/2008/11/15/sharepoint-calendars-color-coding-hover-effects-etc/
Thanks, Christophe! Sorry about that.
Hi,
we can use following code using jQuery to replace <a> innerHTML instead Christophe’s code
if(typeof jQuery=='undefined'){
	var jQPath = 'https://ajax.googleapis.com/ajax/libs/jquery/1.3/jquery.min.js'
	document.write('');
}

$(document).ready(function(){
$("a:contains('
I work for a military hospital and use the Outlook calendar because of the color codes. We are currently using WSS3.0 for our Intranet and each department and clinic use also use the Outlook calendar. We will upgrading to MOSS in June 2009. Our ‘main calendar’ is what the staff is able to view. I would like to be able to set one color as the ‘standard’ for the hospital. Here is the list we use.
APFT/CTT = Green, Hospital = Orange, Schools = Gray, Meeting/Conference/VTC = Yellow
Hope you can help.
Thanks,
Dear Frank,
I have sent Mark three more short screencasts of ways to implement the color-coded calendar when your choices don’t have a common letter in a unique position.
He’s planning to run them as a series. Stay tuned.
Blessings,
Jim Bob
Note that in your specific example you may have to remove the “/” in your categories as they are special characters in html.
Is it the same with Excel web page, if we want to change the color of the column
Great, thanks for this step by step instructions.
I followed all the steps and at the end I have payroll calender. Only thing I am having trouble is “HR Deadline” it still shows me <DIV style….” instead of color. Pay Period and Payday is working fine. Can you tell me what am I missing?
Regards,
T.I.A.
cloudno9,
I would need to take a look at how that one may be different.
If all of the rest are working fine, that tells me something is being messed up in the HTML. Post the full HTML that is being displayed and I can help you trouble-shoot it.
Blessings,
Jim Bob
Here is the code that I am using to convert that calculated field text into html…
and this is what I am getting on my calender for HR Deadline….
HR Deadline: 1
Let me know if you need something else.
Regards,
It’s the code around HR Deadline that I need to see. If you pasted it with the “<DIV …” around it, it didn’t come through. Try emailing it to me instead.
I too am having the same issue: everything works but the HR Deadline. that is drawing html code instead.
If you spot the issue, let me know.
One more clue: when I set the HR Deadline to be an all day event it works.
cloudno9 and Webape,
Skip the “DIV” portion of the tag and post what it’s giving you in the rest of the tag, starting with “style=’border…”
Blessings,
Jim Bob
[email protected]
This is what is showing for the HR Deadline
if I set it to 4:00 PM
And when you change it to All Day Event, what do you get?
I get the colored box as in your example minus the “4:00 PM” above it.
Click on that item and post what is in the Display field (minus the DIV again)
Style=’border:1px #800000 solid; padding: 5px; margin: 0px;color:#800000; background-color:#ffcccc;’>HR Deadline:1
Webape: Email me: [email protected].
I want to check something. Perhaps we can solve this offline and then just post the solution. ;)
Very useful, Jim Bob. Thank you for taking the time to post!
Another way to calculate the right colors, especially if you don’t have a common character in a unique location.
This is great, I’ve been trying to figure out how to do this for a while now. I almost tried to buy an application to accomplish this goal.
Is there a way to get rid of the extra whitespace at the bottom of the calendar after this is done?
Eric, I don’t have whitespace at the bottom of mine. Have you hidden the CEWP?
If not, try this…
1. From Site Actions choose Edit Page
2. On the CEWP, click edit -> Modify Shared Web Part
3. In the Edit pane, expand Layout
4. Check the Hidden box
5. Click OK
6. Click Edit Exit Mode
HTH
Blessings,
Jim Bob
Jim Bob,
Many thanks for posting this solution!!
KJ
Thanks Jim Bob, I did do that, but it didn’t update immediately so I didn’t see it. Works great!
any update on this yet?
Thanks
Webape: Email me: [email protected].
I want to check something. Perhaps we can solve this offline and then just post the solution.
This is working very well.
Is there a way to change the color based on the current date? So, if there is an activity planned for tomorrow, this should show in Amber. If the activity is planned for today, it should show as Red.
Neeti: Great question. I will work on a solution and post my findings in the next few days.
Neeti,
Two questions:
1. Are colors only based on date and not a type of event?
2. What color for items more than one day in the future and in the past?
Blessings,
Jim Bob
Jim,
What I am looking for is that the color should depend on the type of event for all future and past events.
But as soon as the date when the event is expected to happen arrives, the color becomes red [#ff0000] or better still would be, if it could start flashing…
I day before the event is due to happen, the color should become amber [#ffc000].
So, if an event is scheduled to happen on 05-May-2009, then on 04-May-2009, it should become amber, and on 05-May-2009, it should become Red.
Thanks
Neeti
I see. I’m going to have to punt on this one for a time. If you’re needing a quick answer, I recommend looking into Christophe’s suggestions on working with [Today] here, here, and here.
If you get it working, I would love to see the solution you found!
Blessings,
Jim Bob
Hi
I found that I needed to recreate the CEWP with null values, move it to foot of page (below Calendar), exit web page, then go back and paste in a fresh copy of Chrisptophes code to get it to work for single day events – multi day events worked OOTB
web development is so much fun : )
Webape and cloudno9, take a look at owen’s solution and see if that doesn’t help.
Hi Jim,
Single day event works if its a full day event. but when you have the event from (lets say) 12:00pm to 2:00pm than it shows the “div” code for that event.
Further:
people make similar comments to mine in Christophes blog and it will work – exact reasons for multiple failures unknown.
It works for all meeting lengths for me – minutes to multiple days.
several pieces of advice:
1. follow Chrisptophes advice in comment 1 to get the code from the right place.
2. I found that it didn’t work a couple of times until I used his copy to clipboard at head fo code (vs highlight and copy)
3. I use the Hide weekends code from Christophe as well – had to get the day highighter working first (under the calendar), then added the hide weekend afterwards – ie keep it simple to start with, and finally
4. Check your column code – in my case it had to do with nested ‘ and ” – passed the sharepoitn acceptance but didnt display right.
Good luck
This is a great solution for a MOSS shortcoming! I got our organization calendar working with one minor problem. If I click on the week view in the calendar any events that are repeating (recurrence) the title does not show up. The only thing in the time block is the circular recurrence symbol. All other events display normally in the week view. In the month and day view all events display perfectly.
Any suggestions?
That’s a great question for Christophe.
Christophe, how could your code be modified to change the way the time and recurrence icon are displayed? As it is, the time and recurrence icon are displayed above our calculated box. In the week view, the colored box doesn’t show up at all.
Thoughts?
Love the calendar. Is there a way to put a key on there so users can know what the colors mean? I think I could put some little color boxes in the description bar at the top, but I can’t figure out how to get the bar to display html. My code just shows up in the bar as code.
I have published an update that should address the issues with intraday and recurring events:
http://pathtosharepoint.wordpress.com/2008/11/15/sharepoint-calendars-color-coding-hover-effects-etc/
I plan to publish a more complete update in a couple weeks.
@eric: simply add the key as html. See a similar example in the following post:
http://pathtosharepoint.wordpress.com/2008/09/29/another-example-of-progress-bar/
Christophe: I tried using the updated code you you linked to above on 15 May and it did not work at all. After the failure I reinserted the old code and it worked as before, month and day view perfect, week view does not show the time or title on recurring, only the circular recurring symbol. I am trying to get my group to adopt the color coding, but without the week view showing all events properly I am getting pushback. Appreciate any help you can give me.
Scott: did you remember to replace the DIV tag with a SPAN in the formula, as explained in my updated post? Feel free to send me your formula:
[email protected]
Did anybody figure out why some people are getting DIV code for hourly appointments and it works for the all day events, I think Cloudno9 was having this problem. I changed my code to SPAN, and got the same issue. Thanks for any help on this in advance.
I added the code and followe dthe video a few times but i keep getting the code on the cell instead of the color cell. do i need to turn javascript on the SP server, or somehting else
Here’s a neat trick…
In your display column, you can determine an all day event (ADE) by checking TEXT([start time], “h:mm”)=”19:00″. If that is true, you can render a DIV tag, which gives the nice stretched-out color we are seeking. If it fails, use a SPAN tag for non-ADEs, but you may want to play with the formatting a bit by setting a standard height and width.
I would like to find a way to hack the surrounding DIV in sharepoint for non-ADEs in week and day view. Anybody got any ideas?
I’m testing this solution, but I have problems with normal calendar entries – they are showing as code. Only all day events works properly.
When I check a web page source of calendar before any changes was made I can see that in normal calendar entries I didn’t have any after but they exists in all day events – maybe this is a problem.
What can I check to make this solution run properly?
Regards
Bas
Bas
check Christophes blog on the same subject. I left an entry there explaining how I had to recreate the calendar anew with the colour coding as it just wouldnt work with an existing calendar.
Software is just like this sometimes (it wasnt just caching at the browser/server either as far as I could tell – just wouldnt ‘take’ the new design and display HTMl properly).
It will work – persist : )
Colour coding script from http://pathtosharepoint.com/ works ok :))
Thank You very much :))
Best regards
For the code showing on the hourly events I resolved it by adding to the JavaScript. I had it recognize the B tag (bold around the time) just like the A and TD tags. Works perfect now.
Hi,
I got this working fine with the DIV tags on the Month view, but when I switch to a day view or week view, I just see the html code instead of the tags.
Is everybody else that has this working seeing the color shading correctly on the Day view and Week view?