
Creating mailing lists for SharePoint sites and blogs [No Code Required] – Part 1: Creating a secured backend
Guest Author: Ayman El-Hattab
This multi-part series of posts is intended to help you create mailing lists for your SharePoint sites or blogs without writing a single line of .NET Code. In the introductory article, I listed the project initiatives, requirements, and objectives. If you have not read it yet, I would encourage you to do that first.
As per the requirements listed in the introductory part, we need to create a back-end where we will store the subscribers’ contacts and information. Since everything in SharePoint is stored in lists or in libraries, we will use a Contacts List to hold our users’ information. We need anonymous users to be able to contribute to this list by adding their contacts without giving them any sort of access to the list views. In addition, we need to set in motion the content approval feature provided by SharePoint to stop subscribers from receiving e-mails unless they are permitted. That being said, let us get started…
For this series of articles, I’ve assumed that you already have a SharePoint site set up and that it is accessible to anonymous users. If you do not know how to configure your SharePoint site for anonymous access, check out this short video.
- Open up SharePoint Designer, connect to your SharePoint site collection, and supply your credentials.
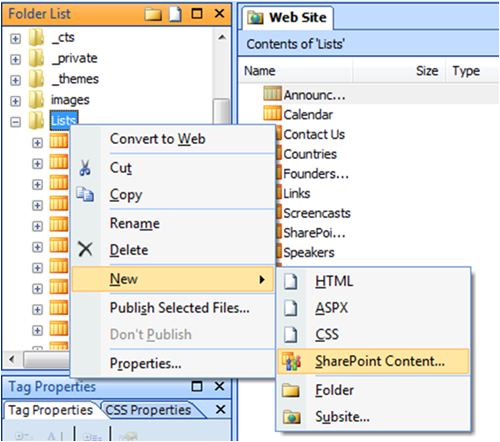
- Choose a location from the folder list as to where you want to create the list that will hold the subscribers’ contacts.
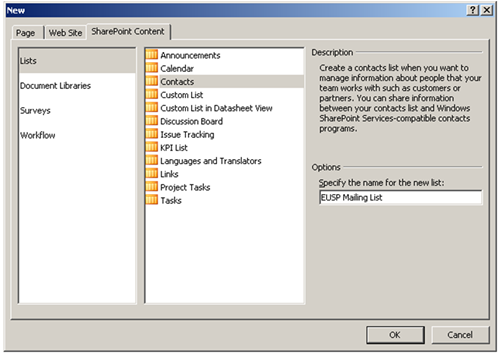
- Choose a “contacts list” template to start with and specify a name for the list.
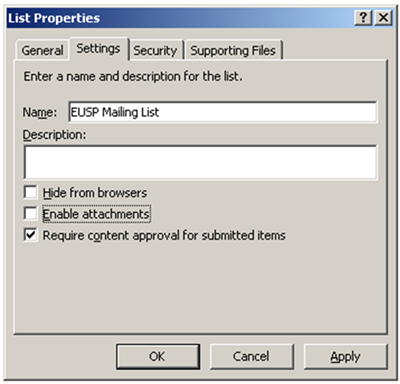
- Go to the newly created list from SharePoint Designer, right click, and select properties.
- The list properties dialog box opens up, open the settings tab, uncheck “Enable attachments” and check “Require content approval”. Press the “apply” button. Remember that we need the emails to be sent only to the approved subscribers.
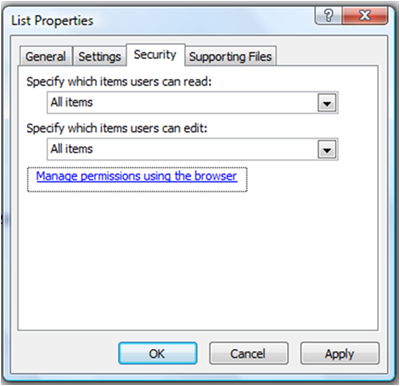
- Switch to the security tab
- Click “Manage Permissions using the browser”.
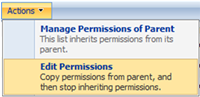
- The list by default inherits permissions from the site, but for anonymous lists, this will not do. By selecting ‘Edit Permissions’ from the ‘Actions’ menu, you can specify specific permissions for this list.
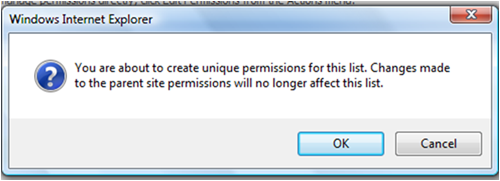
- You will be prompted that you are breaking the inheritance from the parent site, click Ok
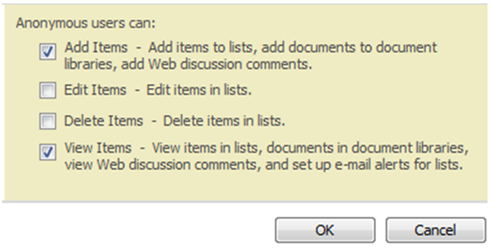
- The Setting menu has now appeared. Open it, and choose ‘Anonymous Access’.
- Configure the anonymous users’ permissions as shown in the following figure then press Ok.
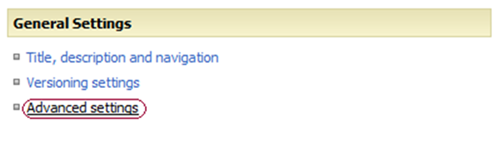
- Navigate to the list settings page using the breadcrumb.
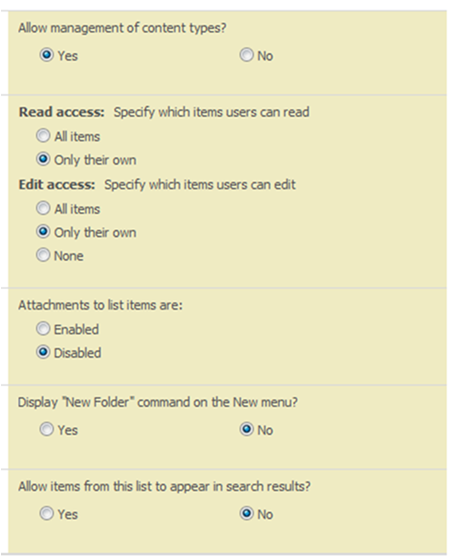
- Choose “Advanced Settings” from the General settings tab.
- Configure the advanced settings as shown in the figure below.
- Navigate back to the list, click new contact.
- Copy the URL from your browser address bar to Notepad. Edit the value of the “Source” query string parameter to be the home page of your site. In my case, I ended up with the following URL :
Note : You must edit “Source” value, otherwise your visitors will be redirected to the default view of the list after submitting the request and they will be prompted to provide their credentials.
- Now everything is set up for your mailing list form, you just need to provide your visitors with a link to subscribe to the list. You can add a content editor web part to your home page and insert a link to the URL that you ended up with in the previous step.
- Access the site anonymously and navigate to the Mailing list form through the content editor web part you created in the previous step.
- Fill out the form and here you go! You are redirected back to the home page.
Note: Anonymous users will not be able to navigate to the list views even through the breadcrumb. They will be prompted to enter their credentials or they will be redirected to the Access Denied page.
Summary:
In this post, I’ve illustrated creating SharePoint lists through SharePoint designer, configuring them for anonymous contribution, and preventing anonymous users from accessing any submitted data. I have also demonstrated configuring SharePoint lists to enable content approval.
In the next post, we will create a custom SharePoint list form through SharePoint designer like the one shown in the introductory part, manage the “Contact” content type, create client-sided validations and much more …
 Guest Author: Ayman El-Hattab
Ayman El-Hattab is a SharePoint Developer & Speaker. He is a Microsoft Certified Solution Developer as well as a Microsoft Certified Technology Specialist in SharePoint. Ayman writes articles about topics in relation to SharePoint and its related technologies for online magazines, publicly speaks for numerous user groups and offline communities, is the founder of SharePoint4Arabs.com, organizes events for EGYSUG and you will always find him active at MSDN and Technet forums.
 0
0  0
0


You rock, Ayman!! I’ve been trying to convince my boss that I don’t have to become a .net programmer to do some really great things with SharePoint! Thanks for taking the time to write this series!!
Do you agree? 0
0  0
0
You made it seem so easy. Nice job! We’ve been looking for something like this to manage our Bend SharePoint User Group members. Looking forward to part 2.
Do you agree? 0
0  0
0
Cool feature.. I was wondering if it is also possible to import mailing lists from Yahoo Groups/ Google Groups. This would be very handy a feature.
Do you agree? 0
0  0
0
good post Ayman…
it is exactly what I need..the only difference is in confirmation step..Instead of approving them by the administrator, an automatic email should be sent to the subscriber with verfication link.
waiting the second part …
Do you agree? 0
0  0
0
Rasha, Thanks for your feedback. Unfortunately, it’s imposible to send an automatic email to the subscribers with a verfication link without writing .NET code but I’ll show you after a couple of posts how to send an e-mail to the list subscriber informing them of the approval of their request to join the list.
Do you agree? 0
0  0
0
Great series, waiting for the next post ..
Do you agree? 0
0  0
0
Ayman, is there any benefit from creating the list from SPD, rather than doing it directly in the SharePoint UI?
Do you agree? 0
0  0
0
nope Christophe, I was just demonstrating how to use SPD to create lists as some people do not know that it’s possible to do that from SPD.
Do you agree? 0
0  0
0
Hello Ayman,
I followed the steps above but still I cannot add any item to the list anonymously..
When I tried to access my list http://moss/Lists/NewsletterList/NewForm.aspx?RootFolder=%2FLists%2FNewsletterList&ContentTypeId=0×0100BC9207E280CC314C991E745B4B6F7421&Source=http%3A%2F%2Fmoss%2FPages%2Fdefault%2Easpx
I got prompted to enter the credentials…
*Anonymous access is enabled on the site level.
*The advance settings are exactly as above.
* for the list’s permissions, I broke the inheritance and I enabled (Add items) & (View items) on the list level but when I came back to this setting again, I found all the options are disable and I have this message in the permission page(This list does not inherit permissions from its parent Web site).
What could be the reason?
Thanks..
Do you agree? 0
0  0
0