Creating a SharePoint List Parent / Child Relationship – Out of the Box

Guest Author: Mark Rackley
First Things First
Okay, first off, my development blogs will fall into one of two categories “Out of the Box” or “Custom”. My definition for “Out of the Box” is anything that can be done in SharePoint, SharePoint Designer, or InfoPath. Another way to look at it is if you can do it “Out of the Box” you can do it remotely without having to use a VM or any sort of Remote Desktop Connection. Of course, this may be everyone’s definition of “Out of the Box”, but I just want to make sure we are all on the same page when reading my Blogs.
The Impetus
When we first started our SharePoint development efforts we had a requirement to write an application to track issues and projects as well as log time against them. All of our development had to be Out of the Box because of the development constraints with Custom development and well, because at the time we didn’t really know what we were doing. However, a couple of things came out of this development effort which I think will actually come in handy. One of these was creating a Parent / Child relationship between lists so that we could track hours for a project or issue. Unless there is some functionality in SharePoint that I’m not aware of (and there is a TON) you cannot create a list and have it automatically have any parent identifying field automatically set? If I’m wrong, I’d love to know it.
Is There A Better Way?
One of the joys of SharePoint is that there are a lot of different ways to accomplish the same thing. Is this the BEST method? I doubt it. This is what I was able to figure out and is pretty straightforward. In fact, I just looked looked at some existing SharePoint templates to see how they did it. This isn’t even my idea! But I figure one of the benefits of a Blog is that it is a good place to document some of the things I’ve done and can easily go back later and find it. So, this is more about me helping me than me helping you. Yes, it’s out there. I’m as selfish as my wife says I am.
Blah… Blah… Blah… Just Show Me How You Did It
Okay! Keep your pants on. First lets think of a real world scenario. How about a time tracking application to track time against issues? What a great idea! Here are the steps we’ll take.
- Create Issue List
- Create Time Log Entry List
- Show time log entries for an Issue on an Issue View
- Create link on Issue View that passes Issue List ID to a page that creates a new Time Log Entry
- Create a page for creating a new Time Log Entry and store parent’s ID
Pretty easy eh? Let’s get started. I’ll show you step-by-step in case you are as dense I am.
Creat Issue List
Follow these steps from your SharePoint site (or watch the quick video, it always helps me to actually see it done)
- Click “Site Actions”
- Click “Site Settings”
- Click “Site Libraries and Lists”
- Click “Create new Content”
- Click “Custom List”
- Enter the name of the List (“Issue” in this example)
- Click “Create”
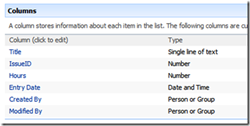
You now have a custom list created called “Issue”. This list only has a couple of columns (Title, Created By, Modified By, and other auto-generated columns). If you want to add more columns click on “Settings” then “Create Column” to add whatever columns you need.

Create Time Log Entry List
Follow the same steps above and create another list called “Time”.
Show Time Log Entries for an Issue on an Issue View
Okay, now this is where the fun starts. Start up SharePoint Designer and open your site. I suppose the same results could be achieved by editing the aspx pages directly, but again, I’m not that ambitious. Open up the Issue Display form (DispForm.aspx). I’ve heard some people say that you should not modify the default aspx files generated by SharePoint and that’s probably sound advice. For the purposes of this tutorial I am going to use these files. If you need help creating a new file shoot me an email.
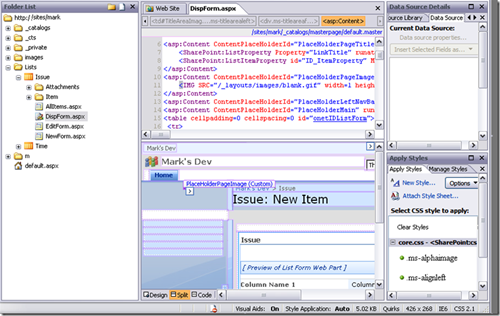
Drag and drop the “Time” List to the bottom of the Issue DispForm.aspx file.
Let’s filter the Time list WebPart so that it will only show Time entries that belong to the Issue. This is done with the following Steps (or again, watch the video):
- Open up the “Common Data View Tasks” for Time List.
- Click “Filter”.
- Click “Click here to add new clause…”.
- Select “IssueID” for Field Name.
- Select “Create a new parameter…” for Value.
- Give the parameter a Name of “IssueID”
- Select “Query String” as the Parameter Source
- Enter “ID” for Query String Variable
Create Link on Issue View that Passes Issue List ID to a Page That Creates a New Time Log Entry
We now need to pass the ID of the current Issue as a query string variable to the aspx page responsible for creating a new Time entry. Edit the Display page for Issue, and insert the following “<xsl:otherwise></xsl:otherwise>” code block within the <xsl:template> tag at the end of the Time list. :
<xsl:template name="dvt_1.rowinsert">
    <xsl:param   name="IsInsertMode" />
     <xsl:variable   name="Pos">_new</xsl:variable>
     <tr>
       <xsl:choose>
     <xsl:when test="$IsInsertMode =   '1'">
    </xsl:when>
    <em><xsl:otherwise>
    <td class="ms-vb" colspan="99">
    <a   href="../Time/NewForm.aspx?IssueID={$IssueID}" onclick="javascript:this.href =   unescapeProperly(escape(this.href)); GoToLink(this); return false;"   target="_self">Create a new Time Log Entry...</a>    </td>
    </xsl:otherwise> </em></p>
The “{$IssueID}” is the parameter that we created above and will contain the ID of the current Issue. The above code will create a link that looks like the following:

When a user clicks on the “Create a new Time Log Entry…” link they will be taken to the page to create a new Time list entry. Save your changes and let’s make changes to the “NewForm.aspx” file for the Time list so that it stores the IssueID.
*UPDATE ISSUES WITH MISSING XSL:TEMPLATE CODE*
It appears as though I may have missed a step, or in some instances an additional step is needed in order to get the XSL code mentioned above. If you are missing the aforementioned “xsl:template” code, follow these steps:
- Open up the “Common Data View Tasks” for Time List.
- Click “Date View Properties…”.
- Click on the “Editing” tab.
- Check the “Show inset item link” checkbox
- Press the “OK” button
At this point you should be able to find the “xsl:otherwise” code block described above and make the necessary modifications. I hope this helps clear up any confusion. Now… back to our regularly scheduled blog…
Create a Page for Creating a New Time Log Entry and Store Parent’s ID
Probably the least intuitive part of this whole process is writing the code in the “NewForm.aspx” page so that it stores the ID of the parent Issue into the IssueID field of the “Time” list. We have the parent ID of the Issue passed to the page in the “IssueID” query string. To do this, simply add the following JavaScript to your “NewForm.aspx” page for a new Time list entry:
<script type="text/javascript">
var qs = location.search.substring(1, location.search.length);
var args = qs.split("&");
var vals = new Object(); </EM></p>
for (var i=0; i < args.length; i++) {
var nameVal = args[i].split("=");
var temp = unescape(nameVal[1]).split('+');
nameVal[1] = temp.join(' ');
vals[nameVal[0]] = nameVal[1];
}
setValueForFieldName("IssueID", vals["IssueID"]);
function setValueForFieldName(fieldName, value) {
if (value == undefined) return;
var theInput = getTagFromIdentifierAndTitle("input","",fieldName);
theInput.value = value;
}
function getTagFromIdentifierAndTitle(tagName, identifier, title) {
var len = identifier.length;
var tags = document.getElementsByTagName(tagName);
for (var i=0; i < tags.length; i++) {
var tempString = tags[i].id;
if (tags[i].title == title && (identifier == "" || tempString.indexOf(identifier) == tempString.length - len)) {
return tags[i];
}
}
return null;
}
</script>
I have found that the location of the script does matter. I generally place it within the “PlaceHolderBodyAreaClass” ContentPlaceHolderId content tags.
Conclusions?
There you have it, when you use the link on the Issue DispForm.aspx to create a new Time log entry it will create a Time entry with the IssueID set to the ID of its corresponding Issue. When you view an Issue you will see a list of all Time entries corresponding to that Issue. This also comes in handy for reporting on the data. In our production environment I disabled allowing users to go directly to the NewForm.aspx page for a Time log entry so that there were no orphan Time entries out there. Nothing spectacular, but it gets the job done. If you’ve seen a better way of doing this, please post a comment with a link, I’m sure others would benefit as well.

There’s quite a bit you can do from here. To make this work more real world you would need to modify the “NewForm.aspx” page to hide the IssueID field and you could add some quick and dirty Workflows from SharePoint Designer to do things like sum up hours worked and store it in the Issue.
I’m more than happy to keep this application moving forward in future blogs if there is any interest, adding the above features and any others you might want to see? Just let me know.
Also, if you found this blog completely worthless I’d like to know that as well. I don’t want to make your trips here a total waste of your time, but I do offer a money back guarantee.
<UPDATE>
There seems to be lots of interest out there in sending more than one value from the parent list to the NewForm.aspx page of the child list. I finally got around to writing a blog explaining how to do this as a follow up to this blog. You can find it here:
Enjoy!
 Guest Author: Mark Rackley
Mark has been developing software applications for over 15 years filling the roles of Project Manager, Business Analyst, Lead Developer, and Software Architect. He has been involved in projects for such companies as Dell, Motorola, Intel and Agilent Technologies. He has worked in large corporate environments, small software start-ups, and as a consultant. Mark currently works for UNFI where he was introduced to the world of SharePoint and has taken on a lead SharePoint architect role within his organization making key development, administration, and architecture decisions. Mark’s goal is to help ever new architect and developer avoid the frustrations and brick walls he ran into while learning SharePoint.
Blog: http://www.sharepointhillbilly.com
Email: [email protected]
Twitter: http://www.twitter.com/mrackley
- SharePoint Date Filter: Filtering a List by Greater Than or Equal to Date
- Creating a SharePoint List Parent / Child Relationship - Out of the Box
- Passing Multiple Query String Variables Using SPD – Follow Up on Creating Parent / Child List Relationships
- Setting SharePoint Form Fields Using JavaScript
- Tips When Asking For SharePoint Help
- Setting SharePoint Form Fields Using Query String Variables Without Using JavaScript
- Creating a SharePoint List Parent/Child Relationship – VIDEO REMIX
- SharePoint: Populating Drop Down List Field with Data from Different Site
- Building The Right SharePoint Team For Your Organization


YOUR ‘definition for “Out of the Box” is anything that can be done in SharePoint, SharePoint Designer, or InfoPath.’
MY definition for “Out of the Box” is anything that can be done in SharePoint WITHOUT Designer, WITHOUT InfoPath, and WITHOUT Enterprise Edition.
So while this article excites me and I can do everything until you get to editing the aspx file directly. Did I understand that you could actually create a new file BASED on that one so you were not working with the default file?
I’m willing to dig and struggle and do it manually but I dare not touch the default file. Oh and one other potentially dumb question. Can this be done by a Site Owner or Site Collection Admin. If it requires any kind of “system access” …
Definitely a great idea and I hope you continue with these articles. Not everyone has their hands so tied re SPOOB.
Hey IdoSP,
In this example I am changing the default page, but I highly recommend against doing that. If you aren’t careful you can cause some major issues in SPD that you cannot recover from. Also, I believe Site Owners can do this.
This is actually a cross-post from my blog (www.sharepointhillbilly.com) and there are a lot of comments and feedback on the original post. Also, there are some follow up posts to this which I believe Mark Miller is going to post here as well? So, stay tuned. If this article generates as much traffic as it has on my site, it may call for some extra follow-ups.
Good luck!
Mark
This is really excellent!
Just one question – is there a way that IssueID field can be automatically populated it’s value from the Issue ID?
Cheers
Hi thanks for nice post and I really appreciate if you continue List Parent / Child Relationship article series (Consider Insertion, Best Viewable multiple Lists Data, Maintaining Many to Many Relationship among lists and everything which normally required for building application on relational databases.)
I faced one problem while applying above solution, according to my understanding Javascript on ´Time´ insertion form fetch value from querystring and bind with IssueID column but in my case the issueID not populate automatically in IssuID column of ´Time´ list. Kindly give some guidance. Thanks for nice post.
Hi Nasir,
I had a similar problem. You will need to make the following modification in the above java script:
line 3 -delete amp;
line 4 – delete
line 22 – delete amp;amp;
Hope this helps.
Regards,
Amjad
Hi Amjad,
Thanks for your help. I have followed your guideline and its work. However, I only delete tags from line 4 as object creation is required. I have also added one line of code after javascript begining tag which force/puch the body to execute the function on load.
_spBodyOnLoadFunctionNames.push(”fillDefaultValues”);
If the above code does not work for anybody then try this one.
_spBodyOnLoadFunctionNames.push(”fillDefaultValues”);
function fillDefaultValues()
{
var qs = location.search.substring(1, location.search.length);
var args = qs.split(”&”);
var vals = new Object();
for (var i=0; i < args.length; i++) {
var nameVal = args[i].split("=");
var temp = unescape(nameVal[1]).split('+');
nameVal[1] = temp.join(' ');
vals[nameVal[0]] = nameVal[1];
}
setValueForFieldName("IssueID", vals["IssueID"]);
function setValueForFieldName(fieldName, value) {
if (value == undefined) return;
var theInput = getTagFromIdentifierAndTitle("input","",fieldName);
theInput.value = value;
}
function getTagFromIdentifierAndTitle(tagName, identifier, title) {
var len = identifier.length;
var tags = document.getElementsByTagName(tagName);
for (var i=0; i < tags.length; i++) {
var tempString = tags[i].id;
if (tags[i].title == title && (identifier == "" || tempString.indexOf(identifier) == tempString.length – len)) {
return tags[i];
}
}
return null;
}
}
Hi Amjad,
Thanks for your help. I have applied your suggestions but on line# four I only delete tags and leave rest as object required. My code still not work but after adding one line of code which basically force/puch the body to execute the method onload. I am adding the complete script. If anybody has problem in above given code then try this one :)
<!–
_spBodyOnLoadFunctionNames.push(”fillDefaultValues”);
function fillDefaultValues()
{
var qs = location.search.substring(1, location.search.length);
var args = qs.split(”&”);
var vals = new Object();
for (var i=0; i < args.length; i++) {
var nameVal = args[i].split("=");
var temp = unescape(nameVal[1]).split('+');
nameVal[1] = temp.join(' ');
vals[nameVal[0]] = nameVal[1];
}
setValueForFieldName("IssueID", vals["IssueID"]);
function setValueForFieldName(fieldName, value) {
if (value == undefined) return;
var theInput = getTagFromIdentifierAndTitle("input","",fieldName);
theInput.value = value;
}
function getTagFromIdentifierAndTitle(tagName, identifier, title) {
var len = identifier.length;
var tags = document.getElementsByTagName(tagName);
for (var i=0; i < tags.length; i++) {
var tempString = tags[i].id;
if (tags[i].title == title && (identifier == "" || tempString.indexOf(identifier) == tempString.length – len)) {
return tags[i];
}
}
return null;
}
}
–>
Hi Amjad,
Thanks for your help. I have applied your suggestions but on line# four I only delete tags and leave rest as object required. My code still not worked but after adding one line of code it works. It basically force/puch the body to execute the included javascript method on load. i.e.
_spBodyOnLoadFunctionNames.push(”fillDefaultValues”);
You include from line 2 to Line 11 of above mentioned script in function name “fillDefaultValues()” and try, it works. Thanks.
With Regards,
Nasir Khan
All comments were usefull and Mark example was great, it works for me, thank you All.
Ed Vega
I might add something here:
http://mysplist.blogspot.com/2009/12/inner-join-two-lists-using-sharepoint.html
Hi Mark,
great post!
I’ve got two lists in which items are linked by a field whose display name is “NC ID”. When I’m creating the parameter for the filter I’m using the internal name of the field “NC_x0020_ID” but the filter doesn’t seem to work. The parameter bindings are as follows:
Am I missing something here?
I’ve used your solution to filter on columns that don’t have spaces in the name and everything works great.
Any advice/info would be greatly appreciated,
rgds,
KP
Pardon my ignorance, but you mentioned that you can disable the NewForm.aspx so users can’t accidentally add items. How do you disable that page exactly?
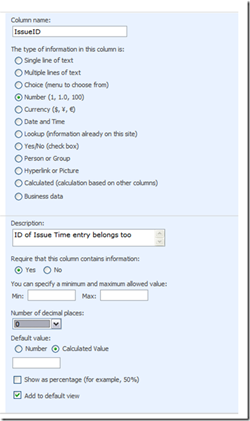
I’ve been trying to follow your example but I can’t get the NewForm.aspx to display the IssueID. I can see where it gets passed on in the URL, but the IssueID field remains empty. I’ve noticed where you’ve created this field as a number content type with calculated value as default. Every time I select this setting it reverts back to the number value default. Any ideas what I’m missing? Any help is greatly appreciated.