SharePoint: Extending the DVWP – Part 15: User-Managed Dropdowns with Site Columns
 Author: Jim Bob Howard
Why Site Columns for Dropdowns?
Marc Anderson calls site columns a single version of truth to be used in many places. When used in conjunction with a lookup into a table at the root of a site, a site column can be used throughout a site collection and yet always reference the single version of truth.
- Create a list
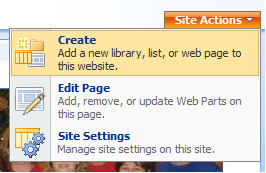
Create a simple list named for the site column you want to create. It only needs a Title column. - At your site root (i.e. http://site or http://site/subsite), click on Site Actions > Create
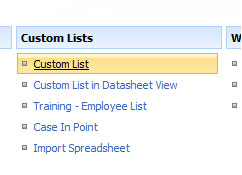
- Click on Custom List under Custom Lists
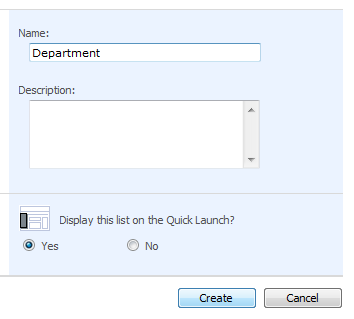
- Give your list a Name
- Click the Create button
- Now that it’s created, you’ll need to give at least Contribute permission to whoever is going to maintain this list. And you’ll need to give Read permission to everyone who will be using a list that accesses this data.
- Create a site column
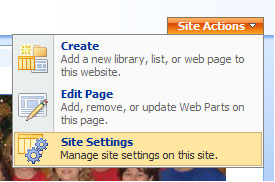
Create a site column that is a lookup into the list you just created - At your site root, click Site Actions > Site Settings
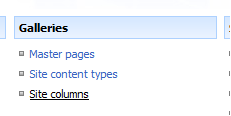
- Click on Site columns under Galleries
- Click Create, located just above the Site Column row header
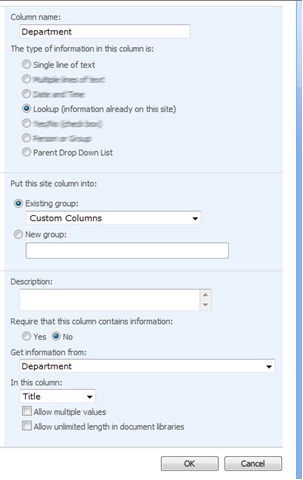
- Give it the same name as your list
- Check Lookup (information already on this site)
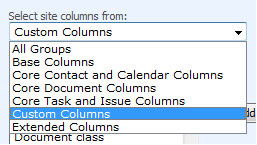
- First time through, if you don’t have a Custom Columns group, I recommend you create one by checking New group and naming it. On following site column creations, you will be able to choose your new group from the Existing group list.
- Enter an optional Description
- I prefer to check No under Require that this column contains information; I can control its requiredness when I add this site column to my actual list.
- Under Get information from, choose the list you just created
- Under In this column, choose Title
- Click the OK button
- Add it to your list
For each dropdown, add a site column to your list - From your list, click Settings -> List Settings
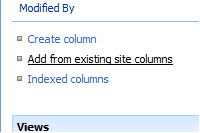
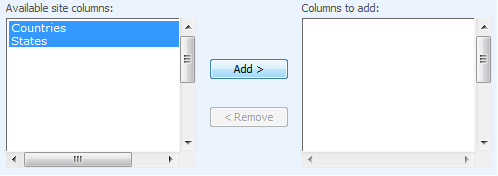
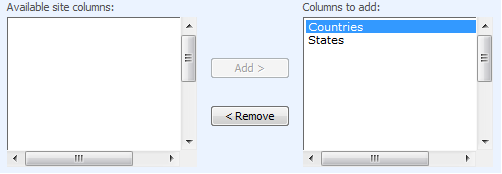
- Under Columns, click Add from existing site columns
- If you created a custom group for your site columns, choose it
- Click all of the columns you want to add (Ctrl-click to select more than one)
- Click Add > to add all of them
- Choose options appropriate for your project and click OK

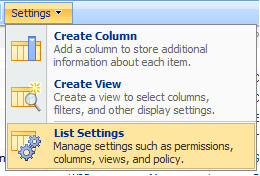
Settings -> List Settings
Choose Columns from Site Columns
Add Columns from Site Columns

Now your dropdown data is maintained in one place and your list will always have the most up-to-date list.
Next time: Now that the site columns are in place, we’ll create relationship lists which will allow us to cascade (or limit) one dropdown based on the choice in another (e.g. if Country is set to USA, limit State to states within the US only).
Author: Jim Bob Howard
Jim Bob Howard is a web designer / webmaster in the healthcare industry. He has been working with SharePoint since March 2009 and enjoys sharing what he has learned. He is a moderator and frequent contributor to Stump the Panel, and answers SharePoint questions on Twitter (@jbhoward) and via email ([email protected]).
- SharePoint: Extending the DVWP - Part 1: Layout Enhancement - Rearranging Columns - Default and Edit Templates
- SharePoint: Extending the DVWP - Part 2: Layout Enhancement - Rearranging Columns - Insert Template
- SharePoint: Extending the DVWP – Part 3: Getting it All on One Line - DVWP Function Action Links
- SharePoint: Extending the DVWP – Part 4: Turning DVWP Action Links into Buttons
- SharePoint: Extending the DVWP – Part 5: Doing Stuff Before Save on Submit - PreSaveAction()
- SharePoint: Extending the DVWP – Part 6: Examining the Form Action Links
- SharePoint: Extending the DVWP – Part 7: Creating a Form Action Workflow
- SharePoint: Extending the DVWP – Part 8: Creating a Form Action Workflow - The After Math
- SharePoint: Extending the DVWP – Part 9: Oops! Failed Setting Processor Stylesheet
- SharePoint: Extending the DVWP – Part 10: Passing Workflow Variables to a Form Action Workflow
- SharePoint: Extending the DVWP – Part 11: Getting More Form Fields to the Workflow
- SharePoint: Extending the DVWP – Part 12: Adding More Form Fields from the Data
- SharePoint: Extending the DVWP – Part 13: Putting PreSaveAction() to Work – Creating Variables
- SharePoint: Extending the DVWP – Part 14: Putting PreSaveAction() to Work with jQuery
- SharePoint: Extending the DVWP – Part 15: User-Managed Dropdowns with Site Columns
- SharePoint: Extending the DVWP – Part 16: User-Managed Dropdowns - Loading Data
- SharePoint: Extending the DVWP – Part 17: User-Managed Dropdowns – Creating a Relationship list
- SharePoint: Extending the DVWP – Part 18: User-Managed Dropdowns – Loading the Relationship list – Part 1
- SharePoint: Extending the DVWP – Part 19: User-Managed Dropdowns – Loading the Relationship list – Part 2
- SharePoint: Extending the DVWP – Part 20: Cascading Dropdowns - Applying the jQuery
- SharePoint: Extending the DVWP – Part 21: Cascading Dropdowns - Three-tier Cascade
- SharePoint: Extending the DVWP – Part 22: Creating Title Based on Other Fields with jQuery
- SharePoint: Extending the DVWP – Part 23: Creating Title Based on Other Fields with a Workflow
- SharePoint: Extending the DVWP – Part 24: A Note to Readers
- SharePoint: Extending the DVWP – Part 25: Using an Audit Trail by Creating List Items with SPServices
- SharePoint: Extending the DVWP – Part 26: Modifying the Edit Template
- SharePoint: Extending the DVWP – Part 27: Adding an Alternate Edit Template to a DVWP
- SharePoint: Extending the DVWP – Part 28: Massage the Remove Template
- SharePoint: Extending the DVWP – Part 29: Modifying Form Action Workflows on the remove Template
- SharePoint: Extending the DVWP – Part 30: Using EasyTabs with Filtered DVWPs to Make Data Manageable
- SharePoint: Extending the DVWP – Part 31: Filling in Default Data on the insert Template with jQuery
- SharePoint: Extending the DVWP – Part 32: Filling in Default Data on the insert Template with Multiple DVWPs
- SharePoint: Extending the DVWP – Part 33: Modifying Total and Subtotal Row Layouts in DVWP
- SharePoint: Extending the DVWP – Part 34: Using Icons for Form Action Links
- SharePoint: Extending the DVWP – Part 35: Putting it All Together
- SharePoint: Extending the DVWP – Bonus: Fixing the Insert Form Action When "No Matching Items"


 on
on
How is this article related to DVWP??
Dear Kevin,
This and the next 3-4 articles are not unique to the DVWP, but they will culminate in being used on the Edit Template of a DVWP.
Since cascading dropdowns haven’t been covered extensively on EUSP, I needed to include these steps so that later ones would make sense.
Hope that helps.
Blessings,
Jim Bob
Seems a bit bizarre to do a step-by-step walkthrough of how to create a site column when the previous two articles have been detailing how to customise pre-save actions on form action workflows. Anybody capable of following article 14 would surely know how to do this already. I’ll stick with it though, it will probably go somewhere useful.
Thanks for sticking with it, Nathan. ;)
I’m sticking with it, but I wonder what do States and Countries have to do with Department?
Shouldn’t you populate the Department list with names of Departments?
Oops! So much for abstracting the concept. ;)
Yes, I’m using this with Departments, but my department names and locations won’t be familiar enough to readers to make the hierarchy obvious. Which is why I switched to States and Countries for demonstration purposes. Should have made the graphics consistent. ;)
Blessings,
Jim Bob