SharePoint: Extending the DVWP – Part 25: Using an Audit Trail by Creating List Items with SPServices
 Author: Jim Bob Howard
Back in Part 14 of this series, "Putting PreSaveAction() to Work with jQuery," I gave a quick snapshot of how you might use jQuery in the PreSaveAction() to do something before the record you’re working on is saved. The example I gave was of writing an audit trail of changes to a separate list so that you have two pieces of truth: (1) the current view, and (2) a history of changes made to bring it to its current view.
In this article, I want to spend a little time unpeeling the onion of creating list items in another list when an item in one list is created, modified, or deleted.
Creating an Item in List B from List A
There are any number of projects that might require you to insert, edit, or delete items in a list other than the one you’re working on. Perhaps you’re working on an order processing solution where you need to update inventory when an order is placed. Or a library check-out system, where a book’s status needs to change when John Doe checks it out.
There are lots of options when it comes to updating information in another list. But what if you want to create a completely new item, like in the case of an audit trail? Obviously, you will need to decide what data you want to capture in your audit trail. For every column in your main list that you want to record changes for in your audit list, you will need to create that column in your audit list.
For our purposes, we’ll use almost all of the columns in our main list in the audit trail.

Main List for FTE (Full-time Employees)
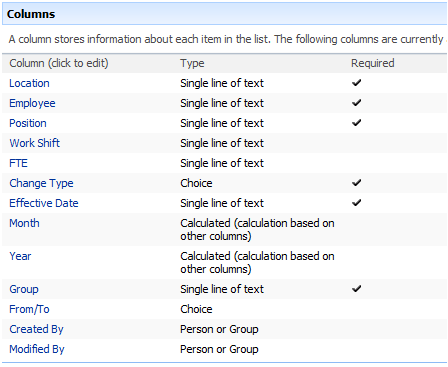
Audit Trail for FTE
Notice the names don’t have to perfectly match in name or order. Here’s the match-up that worked for my project:
|
Main (Display | Static) |
Audit (Display | Static) |
|
Location | @LocDept |
Location | @Location |
|
Group | @Group12 |
Group | @Group |
|
Position | @Positions |
Position | @Position |
|
Worker | @Title |
Employee | @Title |
|
Work Shift | @Workshift |
Work Shift | @WorkShift |
|
FTE | @FTE |
FTE |@FTE |
|
EffDate | @EffDate |
Effective Date | @EffDate |
|
Old Location | @Old%5Fx0020%5FLocation |
|
|
Last Change | @Audit |
|
|
|
Change Type | @ChangeType |
|
|
Month | @Month |
|
|
Year | @Year |
|
|
From/To | @FromTo |
Created By and Modified By will be automatically filled by SharePoint so we won’t worry about those for these two lists.
You will notice some differences between the declarations of each list:
- Whereas the main list has several Lookup columns, their counterparts in the audit trail are Single line of text.
- I’ve also added a Last Change column to my main list. I’ll save the ID of the last audit list record here, and display its Modified field. This will be different from the Effective Date.
- In the audit list, I’ve also added:
- Change Type: Choice column (New, Update, Terminate, Resign, Transfer) – When an item is inserted, this will be New; for edits, this will be Transfer if the Location changes; any other changes will simply use Update. If an item is deleted, we’ll record whether it was company-initiated (Terminate) or employee-initiated (Resign). [Callout: Remember this when we get to Creating an Alternate Edit Template.]
- From/To: Choice column (From, To) – To show a before/after view of a change to a record, we’ll create two items for an edit.
- Month: Calculated column to pull out the Effective Date month for sorting/grouping [Formula: =TEXT([Effective Date],"mm – mmmm")]
- Year: Calculated column to pull out the Effective Date year for sorting [Formula: =TEXT([Effective Date],"yyyy")]
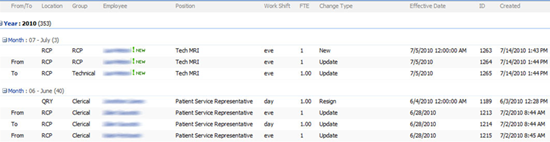
FTE Change Audit
Putting jQuery Back to Work
Here again is the jQuery script from Part 14 (see Part 13: Putting PreSaveAction() to Work — Creating Variables for an explanation of the variables), which incorporates Marc Anderson’s SPServices library:
  function PreSaveAction() {
  var txtChangeType = "Update";

  var txtNewName = $("input[name*=$ff1_]").val();
  var txtOldName = $("span[id*=_ff9_]").text();

  var txtNewPos = $("input[name*=$ff3_]").val();
  var txtOldPos = $("span[id*=_ff11_]").text();

  var txtNewShift = $("select[name*=$ff4_]").val();
  var txtOldShift = $("span[id*=_ff12_]").text();

  var txtNewFTE = $("input[name*=$ff5_]").val();
  var txtOldFTE = $("span[id*=_ff13_]").text();

  var txtNewGrp = $("input[name*=$ff2_]").val();
  var txtOldGrp = $("span[id*=_ff10_]").text();

  var txtNewLoc = $("input[name*=$ff6_]").val();
  var txtOldLoc = $("span[id*=_ff14_]").text();

  var txtEffDate = $("input[name*=$ff7_]").val();

  if (txtNewLoc != txtOldLoc) txtChangeType = "Transfer";
  $().SPServices({
  operation: "UpdateListItems",
  async: false,
  listName: "FTE Change Audit",
  updates: "<Batch OnError='Continue' PreCalc='TRUE'>" +
    "<Method ID='1' Cmd='New'>" +
      "<Field Name='FromTo'>From</Field>" +
      "<Field Name='Title'>" + txtOldName + "</Field>" +
      "<Field Name='Location'>" + txtOldLoc + "</Field>" +
      "<Field Name='Group'>" + txtOldGrp + "</Field>" +
      "<Field Name='Position'>" + txtOldPos + "</Field>" +
      "<Field Name='WorkShift'>" + txtOldShift + "</Field>" +
      "<Field Name='FTE'>" + txtOldFTE + "</Field>" +
      "<Field Name='EffDate'>" + txtEffDate + "</Field>" +
      "<Field Name='ChangeType'>" + txtChangeType + "</Field>" +
     "</Method>" +
    "</Batch>",
  completefunc: function(xData, Status) {
  }
  });

  $().SPServices({
  operation: "UpdateListItems",
  async: false,
  listName: "FTE Change Audit",
  updates: "<Batch OnError='Continue' PreCalc='TRUE'>" +
    "<Method ID='1' Cmd='New'>" +
      "<Field Name='FromTo'>To</Field>" +
      "<Field Name='Title'>" + txtNewName + "</Field>" +
      "<Field Name='Location'>" + txtNewLoc + "</Field>" +
      "<Field Name='Group'>" + txtNewGrp + "</Field>" +
      "<Field Name='Position'>" + txtNewPos + "</Field>" +
      "<Field Name='WorkShift'>" + txtNewShift + "</Field>" +
      "<Field Name='FTE'>" + txtNewFTE + "</Field>" +
      "<Field Name='EffDate'>" + txtEffDate + "</Field>" +
      "<Field Name='ChangeType'>" + txtChangeType + "</Field>" +
     "</Method>" +
    "</Batch>",
  completefunc: function(xData, Status) {
  }
  });

  return true;
  };
  </script>
Breaking it Down
Assuming the Form Action buttons have been modified to call PreSaveAction(), this script will cause the changes to be saved to the audit list. Here’s a breakdown of how it works:
Change Type
var txtChangeType = "Update";
Most changes will be of the type Update. However, if the Location changes, the type becomes Transfer (regardless of what other columns change… YMMV). We check that once we’ve set all the variables:
    var txtNewLoc = $("input[name*=$ff6_]").val();
    var txtOldLoc = $("span[id*=_ff14_]").text();

    . . .

    if (txtNewLoc != txtOldLoc) txtChangeType = "Transfer";
Effective Date
Since the Effective Date for the change pertains only to the change itself, it will be the same for From and To versions of this change.
SPServices
Now that we have our "old" and "new" values, it’s simply a matter of creating two records using UpdateListItems from SPServices. In lines 38 and 59 above, we’re telling the function to make this a new record. Then, we’re just loading up the CAML to put our values into each corresponding column in the audit list.
Alternately, we could have replaced the CAML in updates with:
        batchCmd: "New",
        valuepairs: [["FromTo", "From"],
                     ["Title", txtOldName],
                     ["Location", txtOldLoc],
                     ["Group", txtOldGrp],
                     ["Position", txtOldPos],
                     ["WorkShift", txtOldShift],
                     ["FTE", txtOldFTE],
                     ["EffDate", txtEffDate],
                     ["ChangeType", txtChangeType]],
Notice that listName uses the Display Name of your target list:
listName: "FTE Change Audit",
Rinse and repeat for the FromTo = "To" set and you’ve written out your two audit trail list items.
Insert and Delete
You could use the same technique on New, but it would be easier to set up a Workflow to do that "on create." Comment below if you’d like me to walk through either of those processes as well.
We’ll cover the Resign and Terminate change types when we add an alternate edit template in the near future.
Next Time: What if you want to update data from a joined in list in the DVWP? We’ll cover that next time in Extending the DVWP.
Author: Jim Bob Howard
Jim Bob Howard is a web designer / webmaster in the healthcare industry. He has been working with SharePoint since March 2009 and enjoys sharing what he has learned. He is a moderator and frequent contributor to Stump the Panel, and answers SharePoint questions on Twitter (@jbhoward) and via email ([email protected]).
- SharePoint: Extending the DVWP - Part 1: Layout Enhancement - Rearranging Columns - Default and Edit Templates
- SharePoint: Extending the DVWP - Part 2: Layout Enhancement - Rearranging Columns - Insert Template
- SharePoint: Extending the DVWP – Part 3: Getting it All on One Line - DVWP Function Action Links
- SharePoint: Extending the DVWP – Part 4: Turning DVWP Action Links into Buttons
- SharePoint: Extending the DVWP – Part 5: Doing Stuff Before Save on Submit - PreSaveAction()
- SharePoint: Extending the DVWP – Part 6: Examining the Form Action Links
- SharePoint: Extending the DVWP – Part 7: Creating a Form Action Workflow
- SharePoint: Extending the DVWP – Part 8: Creating a Form Action Workflow - The After Math
- SharePoint: Extending the DVWP – Part 9: Oops! Failed Setting Processor Stylesheet
- SharePoint: Extending the DVWP – Part 10: Passing Workflow Variables to a Form Action Workflow
- SharePoint: Extending the DVWP – Part 11: Getting More Form Fields to the Workflow
- SharePoint: Extending the DVWP – Part 12: Adding More Form Fields from the Data
- SharePoint: Extending the DVWP – Part 13: Putting PreSaveAction() to Work – Creating Variables
- SharePoint: Extending the DVWP – Part 14: Putting PreSaveAction() to Work with jQuery
- SharePoint: Extending the DVWP – Part 15: User-Managed Dropdowns with Site Columns
- SharePoint: Extending the DVWP – Part 16: User-Managed Dropdowns - Loading Data
- SharePoint: Extending the DVWP – Part 17: User-Managed Dropdowns – Creating a Relationship list
- SharePoint: Extending the DVWP – Part 18: User-Managed Dropdowns – Loading the Relationship list – Part 1
- SharePoint: Extending the DVWP – Part 19: User-Managed Dropdowns – Loading the Relationship list – Part 2
- SharePoint: Extending the DVWP – Part 20: Cascading Dropdowns - Applying the jQuery
- SharePoint: Extending the DVWP – Part 21: Cascading Dropdowns - Three-tier Cascade
- SharePoint: Extending the DVWP – Part 22: Creating Title Based on Other Fields with jQuery
- SharePoint: Extending the DVWP – Part 23: Creating Title Based on Other Fields with a Workflow
- SharePoint: Extending the DVWP – Part 24: A Note to Readers
- SharePoint: Extending the DVWP – Part 25: Using an Audit Trail by Creating List Items with SPServices
- SharePoint: Extending the DVWP – Part 26: Modifying the Edit Template
- SharePoint: Extending the DVWP – Part 27: Adding an Alternate Edit Template to a DVWP
- SharePoint: Extending the DVWP – Part 28: Massage the Remove Template
- SharePoint: Extending the DVWP – Part 29: Modifying Form Action Workflows on the remove Template
- SharePoint: Extending the DVWP – Part 30: Using EasyTabs with Filtered DVWPs to Make Data Manageable
- SharePoint: Extending the DVWP – Part 31: Filling in Default Data on the insert Template with jQuery
- SharePoint: Extending the DVWP – Part 32: Filling in Default Data on the insert Template with Multiple DVWPs
- SharePoint: Extending the DVWP – Part 33: Modifying Total and Subtotal Row Layouts in DVWP
- SharePoint: Extending the DVWP – Part 34: Using Icons for Form Action Links
- SharePoint: Extending the DVWP – Part 35: Putting it All Together
- SharePoint: Extending the DVWP – Bonus: Fixing the Insert Form Action When "No Matching Items"


 on
on
Jim,
You are bringing the big guns here – AWESOME!
I truly enjoy your series, it bring a lot of ‘real life’ touch, tips & tricks.
Your work is truly inspiring and for that, THANK YOU!
Greg
Whew! Thanks, Greg… glad I won you back. ;)
You’re very welcome and I’m so glad it’s been a help. I’m especially grateful for the encouragement.
Speaking of big guns… wait ’til you see what’s coming up next! :D
Blessings,
Jim Bob
Jim,
This is a creative use of JavaScript.
How does it compare to the out of the box auditing feature in SharePoint 2007? I think OOTB Auditing would be gauranteed to only audit on a commited new list item save.
It seems like the javascript method might result in an unsynched audit trail. In this case, we’re writing a new list entry to the audit list before submitting the new item form. For one example, event handlers fire after submit.
Tom
Tom,
I can’t speak to the OOTB Auditing, but I’m sure you’re right that it would be guaranteed only on a committed change. This will likely take more tweaking depending on implementation. In our case, we’re not requiring the change to be committed, only validated, and then assume it will be committed. Possibly shaky assumption, I know.
Thanks for the input.
Blessings,
Jim Bob
Another thought, Tom…
(Again, haven’t worked with OOTB Auditing, so you’ll have to correct me if I’m wrong…)
Another benefit of using the jQuery option (given you manage the async possibilities) is that you can automatically type-cast content from your main list into your audit list, if they’re different.
For example, I set up my main list with several lookup site columns. But I want my audit list to store the text at the time of audit snapshot, so the corresponding columns in the audit are “single line of text.” They copy right over and aren’t dependent on the site columns staying the same in perpetuity.
Your thoughts…?
Blessings,
Jim Bob
I haven’t worked with OOTB Auditing much either, so I can’t really compare the two other than what I’ve already said. However, I always prefer an OOTB approach first and then adapt if necessary.
Jim:
This is terrific !!
More, please !
Hi Jim,
I am having some difficulty with inserting an ID into the Last Change column. I tried it in the Document ready function. I have the id, but I can’t place it in the column so that the date shows from the audit list instead. Is it a little complicated with Lookups?
Thank you.
Richard
Hi Richard,
Sorry for not talking out the steps for that.
In your Audit list, you’ll need to create a Calculated Column (i.e. LastChange), which converts Modified to a string.
=TEXT(Modified,”mm/dd/yyyy”)
Then in your main list (FTE for me), you’ll have the “In this column:” for Last Change set to LastChange.
Hope that helps.
Blessings,
Jim Bob
Thanks Jim!
Hi Jim,
In your audit list, all the lookup columns were changed to single line of text. How did you get the display text of the dropdown fields? When I reference a dropdown form field, I get the id of the selected option. Also, what happens to the form field reference when the control gets more than 20 options? Thanks.
Richard,
When writing to the audit trail, I’m not pulling from the database; I’ll scraping the content off the page with the jQuery. Depending on the control, notice I’m getting the .val() or .text() of the control itself. IOW, I’m getting what the user is seeing rather than what is going on behind the scenes.
As for the >20 dropdown scenario, all of my cascading dropdowns were over 20. So you might want to test the <=20 options scenario following the logic above.
Hope that helps a little.
Blessings,
Jim Bob
Thank you Jim.