
SharePoint: Extending the DVWP – Part 27: Adding an Alternate Edit Template to a DVWP
 Author: Jim Bob Howard
Like a multi-course feast, this series has ranged from appetizers to tasty dainties, from crumbs to whole-grain loaves, from pot pie to rack of lamb, and from water to wine. Hopefully, it has whetted your appetite to explore the possibilities of what you can do in SharePoint and with the DVWP in particular.
Well, get your knife and fork ready. We have some roast beast to serve up. (And, Yes! Dessert’s coming!)
If you haven’t already done so, now would be a good time to brush up on your XSLT with Marc Anderson’s Unlocking the Mysteries of the SharePoint Data View Web Part XSL Tags.
Audit for Delete
Throughout this series, we’ve been building into the DVWP, but I want to draw your attention back to the very beginning. In "Part 1: Layout Enhancement – Rearranging Columns – Default and Edit Templates," we worked with the default and edit templates to move links around. It was important that we made our changes on both templates because they share the title row but have template-specific data rows.
When we got to the insert template, again we had to make changes to the layout of the data rows.
In Parts 5-9, we made those links do extra work: calling workflows, passing variables, etc. Then we spent a few parts (15-23) massaging the DVWP edit template. Then we decided to keep a record of the changes that are made to the list by writing them out to an audit list. (Inserts to the list are easily recorded using a workflow on create.) Last time, we modified the edit template a little further with multiple rows, extra labels, and a color-coded box around the edit/insert form.
Now, let’s look at recording deletes in the audit list.
Need for an alternate edit template
Back in "Part 6: Examining the Form Action Links," we found that the delete link that the DVWP supplies doesn’t have its own template. It simply deletes the list item and redraws the list.
Delete
<a href="javascript: {ddwrt:GenFireServerEvent(concat('__cancel;__delete={',$KeyField,'=',$KeyValue,'};__commit'))}">delete</a>The delete link redraws the DVWP with the Default Template, but without the deleted list item. It actually performs three functions:
- cancel (which keeps the form from doing its normal submit function);
- delete (which passes this item’s ID to the delete function); and
- commit (which commits the deletion to take place).
Notice that there is no verification that it should be deleted; it’s just gone (of course, we could easily recover it from the Recycle Bin).
If you only wanted to post an "Are you sure?" message, you could do that by adding a call to PreSaveAction() to the delete form action link.
But what if you want save the record to the audit list along with an Effective Date? For that, you would need a way to enter the Effective Date and store it in the audit list before deleting the record from the main list.
And what if there were different reasons for deleting the record. In the case of employees, they might have resigned (employee-initiated) or been terminated (company-initiated).
For each of those, we need another step before the list item is deleted.
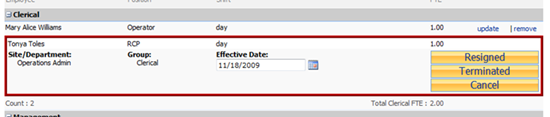
"Delete" template we’ll create
Examining the Edit Template
Let’s take a look at the XSLT of the built-in edit template so we know what we have to copy to create an alternate.
- Open SharePoint Designer (SPD), then
- Open the site that contains your form with the DVWP with a multiple item view list,
- Make sure you’ve modified the DVWP to allow for edit (see Extending the DVWP – Part 1 for more information)
- Hover over your webpart and click on the right-arrow (chevron)
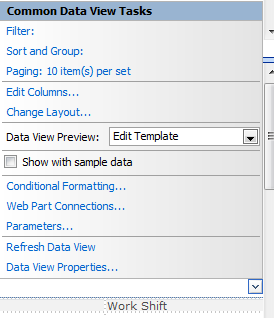
- Click the dropdown for Data View Preview and choose Edit Template
Notice that the page changes to allow you to edit columns for that list item.
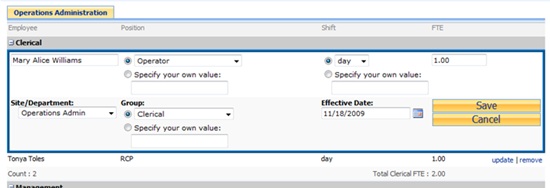
Edit Template (after changes)
Examining the Components of the Edit Template
Click on the top-left-most control in the edit template. In the Code pane, you’ll notice that this template is indeed contained completely inside an XSLT template.
<xsl:template name="dvt_1.rowedit">
    <xsl:param name="Pos" />
    <tr>
        . . .
    </tr>
</xsl:template>
We’ll want to make a copy of that for the delete template.
But, we also need to figure out how and when it’s being called. Do a search for call-template name="dvt_1.rowedit" and you’ll find a portion of script that looks like:
<xsl:if test="not($dvt_HideGroupDetail)" ddwrt:cf_ignore="1">
    <xsl:choose>
        <xsl:when test="$dvt_1_form_editkey = ddwrt:EscapeDelims(string(@ID))">
            <xsl:call-template name="dvt_1.rowedit">
                <xsl:with-param name="Pos" select="concat('_', position())" />
            </xsl:call-template>
        </xsl:when>
        <xsl:otherwise>
            <xsl:call-template name="dvt_1.rowview" />
        </xsl:otherwise>
    </xsl:choose>
</xsl:if>
We’ll need to determine when to call the delete template and add it as an xsl:when to this choose statement. The edit template is called when $dvt_1_form_editkey is equal to the @ID of this list item. We’ll want to call our template in a similar way. So, where is $dvt_1_form_editkey set? Search up on it (without the $) to find out.
Wow! Way back in the ParameterBindings node, we find this:
<ParameterBinding Name="dvt_1_form_editkey" Location="Postback;Connection"/>
That’s where it is declared, but where is it set? Search down this time.
<xsl:otherwise><tr>
    <td class="ms-vb" width="1%" nowrap="">
        <a href="javascript: {ddwrt:GenFireServerEvent(concat('__cancel;dvt_1_form_editkey={',$KeyValue,'}'))}">update</a>
    </td>
    <td class="ms-vb" width="1%" nowrap="" style="border-left:1px black solid; padding-left:3px">
        <a href="javascript: {ddwrt:GenFireServerEvent(concat('__cancel;__delete={',$KeyField,'=',$KeyValue,'};__commit'))}">remove</a>
    </td>
</tr></xsl:otherwise>
Ah! It’s set when we click on the link. And notice the remove doesn’t currently work the same way: it is passed a KeyField, which is used to delete the list item. So, that’s something we’ll need to change, too.
Where else is it used? One more search reveals:
<xsl:stylesheet . . .>
<xsl:output method="html" indent="no"/>
<xsl:param name="dvt_adhocmode">sort</xsl:param>
<xsl:decimal-format NaN=""/>
<xsl:param name="dvt_apos">'</xsl:param>
<xsl:param name="dvt_1_form_editkey" />
<xsl:param name="dvt_1_form_insertmode" />
<xsl:param name="dvt_groupfield" />
The stylesheet also needs it as a param declaration so it can use it.
OK. So, we need to:
- Create a new ParameterBinding variable, and new xsl:param for the stylesheet;
- Modify the remove form action to pass an ID back to the page so the DVWP will know which item it is deleting;
- Tell the template to draw the alternate edit template that is specific to the delete function; and
- Copy the existing rowedit template into the new template we want it to draw. Then,
- Massage the new alternate template to draw and process the way we want it to.
Step 1: Create a new ParameterBinding variable
So, lets make our own version of edit key…
<ParameterBinding Name="dvt_1_form_editkey" Location="Postback;Connection"/>
<ParameterBinding Name="dvt_1_form_removekey" Location="Postback;Connection"/>
…and the stylesheet parameter.
        <xsl:param name="dvt_1_form_editkey" />
        <xsl:param name="dvt_1_form_removekey" />
Step 2: Modify the form action link
It will now look a lot like the update link.
<xsl:otherwise><tr>
    <td class="ms-vb" width="1%" nowrap="">
        <a href="javascript: {ddwrt:GenFireServerEvent(concat('__cancel;dvt_1_form_editkey={',$KeyValue,'}'))}">update</a>
    </td>
    <td class="ms-vb" width="1%" nowrap="" style="border-left:1px black solid; padding-left:3px">
        <a href="javascript: {ddwrt:GenFireServerEvent(concat('__cancel;dvt_1_form_removekey={',$KeyValue,'}'))}">remove</a>
    </td>
</tr></xsl:otherwise>
Step 3: Call the remove template
We’ll just add another xsl:when to choose from when the dvt_1_form_removekey is the same as the current row.
<xsl:if test="not($dvt_HideGroupDetail)" ddwrt:cf_ignore="1">
    <xsl:choose>
        <xsl:when test="$dvt_1_form_editkey = ddwrt:EscapeDelims(string(@ID))">
            <xsl:call-template name="dvt_1.rowedit">
                <xsl:with-param name="Pos" select="concat('_', position())" />
            </xsl:call-template>
        </xsl:when>
        <xsl:when test="$dvt_1_form_removekey = ddwrt:EscapeDelims(string(@ID))">
            <xsl:call-template name="dvt_1.rowremove">
                <xsl:with-param name="Pos" select="concat('_', position())" />
            </xsl:call-template>
        </xsl:when>
        <xsl:otherwise>
            <xsl:call-template name="dvt_1.rowview" />
        </xsl:otherwise>
    </xsl:choose>
</xsl:if>
Step 4: Copy the edit template into a new "remove" edit template
(We’ll call it the remove template for simplicity)
<xsl:template name="dvt_1.rowedit">
    <xsl:param name="Pos" />
    <tr>
        . . .
    </tr>
</xsl:template>
<xsl:template name="dvt_1.rowremove">
    <xsl:param name="Pos" />
    <tr>
        . . .
    </tr>
</xsl:template>
Next time: Next time, as we continue Extending the DVWP, we’ll cover Step 5: Massage the remove template.
Author: Jim Bob Howard
Jim Bob Howard is a web designer / webmaster in the healthcare industry. He has been working with SharePoint since March 2009 and enjoys sharing what he has learned. He is a moderator and frequent contributor to Stump the Panel, and answers SharePoint questions on Twitter (@jbhoward) and via email ([email protected]).
- SharePoint: Extending the DVWP - Part 1: Layout Enhancement - Rearranging Columns - Default and Edit Templates
- SharePoint: Extending the DVWP - Part 2: Layout Enhancement - Rearranging Columns - Insert Template
- SharePoint: Extending the DVWP – Part 3: Getting it All on One Line - DVWP Function Action Links
- SharePoint: Extending the DVWP – Part 4: Turning DVWP Action Links into Buttons
- SharePoint: Extending the DVWP – Part 5: Doing Stuff Before Save on Submit - PreSaveAction()
- SharePoint: Extending the DVWP – Part 6: Examining the Form Action Links
- SharePoint: Extending the DVWP – Part 7: Creating a Form Action Workflow
- SharePoint: Extending the DVWP – Part 8: Creating a Form Action Workflow - The After Math
- SharePoint: Extending the DVWP – Part 9: Oops! Failed Setting Processor Stylesheet
- SharePoint: Extending the DVWP – Part 10: Passing Workflow Variables to a Form Action Workflow
- SharePoint: Extending the DVWP – Part 11: Getting More Form Fields to the Workflow
- SharePoint: Extending the DVWP – Part 12: Adding More Form Fields from the Data
- SharePoint: Extending the DVWP – Part 13: Putting PreSaveAction() to Work – Creating Variables
- SharePoint: Extending the DVWP – Part 14: Putting PreSaveAction() to Work with jQuery
- SharePoint: Extending the DVWP – Part 15: User-Managed Dropdowns with Site Columns
- SharePoint: Extending the DVWP – Part 16: User-Managed Dropdowns - Loading Data
- SharePoint: Extending the DVWP – Part 17: User-Managed Dropdowns – Creating a Relationship list
- SharePoint: Extending the DVWP – Part 18: User-Managed Dropdowns – Loading the Relationship list – Part 1
- SharePoint: Extending the DVWP – Part 19: User-Managed Dropdowns – Loading the Relationship list – Part 2
- SharePoint: Extending the DVWP – Part 20: Cascading Dropdowns - Applying the jQuery
- SharePoint: Extending the DVWP – Part 21: Cascading Dropdowns - Three-tier Cascade
- SharePoint: Extending the DVWP – Part 22: Creating Title Based on Other Fields with jQuery
- SharePoint: Extending the DVWP – Part 23: Creating Title Based on Other Fields with a Workflow
- SharePoint: Extending the DVWP – Part 24: A Note to Readers
- SharePoint: Extending the DVWP – Part 25: Using an Audit Trail by Creating List Items with SPServices
- SharePoint: Extending the DVWP – Part 26: Modifying the Edit Template
- SharePoint: Extending the DVWP – Part 27: Adding an Alternate Edit Template to a DVWP
- SharePoint: Extending the DVWP – Part 28: Massage the Remove Template
- SharePoint: Extending the DVWP – Part 29: Modifying Form Action Workflows on the remove Template
- SharePoint: Extending the DVWP – Part 30: Using EasyTabs with Filtered DVWPs to Make Data Manageable
- SharePoint: Extending the DVWP – Part 31: Filling in Default Data on the insert Template with jQuery
- SharePoint: Extending the DVWP – Part 32: Filling in Default Data on the insert Template with Multiple DVWPs
- SharePoint: Extending the DVWP – Part 33: Modifying Total and Subtotal Row Layouts in DVWP
- SharePoint: Extending the DVWP – Part 34: Using Icons for Form Action Links
- SharePoint: Extending the DVWP – Part 35: Putting it All Together
- SharePoint: Extending the DVWP – Bonus: Fixing the Insert Form Action When "No Matching Items"
- SharePoint: Extending the DVWP – Bonus: Creating a Title Based on Dropdowns with jQuery


Meaty and Deeeeelish!