
SharePoint: Extending the DVWP – Part 28: Massage the Remove Template
 Author: Jim Bob Howard
Last time we copied the default edit template so we now have a remove template. At first, it looks just like the edit template.
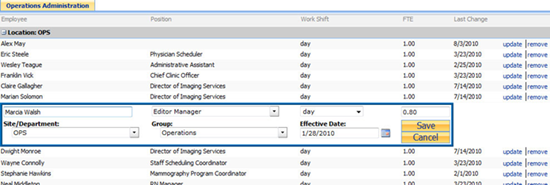
Remove Template (looks a LOT like the Edit Template)
Now, we need to make some changes:
- We want to continue the color-coding theme we implemented two articles ago, but make it red for remove.
- Since we’re removing the record, the only column we want the user to change is the Effective Date, which will only be written out to the audit list before the delete.
- There are two reasons we would remove a full-time employee: resignation or termination. So, we want to have two "save" buttons, labeled Resign and Terminate.
- (Optional) If the Effective Date is in the future, we might want to write it to the audit list, but then start a workflow that won’t delete the list item until that date.
If we try to switch to the new remove template in the Design pane, we’ll find it’s not in the list.
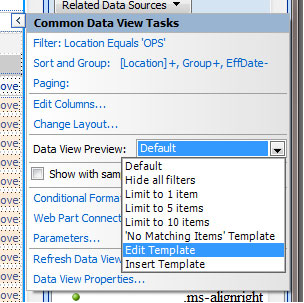
No Remove Template to choose
So, while we’re editing the page, we’ll need to fake out SPD by swapping the names of the dvt_1.rowedit and dvt_1.rowremove templates. No need to change any of the other copies we made from the default template.
<xsl:template name="dvt_1.rowedit">
    <xsl:param name="Pos" />
    <tr>
        . . .
    </tr>
</xsl:template>
<xsl:template name="dvt_1.rowremove">
    <xsl:param name="Pos" />
    <tr>
        . . .
    </tr>
</xsl:template>
…becomes…
  <xsl:template name="dvt_1.rowremove">
    <xsl:param name="Pos" />
  </xsl:template>
<xsl:template name="dvt_1.rowremove"><tr>
      . . .
  </tr>
</xsl:template>
<h3>
  <xsl:template name="dvt_1.rowedit">
    <xsl:param name="Pos" />
  </xsl:template>
</h3>
<xsl:template name="dvt_1.rowedit"><tr>
      . . .
  </tr>
</xsl:template>
Step-by-Step
Let’s look back at the changes we wanted to make and take them one step at a time.
- Continue color-coding
- Make only Effective Date editable
- Make two different Save buttons
While we’re in the Code pane, let’s change the outline box to red so we have a visual clue as to where we’re working. If you were following along two articles ago, you should already have classes that will draw things red for you:
.dl-l {border-left:medium red ridge;}
.dl-r {border-right:medium red ridge;}
.dl-t {border-top:medium red ridge;}
.dl-b {border-bottom:medium red ridge;}
In the remove template ONLY, change every ed- to a dl-, then we’ll go back to the Design pane, switch back to the Edit Template (now displaying our remove template) and see how things look:
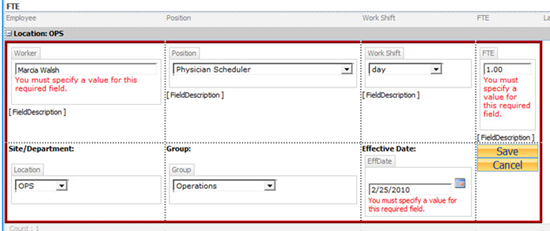
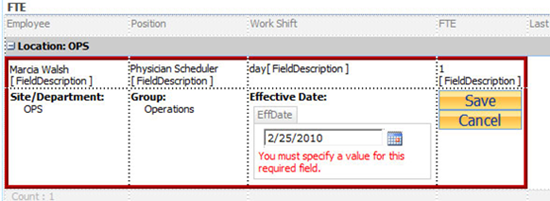
Looks just like the edit template, except for the red box replacing the blue
Simple. Hover over the Worker control and change the Format As to Label. Repeat for all of the controls except Effective Date. Changing it to a Label makes it look like Text, but still allows the control to be accessible from a workflow.
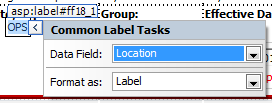
Change the display properties from the Design pane
[Reminder: When you make changes in the Code pane to anything but the default template, every time you click on the Design pane, it will revert to the default template and you'll have to choose edit template again from the Date View Preview. BUT, if you change the Format As attribute in the Design pane, you don't have that problem.]
Only Effective Dateis editable, all fields are accessible a to jQuery and/or a workflow
Like we’ve done before, we’ll make a copy of the existing Save button and change it to do what we want. In this case, we’ll notice that the buttons are drawn by a separate template depending on which mode we’re in.
<xsl:choose>
    <xsl:when test="$Mode = 'edit'">
        <tr>
            <td class="ms-buttonactivehover" width="1%" nowrap="" align="center">
                <a href="javascript: {code}">Save</a>
            </td>
        </tr>
        <tr>
            <td class="ms-buttonactivehover" width="1%" nowrap="" align="center">
                <a href="javascript: {ddwrt:GenFireServerEvent('__cancel')}">Cancel</a>
            </td>
        </tr>
    </xsl:when>
    <xsl:when test="$Mode = 'insert'">
        <tr>
            <td class="ms-buttonactivehover" width="1%" nowrap="nowrap" align="center">
                <a href="javascript: {ddwrt:GenFireServerEvent('__commit')}">Save</a>
            </td>
        </tr>
        <tr>
            <td class="ms-buttonactivehover" width="1%" nowrap="nowrap" align="center">
                <a href="javascript: {ddwrt:GenFireServerEvent('__cancel')}">Cancel</a>
            </td>
        </tr>
    </xsl:when>
    <xsl:otherwise>
        <tr>
            <td class="ms-vb" width="1%" nowrap="">
                <a href="javascript: {ddwrt:GenFireServerEvent(concat('__cancel;dvt_1_form_editkey={',$KeyValue,'}'))}">update</a>
            </td>
            <td class="ms-vb" width="1%" nowrap="" style="border-left:1px black solid; padding-left:3px">
                <a href="javascript: {ddwrt:GenFireServerEvent(concat('__cancel;dvt_1_form_removekey={',$KeyValue,'}'))}">remove</a>
            </td>
        </tr>
    </xsl:otherwise>
</xsl:choose>
For now, we’ll just copy the buttons and rename them. We’ll fix the workflow call in just a bit:
<xsl:choose>
    <xsl:when test="$Mode = 'edit'">
        . . .
    </xsl:when>
    <xsl:when test="$Mode = 'remove'">
        <tr>
            <td class="ms-buttonactivehover" width="1%" nowrap="" align="center">
                <a href="javascript: {code}">Terminated</a>
            </td>
        </tr>
        <tr>
            <td class="ms-buttonactivehover" width="1%" nowrap="" align="center">
                <a href="javascript: {code}">Resigned</a>
            </td>
        </tr>
        <tr>
            <td class="ms-buttonactivehover" width="1%" nowrap="" align="center">
                <a href="javascript: {ddwrt:GenFireServerEvent('__cancel')}">Cancel</a>
            </td>
        </tr>
    </xsl:when>
    <xsl:when test="$Mode = 'insert'">
        . . .
    </xsl:when>
    <xsl:otherwise>
        . . .
    </xsl:otherwise>
</xsl:choose>
Oh, wait! That means we need to set the Mode somewhere.
Looking right above this, we’ll see that Mode is a parameter of the dvt_1.automode template:
<xsl:template name="dvt_1.automode">
    <xsl:param name="KeyField" />
    <xsl:param name="KeyValue" />
    <xsl:param name="Mode" />
    <xsl:param name="Pos" />
So, we just need to make sure we pass in "remove" for the Mode, when this template is called from the dvt_1.rowremove template. But remember, we currently have it named dvt_1.rowedit. Make sure you edit the right one:
<xsl:template name="dvt_1.rowedit">
<xsl:param name="Pos" />
<tr>
<td class="ms-vb dl-l dl-t">
<asp:Label runat="server" id="ff19{$Pos}" text="{@Title}" {code} /></td>
<td class="ms-vb dl-t">
<asp:Label runat="server" id="ff20{$Pos}" text="{@Positions}" {code} /></td>
<td class="ms-vb dl-t">
<asp:Label runat="server" id="ff22{$Pos}" text="{@WorkShift}" {code} /></td>
<td class="ms-vb dl-r dl-t">
<asp:Label runat="server" id="ff23{$Pos}" text="{@FTE}" {code} /></td>
</tr>
<tr>
<td class="ms-vb dl-b dl-l">
<strong>Site/Department: </strong><br />     
<asp:Label runat="server" id="ff18{$Pos}" text="{@LocDept}" {code} /></td>
<td class="ms-vb dl-b">
<strong>Group: </strong><br />     
<asp:Label runat="server" id="ff21{$Pos}" text="{@Group12}" {code} /></td>
<td class="ms-vb dl-b">
<strong>Effective Date: </strong><br />
<SharePoint:FormField runat="server" id="ff17{$Pos}" controlmode="Edit" fieldname="EffDate" itemid="{@ID}" {code} /></td>
<xsl:if test="$dvt_1_automode = '1'" ddwrt:cf_ignore="1">
<td class="ms-vb dl-b dl-r" width="1%" nowrap="">
<xsl:call-template name="dvt_1.automode">
<xsl:with-param name="KeyField">ID</xsl:with-param>
<xsl:with-param name="KeyValue" select="ddwrt:EscapeDelims(string(@ID))" />
<xsl:with-param name="Mode">remove</xsl:with-param>
<xsl:with-param name="Pos" select="$Pos"/>
</xsl:call-template>
</td>
</xsl:if>
</tr>
</xsl:template>
On line 977 above, we see that we can pass ‘remove’ to the dvt_1.automode through the Mode param
OK, that was a lot… let’s break here and next time, we’ll massage the workflows for our two buttons. But let’s at least see how it looks (remember: to see the remove template, we have to click the update button since we’ve swapped the names):

The remove template with nice-looking (though non-functioning) buttons
Next time: Now that our alternate edit template is set up, next we’ll update the form action workflows associated with our Terminated and Resigned buttons, as we continue Extending the DVWP.
Author: Jim Bob Howard
Jim Bob Howard is a web designer / webmaster in the healthcare industry. He has been working with SharePoint since March 2009 and enjoys sharing what he has learned. He is a moderator and frequent contributor to Stump the Panel, and answers SharePoint questions on Twitter (@jbhoward) and via email ([email protected]).
- SharePoint: Extending the DVWP - Part 1: Layout Enhancement - Rearranging Columns - Default and Edit Templates
- SharePoint: Extending the DVWP - Part 2: Layout Enhancement - Rearranging Columns - Insert Template
- SharePoint: Extending the DVWP – Part 3: Getting it All on One Line - DVWP Function Action Links
- SharePoint: Extending the DVWP – Part 4: Turning DVWP Action Links into Buttons
- SharePoint: Extending the DVWP – Part 5: Doing Stuff Before Save on Submit - PreSaveAction()
- SharePoint: Extending the DVWP – Part 6: Examining the Form Action Links
- SharePoint: Extending the DVWP – Part 7: Creating a Form Action Workflow
- SharePoint: Extending the DVWP – Part 8: Creating a Form Action Workflow - The After Math
- SharePoint: Extending the DVWP – Part 9: Oops! Failed Setting Processor Stylesheet
- SharePoint: Extending the DVWP – Part 10: Passing Workflow Variables to a Form Action Workflow
- SharePoint: Extending the DVWP – Part 11: Getting More Form Fields to the Workflow
- SharePoint: Extending the DVWP – Part 12: Adding More Form Fields from the Data
- SharePoint: Extending the DVWP – Part 13: Putting PreSaveAction() to Work – Creating Variables
- SharePoint: Extending the DVWP – Part 14: Putting PreSaveAction() to Work with jQuery
- SharePoint: Extending the DVWP – Part 15: User-Managed Dropdowns with Site Columns
- SharePoint: Extending the DVWP – Part 16: User-Managed Dropdowns - Loading Data
- SharePoint: Extending the DVWP – Part 17: User-Managed Dropdowns – Creating a Relationship list
- SharePoint: Extending the DVWP – Part 18: User-Managed Dropdowns – Loading the Relationship list – Part 1
- SharePoint: Extending the DVWP – Part 19: User-Managed Dropdowns – Loading the Relationship list – Part 2
- SharePoint: Extending the DVWP – Part 20: Cascading Dropdowns - Applying the jQuery
- SharePoint: Extending the DVWP – Part 21: Cascading Dropdowns - Three-tier Cascade
- SharePoint: Extending the DVWP – Part 22: Creating Title Based on Other Fields with jQuery
- SharePoint: Extending the DVWP – Part 23: Creating Title Based on Other Fields with a Workflow
- SharePoint: Extending the DVWP – Part 24: A Note to Readers
- SharePoint: Extending the DVWP – Part 25: Using an Audit Trail by Creating List Items with SPServices
- SharePoint: Extending the DVWP – Part 26: Modifying the Edit Template
- SharePoint: Extending the DVWP – Part 27: Adding an Alternate Edit Template to a DVWP
- SharePoint: Extending the DVWP – Part 28: Massage the Remove Template
- SharePoint: Extending the DVWP – Part 29: Modifying Form Action Workflows on the remove Template
- SharePoint: Extending the DVWP – Part 30: Using EasyTabs with Filtered DVWPs to Make Data Manageable
- SharePoint: Extending the DVWP – Part 31: Filling in Default Data on the insert Template with jQuery
- SharePoint: Extending the DVWP – Part 32: Filling in Default Data on the insert Template with Multiple DVWPs
- SharePoint: Extending the DVWP – Part 33: Modifying Total and Subtotal Row Layouts in DVWP
- SharePoint: Extending the DVWP – Part 34: Using Icons for Form Action Links
- SharePoint: Extending the DVWP – Part 35: Putting it All Together
- SharePoint: Extending the DVWP – Bonus: Fixing the Insert Form Action When "No Matching Items"
- SharePoint: Extending the DVWP – Bonus: Creating a Title Based on Dropdowns with jQuery


Splendid! More, please!
As always, you’re the boss !