
SharePoint: Extending the DVWP – Part 30: Using EasyTabs with Filtered DVWPs to Make Data Manageable
 Author: Jim Bob Howard
If you’ve been following along with the Extending the DVWP series, you might be wondering, "Why is he doing all of this?" The whole point of this project was to make things easier for managers to update the number of full-time employees in their department. The administrative assistant who is collecting that data for reporting needs it all in one Excel spreadsheet to run some percentages, etc.
But the managers themselves only need to update their own site, so they don’t need the Excel spreadsheet with access to the other 14 locations just to be able to update their own.
Making it Easy with EasyTabs
Now that we have this robust DVWP, wouldn’t be great to break each location out into its own tab so the managers can just edit their own?
Well, no it’s actually not that great. There’s so much data that the overhead involved to load it all in multiple tabs, so that a manager can just pick their own tab, is completely overwhelming. Plus, in my requirements, several of the managers are responsible for staffing at multiple locations. Additionally, there are categories of employees that are not "really" full-time employees, but count as a fraction of a person, or not at all but still need to be maintained in the same list.
All that to say, that the better implementation for our purposes is to create multiple pages with multiple (though a subset of the whole) tabs.
Like this:

A page with one tab

A page with a few tabs

A page with several tabs
… etc.
So, what I’m going to do is use Christophe Humbert’s EasyTabs to stack multiple DVWPs on a page, each filtered on a subset of the FTE data.
Easy Part – Filtering
To filter a DVWP:
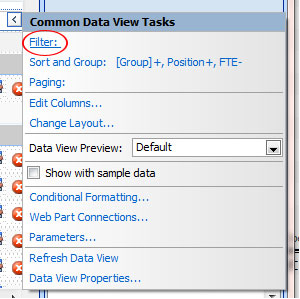
- In SharePoint Designer (SPD), hover over the DVWP in the Design pane and click the chevron (right arrow), and click on the Filter: link.
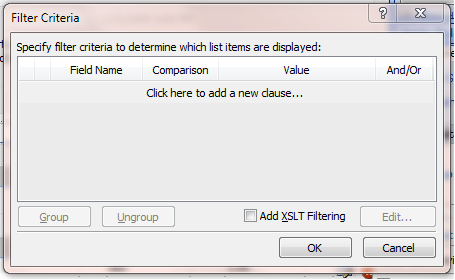
- This will bring up the Filter Criteria dialog box:
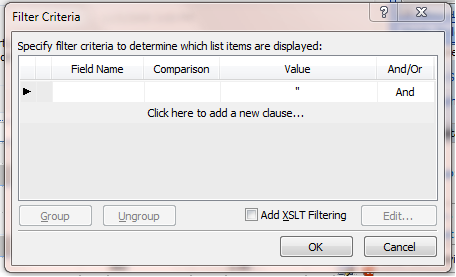
- To add a new filter clause, simply do as it says and "Click here…"
- Select the Field Name you want to filter, the comparison you want to make, and the value
- Click OK and your DVWP will be filtered.

Let’s do one more filter and then we’ll stack them with Easy Tabs.
More Complicated Filters
In my implementation, I have several categories of employees that count as a portion of an FTE, but aren’t supposed to be included with the rest; they’re all supposed to be grouped together. Here’s how I filter them:
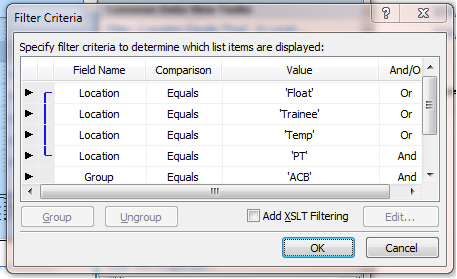
Location columns are grouped
Notice that all of the Location filters are OR’ed together and grouped. The result of that is AND’ed with Group = ‘ACB’.
To group them:
- Click the arrow next to the top clause
- Holding down the Shift key, click the arrow next to the bottom one
- The Group button will now be clickable
- Notice that the Filter setting now begins with ( Location Equals ‘Float’ Or …)
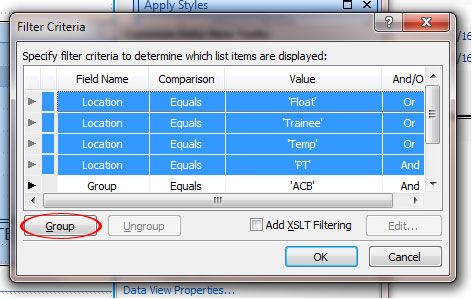
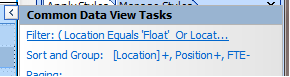
Filter: ( Location Equals ‘Float’ Or Location Equals ‘Trainee’ Or Location Equals ‘Temp’ Or Location Equals ‘PT’ ) And Group Equals ‘ACB’
Your filter on this DVWP now will show all list items with Group=’ACB’ and Location one of: ‘Float,’ ’Trainee,’ ’Temp,’ or ’PT.’
The Need for Tabs
Without Easy Tabs, my DVWPs just stretch down the page:

With Easy Tabs, they’re stacked for easy readability and accessibility:


Implementing Easy Tabs is extremely easy:
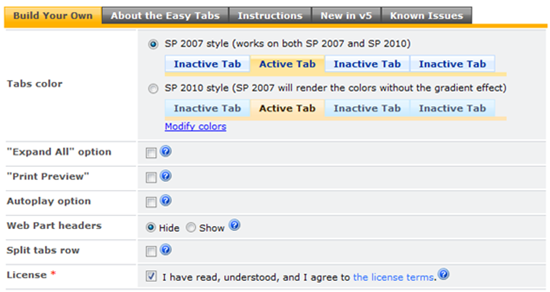
- Download the javascript from Christophe Humbert’s Path To SharePoint site (at this writing, 5.0 beta is the current version)
- At the link above, choose your options:
- As soon as you check the License box, your version of the code will appear in the box at the bottom of the page
- Copy it and paste it into the Source Editor of a CEWP on your page
- Click OK and Exit Edit Mode
All of a sudden, all of the webparts in the same zone as the Easy Tabs webpart will be stacked with tabs.
Next time: A little more clean-up of our DVWPs are necessary; we need to fill in default data for the page/tab, activate the cascading dropdowns with default data, modify the Total and Subtotal rows… we’ll cover those over the final few articles of Extending the DVWP.
Author: Jim Bob Howard
Jim Bob Howard is a web designer / webmaster in the healthcare industry. He has been working with SharePoint since March 2009 and enjoys sharing what he has learned. He is a moderator and frequent contributor to Stump the Panel, and answers SharePoint questions on Twitter (@jbhoward) and via email ([email protected]).
- SharePoint: Extending the DVWP - Part 1: Layout Enhancement - Rearranging Columns - Default and Edit Templates
- SharePoint: Extending the DVWP - Part 2: Layout Enhancement - Rearranging Columns - Insert Template
- SharePoint: Extending the DVWP – Part 3: Getting it All on One Line - DVWP Function Action Links
- SharePoint: Extending the DVWP – Part 4: Turning DVWP Action Links into Buttons
- SharePoint: Extending the DVWP – Part 5: Doing Stuff Before Save on Submit - PreSaveAction()
- SharePoint: Extending the DVWP – Part 6: Examining the Form Action Links
- SharePoint: Extending the DVWP – Part 7: Creating a Form Action Workflow
- SharePoint: Extending the DVWP – Part 8: Creating a Form Action Workflow - The After Math
- SharePoint: Extending the DVWP – Part 9: Oops! Failed Setting Processor Stylesheet
- SharePoint: Extending the DVWP – Part 10: Passing Workflow Variables to a Form Action Workflow
- SharePoint: Extending the DVWP – Part 11: Getting More Form Fields to the Workflow
- SharePoint: Extending the DVWP – Part 12: Adding More Form Fields from the Data
- SharePoint: Extending the DVWP – Part 13: Putting PreSaveAction() to Work – Creating Variables
- SharePoint: Extending the DVWP – Part 14: Putting PreSaveAction() to Work with jQuery
- SharePoint: Extending the DVWP – Part 15: User-Managed Dropdowns with Site Columns
- SharePoint: Extending the DVWP – Part 16: User-Managed Dropdowns - Loading Data
- SharePoint: Extending the DVWP – Part 17: User-Managed Dropdowns – Creating a Relationship list
- SharePoint: Extending the DVWP – Part 18: User-Managed Dropdowns – Loading the Relationship list – Part 1
- SharePoint: Extending the DVWP – Part 19: User-Managed Dropdowns – Loading the Relationship list – Part 2
- SharePoint: Extending the DVWP – Part 20: Cascading Dropdowns - Applying the jQuery
- SharePoint: Extending the DVWP – Part 21: Cascading Dropdowns - Three-tier Cascade
- SharePoint: Extending the DVWP – Part 22: Creating Title Based on Other Fields with jQuery
- SharePoint: Extending the DVWP – Part 23: Creating Title Based on Other Fields with a Workflow
- SharePoint: Extending the DVWP – Part 24: A Note to Readers
- SharePoint: Extending the DVWP – Part 25: Using an Audit Trail by Creating List Items with SPServices
- SharePoint: Extending the DVWP – Part 26: Modifying the Edit Template
- SharePoint: Extending the DVWP – Part 27: Adding an Alternate Edit Template to a DVWP
- ExSharePoint: Extending the DVWP – Part 28: Massage the Remove Template
- SharePoint: Extending the DVWP – Part 29: Modifying Form Action Workflows on the remove Template
- SharePoint: Extending the DVWP – Part 30: Using EasyTabs with Filtered DVWPs to Make Data Manageable
- SharePoint: Extending the DVWP – Part 31: Filling in Default Data on the insert Template with jQuery
- SharePoint: Extending the DVWP – Part 32: Filling in Default Data on the insert Template with Multiple DVWPs
- SharePoint: Extending the DVWP – Part 33: Modifying Total and Subtotal Row Layouts in DVWP
- SharePoint: Extending the DVWP – Part 34: Using Icons for Form Action Links
- SharePoint: Extending the DVWP – Part 35: Putting it All Together
- SharePoint: Extending the DVWP – Bonus: Fixing the Insert Form Action When "No Matching Items"
- SharePoint: Extending the DVWP – Bonus: Creating a Title Based on Dropdowns with jQuery


Hi Jim,
The link that you posted for easy tabs no longer works. This one looks current: http://sp2010.pathtosharepoint.com/SharePoint-User-Toolkit/
Thanks.
Thanks Richard. Christophe has been VERY busy, starting to rework his solutions for 2010. I really like the way he’s setup his tool-kit. I wish more people would do it that way. Really makes it easy when he upgrades his code base. — Mark
Hi,
Thanks for posting this. I’ve tried but doesn’t seem to work, the issue I think is that EasyTabs works when the DVWPs are on the same Web Part Zone and I can’t figure out how to get all of them on the same zone.
What am I doing wrong?
Thanks.
That’s right; they do have to be on the same Web Part Zone. And that can be a bit tricky when adding them in SharePoint Designer.
Here’s a trick that works for me:
1. In the Design pane, click the existing web part in the zone
2. In the Code pane, click once just before (or just after) the existing web part code
3. Now, when you add your DVWP, it will be inserted within that zone.
Hope that helps.
Blessings,
Jim Bob