Why Can’t I Easily Port SharePoint Designer Workflow Solutions From One List to Another? Part 2
Porting a Simple SharePoint Designer Workflow One List to Another
Overview
This tutorial style article describes how to port a SharePoint Designer workflow from one list to another. It assumes a business case where we want to move a dead simple workflow from a development environment to a production environment. However, this approach works for moving a workflow from one site to another in the same environment or even within the same site.
The workflow is dead simple and not real world. A real world example quickly bogs down into more detail than anyone wants to read in one sitting. This article focuses on the mechanics of the process. The skills you pick up here will enable you to do the same with real world examples. I promise to describe those examples in future articles.
This approach works for both WSS and MOSS.
Lastly, this article builds upon the concepts introduced in last week’s article, posted here: http://www.endusersharepoint.com/?p=1008
Setup
Create two sites based on the blank template and name one “Dev Site” and the other “Prod Site.”
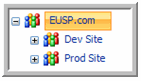
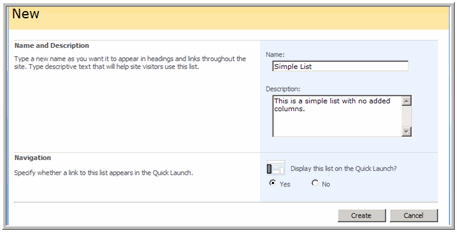
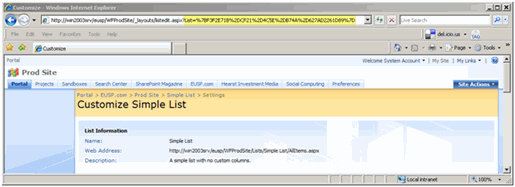
Create a simple list in both sites:
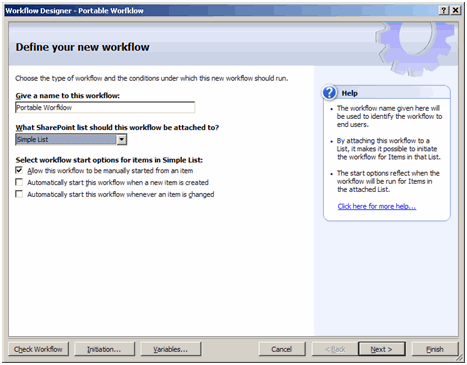
Create a very simple workflow in development:
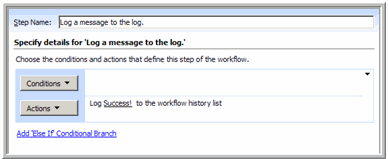
Create just one step that logs a message as shown:
Verify that it works by creating an item, starting the workflow and checking the workflow history.
Create an item and manually start the workflow:
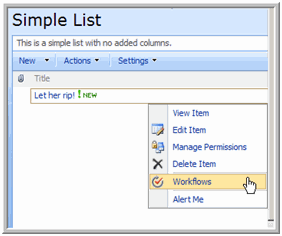
View the history:
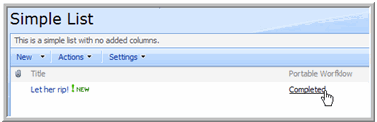
Validate that the workflow ran:

Porting Time
Now it’s time to port (move/migrate) the workflow from development to production.
In order to port the workflow in a real world workflow, we need to record the values of the GUIDs to which the workflow is attached. When we move it to the development environment, we’ll need to manually replace them. We’ll do that using SharePoint Designer’s find and replace functionality.
These current list values are here:
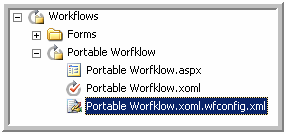
They are in the “*.xoml.wfconfig.xml” file. Replace “*” with the name of your actual workflow. (If you’re feeling adventurous, open up “Portable Workflow.aspx” and play around with it when you finish this tutorial.)
This is what my config XML file looks like:
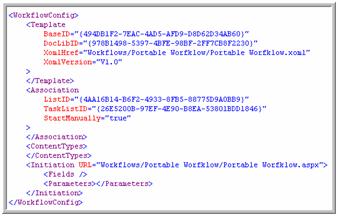
We particularly care for the section in the middle. From here, we can see that our workflow is associated with a SharePoint List whose GUID = “4AA16B14-B6F2-4933-8FB5-88775D9A0BB9”. Note that GUIDs are often enclosed in curly braces, but not always. In any event, the curly braces are not part of the GUID.
In this example, our workflow does not create any tasks. That will be the subject of the next article.
We know that the production environment has our custom list and we also know that it won’t have the same GUID. We need to find it. One straight-forward way to obtain that GUID is to access the production site and go to the list’s settings. Then, look at the URL on the web browser:
The actual URL is:
http://win2003srv/eusp/WFProdSite/_layouts/listedit.aspx?List=%7BF3F2E71B%2DCF21%2D4C5E%2DB74A%2D627AD2261D89%7D
Hyphens and curly braces are “illegal” when it comes to URLs. Instead, they are URL-encoded. We can decode them easily enough by replacing the encoded values as shown:
- Replace %7B with “{“
- Replace %7D with “{“
- Replace %2D with “–“
Following that simple rule, we end up with:
http://win2003srv/eusp/WFProdSite/_layouts/listedit.aspx?List={F3F2E71B-CF21-4C5E-B74A-627AD2261D89}
From here, we can easily that the production list’s GUID is: {F3F2E71B-CF21-4C5E-B74A-627AD2261D89}
We’re getting close!
Next, we need to create an empty placeholder workflow attached to the new production list as shown. Simply do the File -> New thing, name the workflow whatever you want (I named it “Portable Workflow”) and then click Finish. In other words, don’t even bother clicking next.
Note: If you look at the production site’s newly created *.xoml.wfconfig.xml, you’ll see the same node and that it shows the same ListID you calculated using the previous steps.
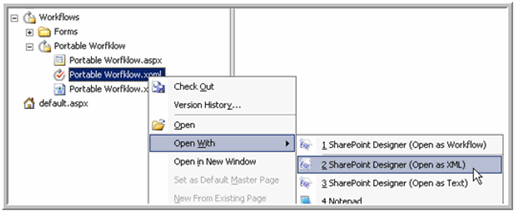
Close the production site and open the development site again. Navigate to the workflow, right click on the XOML file and select “Open with -> SharePoint Designer (Open as XML)” as shown:
Copy that entire section of XML code into the clipboard. My XML code looks roughly like this:
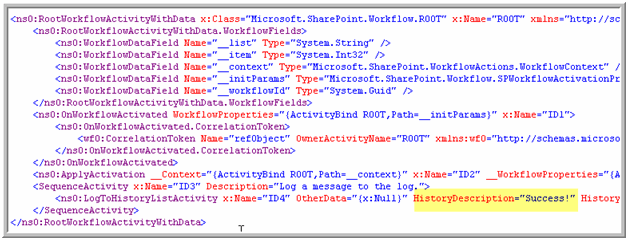
Note: I’ve highlighted the HistoryDescription. If you’re feeling adventurous, come back here later and change the word “Success!” to “Wow!”, save the XOML file, run the workflow and look at the workflow history. You can probably guess what you’ll see. Look for future articles to describe this trick in a little more detail and its potential value.
Close this site and open the production site. Open the production XOML file as XML and simply replace the entire contents with the clipboard contents (CTRL-A, CTRL-V).
Save the workflow and close the “Open as XML” copy.
Re-open the workflow, but this time by double clicking on the XOML file. This will open it up in the usual wizard style. If you’ve done everything correctly, you’ll see the step and action we created in development. Click Finish, create an entry in the production copy of the list, run the workflow and look at the history. Again, if all was done correctly, the workflow history looks the same in production as it did in development.
It probably feels like a lot of work just went into this. It really isn’t. Let’s summarize what we just did:
- Created a custom list in a development and custom site.
Note: In my case, I did this work in the same farm. There’s a good chance that your development environment is in a completely different farm from production. The good news is that it won’t matter and you don’t even need to know whether they are in the same or different farms. - Created a simple workflow in the development list and tested it.
- Create a new blank workflow in the production list.
- Made a note of the production list’s GUID.
- Copied the development workflow’s XML to the clipboard.
- Overwrote the production list’s XML with by pasting the clipboard contents.
- Opened the production list workflow with the SharePoint Designer workflow wizard and clicked “finish.”
- Tested the results.
At this point, you may be wondering: “why did we copy the GUID at all? We never used it.” I wanted to explain the process now so as to lay the groundwork for the next set of articles. Any non-trivial workflow will require us to know this GUID and possibly others, depending on the complexity of the workflow.
Conclusion
At its most basic level, porting a workflow is just a copy/paste operation. However, there is a lot of clicking and opening/closing/re-opening, etc. It’s tedious and can be error prone. It requires far more effort than the contrived example in this article would justify.
However, with a good process to help track each of the steps, this can be a more reliable method for porting complex workflows from development environments to production environments. I’ll discuss that approach in the next series of articles.
 Paul Galvin, Microsoft MVP – SharePoint
Web site: Paul Galvin’s SharePoint Space
Paul is a Solutions Architect currently working most closely with Microsoft Office SharePoint Server 2007. He was recently awarded Microsoft MVP – SharePoint status for his work with the SharePoint community.


 on
on
Could you discuss if there are any circumstances under which this won’t work? Obviously if there are lookups in the XOML, the GUID needs to be replaced there as well. There appears to be a (non-unique) number associated with each column as well, that I doubt would be consistent across sites. Is there a way to get that number without recreating the workflow?
Eric J, I will be covering a wide variety of scenarios and I’ll try and address your question specifically in the next article (for next Monday).
–Paul G
Hi Paul,
Just noticed a typo – in the section copied below the ‘Replace %7D with “{“ ‘ should be a closing curly bracket.
” …?List=%7BF3F2E71B%2DCF21%2D4C5E%2DB74A%2D627AD2261D89%7D
Hyphens and curly braces are “illegal” when it comes to URLs. Instead, they are URL-encoded. We can decode them easily enough by replacing the encoded values as shown:
Replace %7B with “{“
Replace %7D with “{“
Replace %2D with “–“ …”
I was shown a trick that if you delete the “*.xoml.wfconfig.xml” file, then you can use the SPD workflow wizard to reassociate the workflow to a list. Using this method means you don’t have to manually find out the GUID. SPD does it all for you.
A better way to get the list ID is through the Audience Targeting Settings page. It’s accessible through the list settings page.
If you have and conditions in your workflow, SharePoint designer will create *.xoml.rules This file doesn’t reference the list ID but rather the steps of the *.xoml file
And i eagerly await directions on moving task lists. Those are a pain.
Great articles Paul, Thank you for sharing. Check out my post on how to easily clean up a URL so that the GUID is easier to find.
http://www.sharingthepoint.com/Lists/Posts/Post.aspx?ID=83
- Dan
Hi Paul,
good starter. You inspired me to write a tool that does all that stuff automatically and has kind of a user-friendly GUI.
Have a look here
http://it-infrastructures.spaces.live.com/blog/cns!5336B7AA459C8A89!351.entry
I would be interested in hearing your comments.
Regards
René
Was this article continued? I did not see any follow up. I have a more complicated workflow and am trying to figure out if I can port it as described.
Hi Paul!
I have this issue where I need to do the GUID replacements programatically. All works fine, except for some reason the workflow isn’t updated properly. If I try to run it it just responds with “Failed to start” (freely translated, I’m running a swedish version of SP).
If I open the transfered workflow in SPD, and do nothing else than click “Finish” button, the workflow works. So I thought maybe you know the programatic counterpart of clicking “Finish” in SPD.
I’m using C#, and for what I’ve learned SPList.UpdateWorkflowAssociation(WorkflowAssociation) should do the trick, I’ve also tried to update the list and the hosting web, but no luck. Do you have any ideas?
What about ASPX page. Shold I recreate it?
I’ve only done “dead simple” workflows like in Paul’s demo. But I think I can answer your question: I have not been bothering to copy or recreate the aspx – - it gets created on its own.
There may be an aspx-related step depending how you set up the workflow: When I create my placeholder workflow in the target environment, I’ve been indicating the target list in the dropdown. If I don’t do that, then in order to get the workflow to attach to the right list, I have to either a) click on the xoml and assign the list from the dropdown, or b) go into the aspx to paste the listID : from its spot in the wconfig.xoml, which is not hard to locate, into the aspx (search the aspx on “ListID”). Between those two options, just depends whether you want SPD to paste the list’s GUID for you.
Thanks for the article, Paul !
Paul, also thanks for pointing out your workflow-copy-mechanics article is intended as a starting point and that we’d find it necessary to continue some likely extensive homework on production SPD workflows.
My first request to copy a production SPD workflow came today. My client says it’s her simplest SPD workflow.
Lookups from the source environment don’t go across except, apparently, as GUIDs. That’s no surprise, because the target environment can’t use lookups from the source environment. That would be like telling someone to find New York City on a map of California.
What surprised me was a class of items in the workflow that didn’t show up in the target environment: All the workflow’s conditional statements were absent when we opened the target-environment workflow xoml in the SPD compiler. I did see Actions, and no conditionals with them.
Without further info, I’d just say a phase of compilation goes wrong. I’m casting about for any material that would give me an idea of how compilation derails regarding the IFELSEs.
If there’s a part 3 of this series, I’d be interested to check it out. Thanks again !
> All the workflow’s conditional statements were absent when we opened the target-environment workflow xoml in the SPD compiler.
Now I see when I create conditions in my dummysheet workflow, an additional xoml file with rules gets created. Ah, the learning curve !
I’d like to populate the workflow description that shows up on the page when you select workflow from the list item’s pull down menu.
It shows up for the OOTB workflows like “Approval” and “Collect Feedback”
JK
Hello Paul,
Thank you for this excellent article. Are you going to cover SPD workflows that create tasks and handle Content Types in a future article, by any chance?
Best regards,
Thank you very much ….
This worked for me !!!!
I had to replace the .XOML with the GUID of the list since my workflow was not as simple :-)
Great article thanks :-)
Any ideas on moving the task foms with the workflows? what seemed simple, simply doesn’t work!