Controlling Workflows
Use Control Lists to Create Flexible Workflow Solutions
We technical types use a lot of jargon and acronyms in our daily routine such as “OOP” (object oriented programming), “CT” (Content Types), “SPD” (SharePoint Designer), “RTFM” (please read the manual), etc. This article concerns itself with a particular bugaboo called “hard coding:” What it is, why it’s bad and how to avoid it in SharePoint designer workflow solutions.
Hard coding is a practice where we put a sort of permanent value into a program or workflow that can only be changed by re-creating or updating that program/workflow. Consider this screen shot:
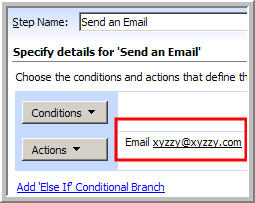
Figure 1: Email Activity with Hard Coded Email Address
The screen shot shows that the email is being sent to a specific user, [email protected].
This is a hard coded email address. It’s built into the workflow and never changes until someone pulls up SharePoint designer, edits that action, changes the value and re-saves the workflow. This kind of manual process can cause a lot of grief. It’s inflexible and throws a wrench into any business process that relies upon it.
What happens if “xyzzy” is the person responsible for approving vacations and xyzzy is actually out on vacation? What happens if “xyzzy” separates from the company or changes roles and is no longer responsible for approving vacations? He/she obviously can’t respond to any email notifications in this case or wouldn’t make sense, depending on circumstances.
Laying the Groundwork
Fortunately, we can address this problem using SharePoint Designer and a custom list. Use a custom list to store the email address of the vacation approver and use SharePoint Designer workflow to locate that email address at run-time (i.e. as the workflow runs through its paces rather than the hard coded specific value as show in Figure 1 above).
In order for the SharePoint Designer workflow to determine this email address, we obviously need to store the email address somewhere. We’ll do that in a custom list.
First, access your existing sandbox / test SharePoint site. If you don’t have one, create one for yourself.
Next, create a custom list named “Workflow Control” with one additional column named “Approver Email Address”. When you’ve finished, your “new item” screen will look like this:

Figure 2: New Workflow Control Item with Approver Email Address
Fill out the form supplying values and click OK:
- Title: Vacation Approvals
- Approver Email Address: [your email address]
Lastly, create another custom list called “Vacation Requests.” In the real world, we would add columns to this list (most likely via a Content Type) that would capture information like Name, Start and End Date, Manager and other information. We’re not trying to create real world vacation request system in this article, so we won’t be doing that as we’re confining ourselves to sending email addresses based on the workflow control list in Figure 2. As a result, we’re just fine with a simple custom list with just the default Title column.
We have now laid the groundwork for building a flexible SharePoint Designer workflow.
Build the Flexible Workflow
Fire up SharePoint Designer, connect it to the sandbox site, create a new blank workflow and associate it with the Vacation Requests custom list as shown in Figure 3:
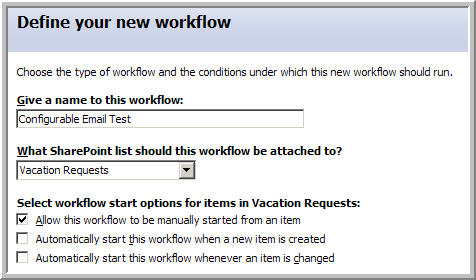
Figure 3: Create “Configurable Email Test” workflow
Follow these steps to create the first step in the workflow:
- Click on Actions.
- Select “Send an Email”
- Click on this message. This pulls up a dialog box where you can enter “To”, “CC”, “Subject”, etc.
- To the far right of the “To” field, click on the address book icon.
- Select “Workflow Lookup…” as shown in Figure 4 below:
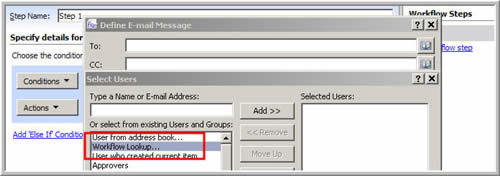
Figure 4: Selecting “Workflow Lookup…”
- Click the “Add > >” button. This pulls up a new dialog box that allows you to specify how to lookup the email address. SharePoint Designer uses this dialog box for several different actions. It’s flexible and powerful but also very confusing, especially to first-time and inexperienced SharePoint Designer users. The dialog box allows you to find data from the current list (in this case, “Vacation Request” as well as other lists altogether. In fact, you can use this dialog box to pull data from any list on the same site as where this workflow is being created. We will use it to pull the email address from the workflow control list we created in the previous section (see Figure 2 to remind yourself).
- Click the dropdown list next to “Source” and pick “Workflow Control.” This causes the dialog box to redraw itself and offer you an opportunity to do more clicking. We can never get enough of that with SharePoint Designer.
- Click on the drop down next to the label “Field” and select “Approver Email Address”
- In the bottom half of the dialog box under the “Find the List Item” click the dropdown box next to “Field:” and select the value “Workflow Control: Title”.
- In the next and final field of the dialog box labeled “Value:” enter “Vacation Approvals”.
Phew!
At this point, your screen looks something like this:
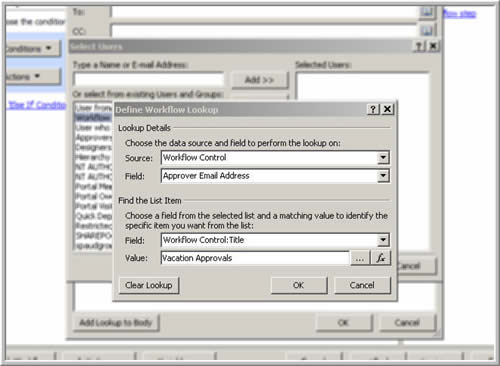
Figure 5: Completed Dialog Box
In plain English, we have just told SharePoint to do this:
When this workflow runs, determine the email address by finding an item in the Workflow Control custom list where the title in that list equals the words Vacation Approvals.
When you click OK, SharePoint Designer warns you that this lookup is not guaranteed to return unique values. There’s an important lesson here, and we’ll leave that for a moment. For now, just click Yes and OK and that brings us a view of the send email activityh like this:
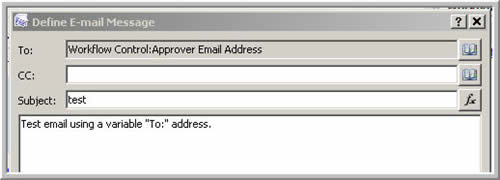
Figure 6: Email Activity using Approver Email Address
Save this activity and finish the workflow to test it.
Test the workflow whichever way you like. If you set it to start manually (as show in Figure 3 above) then create an item in the Vacation Requests list, hover over the Title of that newly created item and select “Workflows.” To close the loop on the testing, change the email address in the control list and run the test again. This time, the email should go to the new email address.
Think About the Possibilities
Look for more opportunities to do this. Email addresses are something of slam dunk. Consider these other common business scenarios as well:
- Assigning tasks – in the end, these always go to a user or group of users. Use a control list to store these IDs so that they can be easily changed as needed.
- Approval amounts: Many times, a generic business process based on dollars changes based on some dollar figure. Typically, larger dollar figures imply approvers higher up in the hierarchy. Approval amounts themselves change over time. Instead of hard coding these values, put them into a control list.
- Pause times: Some times, workflows want to delay a bit before moving on to their next steps. Instead of hard coding that time period, use a control list.
Conclusion
We created a custom list to store control information. In this case, we used the control list to store an email address. At runtime, SharePoint Designer workflow finds the item in the control list that stores that email address and uses it. We’ve taken out the hard coded email address with which we started ([email protected] in Figure 1) and replaced it with a configurable option that lets us change it without firing up SharePoint Designer, looking for the right email activity, saving it, etc. This is clearly a more flexible approach. Expand this concept outside of email activities and we begin to see how we can create very flexible solutions indeed.
 Paul Galvin, Microsoft MVP – SharePoint
Web site: Paul Galvin’s SharePoint Space
Paul is a Solutions Architect currently working most closely with Microsoft Office SharePoint Server 2007. He was recently awarded Microsoft MVP – SharePoint status for his work with the SharePoint community.
- EndUserSharePoint.com: In Defense of SharePoint Designer - Designing High-Quality Workflow Solutions
- EndUserSharePoint.com: Building End User Awareness - Microsoft Infrastructure Update for SharePoint
- Controlling Workflows
- Creating Permanent SharePoint Designer Workflow Audit Trails
- Use Custom Lists for More Effective Workflow Auditing


Greetings,
I will do my best to monitor and respond to comments and questions on this article.
Hope you enjoyed it!
–Paul Galvin
How would the “assigning tasks” work for groups? I tried using a SharePoint Secrity group and that works out well (everyone in the group gets assigned the task) The first person in the group who completes the task finishes the workflow, But I noticed that if one member forwards the task e-mail, the recipient cannot edit the task from the e-mail.
Great idea and I have already been using it. The question I have is there a way to send to a subset of people in the list in the situation where I have say multiple people that are to be notified. I know I can do by creating a SharePoint group but I like the visibility the list gives in terms of titles and other metadata I may want to have.
Instead of doing a lookup, how can I use Checked out to, to retrieve the current user. When I try it an view in the history it is blank.
Any thoughts, Brian.