SharePoint Color Coded Calendar – The PayRoll Schedule
- SharePoint Color Coded Calendar – The PayRoll Schedule
- Screencast: Color Code a SharePoint Calendar – The PayRoll Schedule
- 7 Minute Screencast: Color code a SharePoint Calendar – Update
Update: Jim Bob has sent a 17 minute screencast of his solution which includes another way to assign colors.
After watching Mark Miller’s Screen-Cast, Color Code a SharePoint Calendar, I realized this was the perfect solution for transforming a payroll schedule on an Excel spreadsheet into a SharePoint Calendar to make it more visually appealing and user-friendly.
First Things First
Since I was beginning with a simple list of dates that was already color-coded, converting it to a calendar following Mark’s screen-cast was a snap!

Payroll Schedule in Excel
Of course, the first task was to create a SharePoint Calendar, in three easy steps:

1. Create

2. Create Calendar

3. New Calendar
Presto!

Basic Payroll Calendar
Show Me the Money
The basic calendar is nice and you can display lots of useful information using it this way. But the payroll calendar is something that folks will look at often and the most important question is When do I get paid?
So, let’s create some fields that will help us make Payday stand out, while providing color-coded information about some other important dates, as well.
Setting up the Columns
From the Payroll calendar we just created, click Settings > List Settings:

List Settings
Here, you will see I have already created some columns we will use to make our color-coded calendar.

Customize Columns
Let’s go through the basic columns and then we’ll expand on the more advanced ones:
- Pay Period: This is where we will store the number of the pay period. 1 is for the first payday of the year (though the pay period will most likely begin in the previous year), 2 is for the second, and so on. In our example, there are 26 pay periods per year, so when creating this column, I set a range of 1 to 26, just to avoid accidentally keying a wrong number.
- Start Time and End Time: These come with the Calendar list and we’ll put them to use for our calendar, as is.
- Title: This is the default field for every SharePoint list. We won’t be using it, so I made it not required.
- Location and Description: Again, we won’t be using these, but they’re standard calendar fields that cannot be deleted.
- Three other fields are standard calendar fields that will show up on the EditForm: All Day Event, Recurrence, and Workspace. For our purposes, we’ll use All Day Event and ignore the other two.
Advanced Fields
Now we move into the specific fields we’ll use to (a) make it easy for HR to update the calendar and (b) let their choices be automatically color-coded so the employees can easily find the information they need.
DateType
In the spreadsheet above, we have two dates for the Pay Period: Beginning of Pay Period and End of Pay Period. We’ll combine these into one event and use the Start Time and End Time to show the beginning and ending dates.
Thus we’ll have three choices for DateType: Pay Period, Payday, and HR Deadline. (HR Deadline is the deadline for making any changes that will appear on that pay period’s payday.)

Column: DateType
We will be using the CHOOSE function to FIND a common letter in our DateType choices that is in a different location for each choice. Each of the choices shown has a lower case a, but that won’t work for us, since it is in the same location (the second position) for two of our choices: Pay Period and Payday. So, we’ll use the lower case d, which appears in each choice, but in a different position for each one.
Note: If your choices are different, you will need to look for a common letter to FIND. Alternately, multi-word phrases might allow you to search for a space, or you could force a difference by adding a number at the beginning of each item. If your choices are different lengths, you could use the length, rather than searching for a character or number. Finally, you could add a calculated field that assigns a number to each record which you would then use for calculating colors. (For each of these options see the following posts, or see the comments on Christophe’s post referenced below.)
Color and BGColor
Next we’ll create two calculated fields, based on the DateType choice.
When I examine the Excel schedule above, I see that the capable folks in HR have already chosen some colors to help them differentiate dates. I’m going to use those same colors, converting them to their hexadecimal values.
To find the color they’ve used, I opened the color palette in Excel to see what they’re using. The easiest way to do this in Excel 2007 is to right-click on the field and follow the on-screen menus. In order versions, you can get to this by going to the Font menu (Edit -> Font) and clicking the font-color drop-down.

Determining color values
Clicking on More Colors… will bring up the Colors dialog box.

Custom Color Values
Click on the Custom tab and look at the Red, Green, and Blue values. These are decimal values and we need to convert them to one hexadecimal value (White, for instance is #FFFFFF in hexadecimal) per color.
Each RGB (Red, Green, Blue) hexadecimal value can be separated into three pairs of two-digit hexadecimal values which represent the Red, Green, and Blue values, respectively. Looking at our first color above, we need to convert the Red, Green, and Blue values from decimal (128, 0, 128, respectively) to three two-digit hexadecimal values. A quick and easy way to do this is using the Calculator application in Scientific view.

Scientific Calculator (Choose View -> Scientific)
Simply enter your decimal value (128, in this case) and click on the Hex radio button.
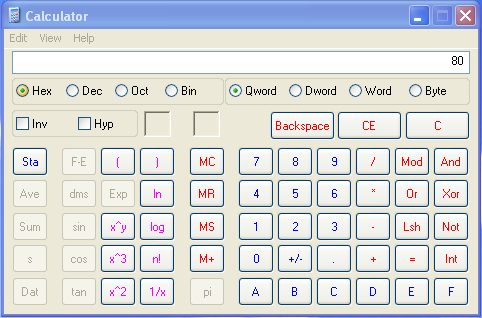
Hexadecimal equivalent of Decimal 128
This is your Red hex value (and Blue, too, in this example). Zero in decimal is zero in hex, too. So, your RGB value becomes #800080 (the # indicates that this should be read as a hex value).
NOTE: The highest two-digit hex value is FF. Decimal is a base 10 counting system, meaning there are ten digits [0-9] used to make all of the numbers in it. Hexadecimal is base 16, meaning there are sixteen digits [0-9, then A-F] used to make all of its numbers.
Doing this for the other two colors, we see that HR has chosen #800080 for Beginning of Pay Period, #008000 for Payday, and #800000 for Payroll/HR Deadline (4PM). We’ll use those same colors for our calculated Color column.
FIND and CHOOSE
Now, we need to determine which color to assign to each row based on the DateType. As stated before, the common letter that has a unique position in each DateType choice is lower case d. We’ll use the FIND function to locate that exact position.
I always have trouble remembering which arrays are zero-based and which are one-based. If you’re like me, I recommend taking an intermediate step to determine what value each of your choices will return. So, before completing the next step, I recommend setting your Color Formula to: =FIND("d",DateType,1) and then looking at the data in a list view. In our case, this will show that the "d" is in the 10th, 4th, and 7th positions, respectively, for Pay Period, Payday, and HR Deadline.
To make it easy to visualize, in the next step this number will be the total number of commas that come before each respective color in the CHOOSE function.
NOTE: If you miscalculate and end up with fewer CHOOSE options than the highest value FIND returns, you will get an error that will show #VALUE in this field. Simply take off the CHOOSE and perform the FIND for each choice (as recommended in the intermediate step two paragraphs above) and recalculate.

Column: Color
How this works: The FIND function looks for d in the DateType choice. It will return this number to CHOOSE function which will then set the Color to the value in that position in the CHOOSE function.
For example, in "Payday," the d is in the 4th position, so FIND returns 4. The CHOOSE function then becomes =CHOOSE(4,,,,"#008000",,,"#800000",,,"#800080). The fourth position has "#008000" so that becomes the value of Color for this row.
BGColor
We’ll use pretty much the same formula for BGColor, only we’ll set the background a little lighter but in the same hue as the text and border.
A simplified look at RGBs will show us that sliding all three values up by a corresponding amount will result in a similar hue, but much lighter as they approach white (#FFFFFF). For each of our colors, the RGB values are either half-way "on" (128 or #80) or "off" (0 or #00). If the Color value component is half-way (#80 is half of #FF) on, we’ll set the BGColor to all the way on (#FF); if it’s off, we’ll turn it most of the way on (#CC).
So, we’ll copy and paste our Color Formula to our BGColor Formula then change 80s to FFs and 00s to CCs (notice that hex values are NOT case-sensitive).

Column: BGColor
Some Assembly Required
Now we can put all of these element together in such a way that Christophe’s (Path to SharePoint) Text to HTML script can make the Content Editor Web Part do the color-coding we need. (Follow the link to get the code.)

Column: Display
Breaking this down, we’re creating a box around our text using the DIV tags (this is what Christophe’s code looks for), using the same Color value for the text and the border; and using the BGColor value for the background color of the box. Within the DIV itself, we’re combining the DateType and the Pay Period number as the text shown on the calendar for our event.
Entering the Data
We’re entering a good amount of data into this calendar, so let’s make it a little easier on ourselves by creating an appropriate Datasheet View of our list data.
From our Calendar, click on the View menu and choose Create View

Create View
Choose Datasheet View

Create View: Datasheet View
Choose to only display the fields you need for quickly entering the data. (I set mine up as a Private view. You might want to walk your editors through setting up a similar view so they can enter the next year’s data without your help.)

Edit View: Datasheet View Shown from Edit View so that selected fields are at the top for screen capture.

Payroll Calendar: Datasheet View
One day’s entry will look like this (if you have ordered your columns this way):

Payroll Calendar Event (Pay Period event)
A Calculated Effort
Now, the default view for a calendar shows the Title, but we didn’t even fill that in. We want it to show our calculated Display field instead.
To that, we’ll go to the View menu and click on Calendar -> Modify this View:

View -> Modify this View
Scroll down to Calendar Columns and notice that the default fields shown for each record are the Title and Location fields, which we left blank.

Calendar Columns
We want to change those to Display and DateType, respectively.

Changing the Calendar Columns
Click OK.
Almost There
Once you have all of your data entered, take a look at your Calendar.

Payroll Calendar – NOT Pretty
Even though we have all the data just the way we want it… we still have to tell SharePoint that we want the Display field to be considered HTML. We do that using Christophe’s code in the Content Editor Web Part. (He deserves the traffic and recognition for his code, so I’ll let you go get it from him. Once you have it, I’ll show you what to do with it.)
The Final Touch
From your Payroll Calendar, go to Site Actions -> Edit Page

Edit Page
Click on Add a Web Part at the top of the screen:
Add a Web Part
Under All Web Parts, choose Content Editor Web Part and click Add:

Content Editor Web Part
Click on open the tool pane:

Open the tool pane
Expand the Layout section and check Hidden:

Hide the CEWP
Then click Source Editor… and paste Christophe’s code in the box and click Save.
Drag the Payroll Calendar web part to the top, so the Content Editor Web Part is last on the page.
Click OK.
Click on Exit Edit Mode

Exit Edit Mode
Voila!

Color-Coded Payroll Calendar
NOTE: If you want to include this calendar as a web part on another page, simply make sure you add the CEWP to the end of that page, as well, with the same code from Christophe.
 Guest Author: Jim Bob Howard
Jim Bob Howard is a web designer / web master in the healthcare industry. He has been working with SharePoint only since March 2009 and enjoys sharing what he has learned. You can email him at [email protected].


I’m still having problems with this calendar. I get an ‘error’ message when I click ‘OK’. Hope some one can really help. I would like to be able to use for our ‘Training Calendar.’ Check comment #5 above. Here is the code I followed the step above.
=”"&DateType&”: “&[Pay Period]&”
Frank – see my comments 35.38.39
the keys for me were to create a NEW calendar rather than try and fix one that didnt work and to use Christophes code.
Persistence is key
Great kick starter! Thanks.
Fyi, the colors don’t have to be HEX RGB. There are plenty of standard colors defined which every browser supports today as part of HTML standards. A great reference site is http://www.w3schools.com and follow the links to CSS styles.
Great demo for static data. On the calculated fields, is there a way to update for every instance of the recurring appt or are you stuck with only the first date when the item was created?
The reason i am asking is we have a monthly meeting that quarterly gets additional members. Trying to show some differentation for the facilitators so they know that this will be a larger audience meeting on the calendar. So far i am having no luck doing so. Any help is greatly appreciated.
I really don’t understand the significance of the commas in the “Color” column.
=CHOOSE(FIND(”d”,DateType,1),,,,”#008000″,,,”#800000″,,,”#800080″)
Four comman, then three commas, then three commas. What does it mean, what is the significance? Can someone please explain this to me?
Dear Matt,
Yes, the significance lies with what the CHOOSE function is going to return.
Note the following paragraph above:
In this example, our CHOOSE function will only return 4, 7, or 10. The commas put responses in the fourth, seventh, and tenth positions. If there was a possibility that something else could be chosen, you might want to fill in the other positions with a “default” color, and/or check for an error and give a default color if ISERROR returns true.
I hope that helps!
Blessings,
Jim Bob
I followed Owen’s recommendation and created a new calendar and used Christophe’s HTMLToText v2.1 from the pathtosharepoint/download library, but had the same problem with items that were not all day items. They wouldn’t display properly in the week and day calendar views. Can you provide any suggestions to make it work?
Betty, a workaround is to make the following change:
var regexpA = new RegExp("\\s*< ([a-zA-Z]*)(.|\\s)*/\\1?>\\s*");(remove the last $ in the expression)
This will be fixed in the upcoming version 3.
Note for the participants in the visualization workshop: the Web Part you have received includes this modification.
Christophe,
Thanks! The correction made it better. Now it works in Month and Day views; the week view is also improved, but is not quite there yet. It doesn’t show the script anymore, but it only shows the time in the default Microsoft pale blue box. Doesn’t show the color or the contents that the display column is set to show–(=”"&DateType&”")). I double checked the calendar view setting and the week view is set with Display as the Week View Title with DateType as the subHeading. Any ideas?
I’ll look into it. Feel free to e-mail me more details (screenshot, formula, etc.):
[email protected]
btw it works fine in my live demo:
http://www.pathtosharepoint.com/Calendars/Lists/WorkshopCalendar/calendar.aspx
Christophe,
Just wanted to check that you got my e-mail with the details you asked for.
Hi Betty,
I did, and sent you this reply the same day:
the first change is to use span tags instead of div tags, as explained here:
http://pathtosharepoint.wordpress.com/2008/11/15/sharepoint-calendars-color-coding-hover-effects-etc/
Hi, I followed every step and replicated everything. I just have a an issue regarding this, when I view the calendar in weekly/day, the coede doesn’t work.
can anyone help me solve this?
For those who can’t make it work in week/day view, here is a summary of the previous episodes:
1/ check out the original article and the updates:
http://pathtosharepoint.wordpress.com/2008/11/15/sharepoint-calendars-color-coding-hover-effects-etc/
In particular, make sure you use span tags, not divs.
2/ grab the latest version of the text to html here (and bookmark the page for upcoming updates):
http://www.pathtosharepoint.com/HTMLcc/default.aspx
3/ if it still doesn’t work, see the little tweak in comment 60 above (this will be fixed in the upcoming version 3)
4/ if it works, let us know!
4/ and if it still doesn’t work, send me more details:
[email protected]
Hi,
I am having the same problem as previously mentioned (by Betty) in a calendar. The color coding works great in all views (day/week/month) for the items marked as “ALL DAY EVENT”, however, for the items that have a determined START TIME and END TIME, the item is in pale blue (rather than the color I assigned) and is displayed with the “START TIME” that is clickable (rather than the “title” I had set to be clickable).
I have done all of the below as posted by Christophe earlier, so I am looking for further assistance.
“For those who can’t make it work in week/day view, here is a summary of the previous episodes:
1/ check out the original article and the updates:
http://pathtosharepoint.wordpress.com/2008/11/15/sharepoint-calendars-color-coding-hover-effects-etc/
In particular, make sure you use span tags, not divs.
2/ grab the latest version of the text to html here (and bookmark the page for upcoming updates):
http://www.pathtosharepoint.com/HTMLcc/default.aspx
3/ if it still doesn’t work, see the little tweak in comment 60 above (this will be fixed in the upcoming version 3)
4/ if it works, let us know!
4/ and if it still doesn’t work, send me more details:
[email protected]”
Please let me know any information required; I would be happy to provide code/screenshots.
Thank you,
Angela
Angela – Christophe has setup a forum on Stump the Panel to handle questions about the color coded calendar solutions. Post your question there and he’ll get right on it. — Mark
Thank you, Mark.
Under Christophe’s Forum: Path to SharePoint Workshop Solutions, I found the Forum: SharePoint Calendar Solutions, with 1 topic posted: Calendar Month View Add Fields. I have not found an exact forum setup to handle color coded calendar solutions. Shall I post my question as a new topic under the Forum: SharePoint Calendar Solutions? I just want to make sure I don’t start something new when a topic already exists.
Thanks,
Angela
Angela, that would be the right place. However, I am surprised that my instructions from November are not enough. I have also responded to the e-mail you sent me directly.
Thank you Mark and Christophe for such quick replies. I made an error when changing the DIV to SPAN. I have corrected this, and all events (intra-day included) are color coded ~~thank you! But now have the “strange wrapping issue” as presented by Susan earlier. My apologies if a solution is posted to this and I am overlooking it. I am trying to follow all of the posts to avoid bugging you with redundant questions.
Thank you,
Angela
Susan, the wrapped issue is not due to the method, and you’d have the same issue with normal text (for example a long title).
Ben’s comment to use DIVs is technically not correct, although it works in most cases. Actually, my first post (in 2008) used DIVs, but I later updated it to SPANs.
If you’d like to continue the discussion, please follow Mark’s advice and use the forum. This way you may also get input from other users.
This is driving me bananas, I have followed the screencast, seem to be recreating the columns and code correctly but can’t seem to reproduce this. Not sure what is going on but I am ready to bang my head on the desk. I am sure I have a comma in the wrong place in my expression or some such.
Kris – Try Stump the Panel. Jim Bob is on there everyday and you might convince him to walk you through it. — Mark
Post your formulas here and we’ll try to help you debug.
Blessings,
Jim Bob
Initially I tried this:
=”"&Title&”"
This gave me syntax errors over and over despite moving code here and there.
which didn’t work so I tried just using the formula from Christophe’s site which gave me this:
=” “&Title&”"
still no dice
I copied the code from Christophe’s website for the CEWP and pasted it into Source then placed it below the calendar as directed. Modified the views several ways. Just can’t get it to work.
First of all, make sure your quotes are not smart quotes.
They aren’t; they are coming through on this post as smart quotes for some reason, sorry.
Great, great post! Thanks Jim Bob, Christophe, and Mark.
I was able to modify the steps to set up a color coded calendar to track personnel activity (vacation, sick leave, FMLA, LWOP). Because there aren’t any common letters in any of those choices I used IF statements in the calculated columns as follows:
ActivityType:
Vacation
Sick Leave
FMLA
LWOP
Color:
BGColor:
I changed the Display field so that it displays as Title:ActivityType:
Added Christophes script and voila I have a color coded Personnel Activity calendar. Something I have been hearing screaming about for quite some time.
Thanks guys, the info is much appreciated!
Not sure why the last piece of code didn’t post there. Should be as follows:
=”DIV style=’border:1px “&Color&” solid; padding:5px; margin:0px; color:”&Color&”; background-color: “&BGColor&”;’>”&ActivityType&”: “&Title&”</DIV"
Might have been the DIV's Add before and after the DIVs as appropriate.
This worked out great. However, I also want to make sure the time doesn’t show up on the calendar. Previously i’ve used a calculated column with the “=TEXT([columnnamehere], “MM/DD/YYYY”)” successfully but I can’t seem to combine it with this solution. Any ideas would be appreciated!
Thanks for the great post and code tweaks suggestions. I noticed that in Jay’s last code there is a small issue.
Here is the correct one
=”"&ActivityType&”: “&Title&”"
strangely the code does not show up properly
Hi,
Great post. I got all the way to the end and I have the code appearing, but when I put in Christophe’s code it didn’t make a color box, it only displays the code. I made sure to move the CEWP to the bottom. Can you help?
Here is what it shows on the calendar rather than a nice colored box:
Committee Meeting: HP Meeting
It looks lile my code didn’t send through my last post.
using your guides I setup a nice calendar for planning infrastructure releases but the multi-day events that had those little white lines on top & bottom were driving me crazy, so I figured how how to change the HTML margin / padding to cover the event bar in the calendar…
adding an IF statement in the tag that changes the margins and padding if the event is more that one day.
here’s the column that I display before (with the line on top and bottom)
=""&Application&" - "&Category&""here’s the column that I display after
="0,"margin-top:-4px;padding-top:5px;padding-bottom:5px;margin-bottom:-6px;","")&"width:100%;text-align: center;border: 1px "&Color&" solid; color:"&Color&";background-color:"&BGColor&";'>"&Application&" - "&Title&""Phil, I found your entry most interesting as I am trying to achieve exactly that. However, I am struggling to get it it work. WOuld you be able to post full details to the changes yo made to the original payroll calendar please.
I had some problems posting the calculated field as the SPAN tags get removed.
Here’s what I have today – I have changed the to *GREATERTHAN* so that the code is maintained in the posting.
First is the start of the SPAN Style:
="*LESSTHAN*SPAN style='"&The if statement use OR() to check the start date & end date for an item if it’s greater than zero (more than 1 day) or equal to 0.999305556 which is 1 day exactly:
OR(DATEDIF([Start Date],[End Date],"D")*GREATERTHAN*0,[End Date]-[Start Date]=0.999305556)If yes, it sets the margins, padding for the SPAN style:
"margin-top:-4px;padding-top:5px;padding-bottom:5px;margin-bottom:-6px;"If no, it does not set the magins or padding:
""Then the rest of the code is formatting the SPAN Style which applies to either case:
&"width:100%;text-align: center;border: 1px "&Color&" solid; color:"&Color&";background-color:"&BGColor&";'*GREATERTHAN*"&Application&" - "&Title&"*LESSTHAN*/SPAN*GREATERTHAN*"Here’s the complete code:
="*LESSTHAN*SPAN style='"&IF(OR(DATEDIF([Start Date],[End Date],"D")*GREATERTHAN*0,[End Date]-[Start Date]=0.999305556),"margin-top:-4px;padding-top:5px;padding-bottom:5px;margin-bottom:-6px;","")&"width:100%;text-align: center;border: 1px "&Color&" solid; color:"&Color&";background-color:"&BGColor&";'*GREATERTHAN*"&Application&" - "&Title&"*LESSTHAN*/SPAN*GREATERTHAN*"ok – I removed the “”&Application&” – “&Category&”/SPAN”
here’s the column that I display after:
=”SPAN style=’”&IF(datedif([Start Date],[End Date],”D”)>0,”margin-top:-4px;padding-top:5px;padding-bottom:5px;margin-bottom:-6px;”,”")&”width:100%;text-align: center;border: 1px “&Color&” solid; color:”&Color&”;background-color:”&BGColor&”;’>”&Application&” – “&Title&”/SPAN”
ok – it’s jut not working… here’s the if statement i added to the HTML:
&IF(datedif([Start Date],[End Date],”D”)>0,”margin-top:-4px;padding-top:5px;padding-bottom:5px;margin-bottom:-6px;”,””)&
Good Morning Mark!
She’s (Silvia’s) referring to the code Jay included in the comments. I think it’s the DIV tags, Jay had the same issue in his original post :-)
Hi -
I got the color-codomg to work witht he calnedar . Thank You!!!
We are currently on SPS 3.0 and looking to upgrade to SP2010. WIll this code continue to work with SP2010.
Thanks,
I recently implemented this color coded solution for Sharepoint Calendars. Needless to say, after having the solution live for 3 weeks the sharepoint group that hosts our services upgraded the SP Farm to 2010. This completely broke the color coding solution. I’ve started from step 1 and went thru the process again to no avail. Is anyone aware of what changes in the 2010 release would have broken the CEWP code that Christophe provided? If so, does anyone have an updated solution for color coding SP 2010 calendar events? Thanks in advance for your help.
Jason – 2010 object model for the presentation layer has major changes. The 2007 calendar solution will not work because of this. Christophe moderates a Stump the Panel forum for this, so jump in there and ask if he is working on a solution. — Mark
The script is actually compatible with the SP 2010 Object Model, but there is another major change in SP 2010: calendars and some other Web Parts are rendered asynchronously.
I have published a script that addresses this issue:
http://blog.pathtosharepoint.com/2010/06/16/html-calculated-column-solutions-for-sp-2010-part-iv/
I’ll certainly publish updates in the future, but for now this is the most reliable solution.
I am trying to apply this technique in a to a radio button choice list so that the color changes for that choice (when displayed) based on which choice was made. I am having a problem with the “Display” column.
“Status” is the column of choices. Here are the 5 choices from the Status column:
Open
In Process
Approved
On Hold
Closed – Not Implemented
I am using the following formula in the “Display” column:
=”"&Status&”"
This is what is displayed on the page in All Items view (after selecting “Approved”):
Approved
When I look at the html source code for this view I see this:
<DIV style=' border: 1px #800080 solid; padding: 5px; margin: 0px; color: #800080; background-color: #ffccff;'>Approved</DIV>
Any thoughts?
Jay, try again, but put spaces around your brackets so that blog doesn’t strip them out.
Alternately, we can move this over to STP and you can wrap your HTML in code tags…
Hi,
I just implemented this on my sharepoint calendar. And it works. However, i can no longer click on the calendar item to see the details of it. I guess this implementation is strictly a view? Or have i done something wrong?
Christophe,
Thanks for the update. I’ll be posting a reference to your new article some time today.
Mark
Not sure what code you’re referring to. There is no code block in this article, just screenshots. — Mark