InfoPath Part 2: Create a Project and Requirements Form
The Project and Requirements Form does not have to be complex, just gathering the basic information needed. In most cases, the business problem being addressed and the proposed solution are the initial pieces of information gathered. Follow along as we create this form and publish it to a site for use by anyone.
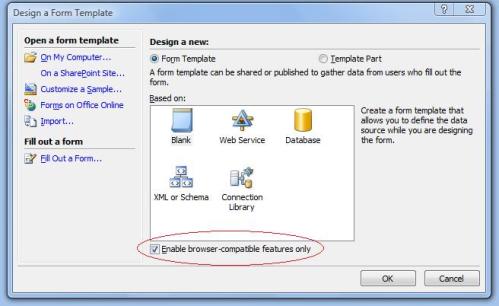
- Open Microsoft Office InfoPath 2007 and select “Design a Form Template”.
- For this solution, we will be creating a form that will be used on the web. Ensure the “Enable browser-compatible features only” box is checked. Click OK.
- To make sure that we have a form that will be appealing to the user, we will create a layout table using the tools on the task pane. Click Layout.
- One of my favorite tools in the Layout Pane is the “Table with Title”. This table is already set up to work with the Themes that are out of the box with InfoPath, so the colors will automatically update to the new theme if you select a different one. Click on “Table with Title”. Go ahead and click in the top cell and add the title to the form.
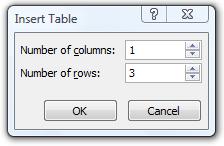
- Click into the contents cell. Instead of entering any information, we will add another table here. Click on the custom table tool in the pane. For this solution, we will use one column and 3 rows.
- In the first row, type: “Please describe your business problem.” In the second row, type: “Please describe the desired solution.” And in the third roe, type: “Does this solution require a workflow?”
- In the task pane, click the drop-down next to Layouts to open the Task Pane menu, and then click Controls.
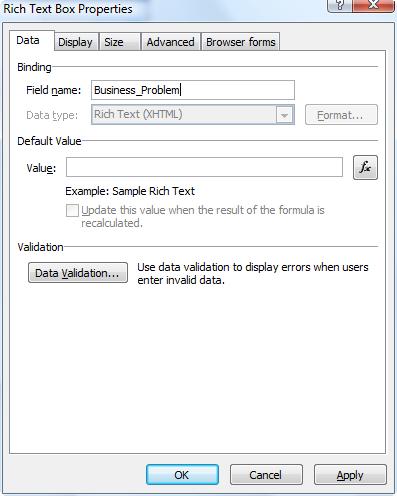
- Click to ensure the cursor is after the period in the first row, click on Rich Text Box in the Controls pane.
- Double click on the Rich Text Box to open the properties. Rename the field Business_Problem. Click OK.
- Click to ensure the cursor is after the period in the second row, and then click Rich Text Box in the Controls pane.
- Double click on the Rich Text Box that you have added to the second row and rename the field Business_Solution. Click OK.
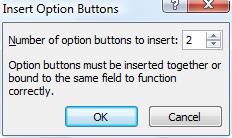
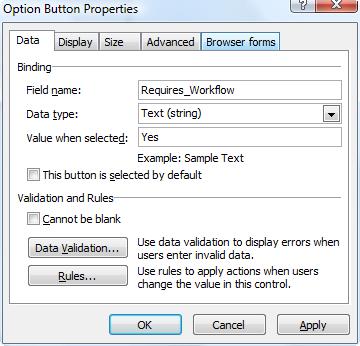
- Click to ensure the cursor is after the question mark in the third row, and then click Option Button in the Controls pane. When the options window appears, enter 2 as the number of option buttons to display. Click OK.
- Delete the field name text next to the option buttons and type “Yes” and “No” for the first and second buttons respectively.
- Double click the “Yes” button; change the name of the field to “Requires_Workflow” and the value when selected to “Yes”. Click OK.
- Double click the “No” button and change the value when selected to “No.” Click OK.
- Click to put the cursor below the third row, but still within the layout table. Click on repeating table in the Controls pane to add it.
- When the options window opens, set the number of columns to 2, and then click OK.
- Double click on the words “Repeating Table” to open the properties for this control.
- Change the text for “Show insert button and hint text” to “Insert next step”. Click the Display tab.
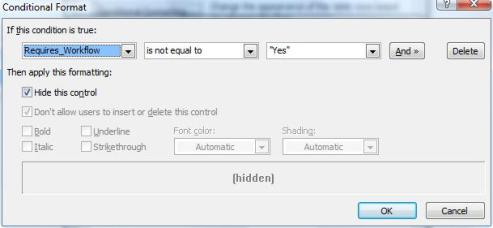
- Since we only want to display this control if the solution does require a workflow, click on the Conditional Formatting button.
- Click Add to add a condition. Click on the drop down in the first field and click “Select field or group”. (Don’t be surprised that there are still fields and groups with number names, this will be corrected!)
- Select Requires_Workflow as the field that will determine the formatting, click OK. Select the condition is “is not equal to” and then select “Type text…” from the drop-down.
- Type “Yes” (without quotation marks, InfoPath will add those automatically after you enter the text) in the field, and then click the check box to “Don’t allow users to insert or delete this control” then “Hide this control”. Note: Check the boxes in that order, or both options will not be available.
- Click OK 3 times to return to the form.
- In the first row, first column, type “Step” and in the second column, type “Description”.
- Hover the mouse over the line dividing the two columns, click and drag the column to the left so that the “Step” column is much smaller than the “Description” column.
- Double click on the text control in the “Step” column. Set the name of the field to Step and then click the function button in the Default value section.
- Type “count(preceding-sibling::*/Step) + 1” (without quotation marks) in the formula and then click OK twice to return to the form. This step auto-numbers this field so that the person filling out the form will not have to put this number in each time.
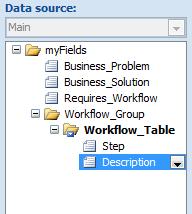
- Click the drop-down next to Controls in the Task Pane and select Data Source.
- Expand the groups until all fields and groups are displayed.
- Right-click on each group and field that is not descriptive, select Properties, and rename it.
- Click File>Save as and save your form.
- Click on Tools>Data Connections, then click Add.
- Select to create a new data connection and ensure the radio button indicates the connection will be to submit data. Click Next.
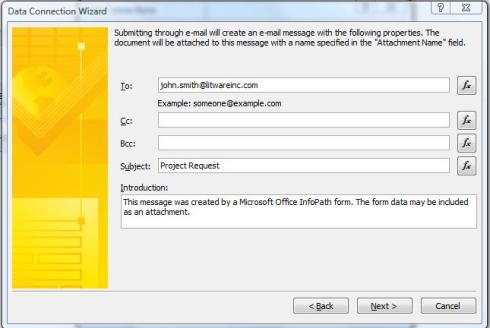
- Indicate the radio button next to “As an e-mail message” to ensure this is the method to submit the form. Click Next
- Format the message by entering the email addresses in the header fields of the recipients of the form. Note that the function buttons are there, if your form had fields that contained email addressed, you could use these fields in the addresses so that the email addresses are not static.
- Either type in a static subject, or use the function button to create a subject line using data within the form.
- The introduction allows you to customize an introduction to the recipient that indicates the purpose of the form or provides instructions. Click Next.
- Indicate the way the form will be sent. Note, for browser-based forms, indicate “Send only the active view of the form and no attachment”. Click Next
- Name the data connection as desired, click Finish, and then click Close.
- In the form, click the drop-down in the task pane and select Controls.
- Click to make sure the cursor is at the bottom of the form, outside of the table.
- Click on Button in the Controls pane.
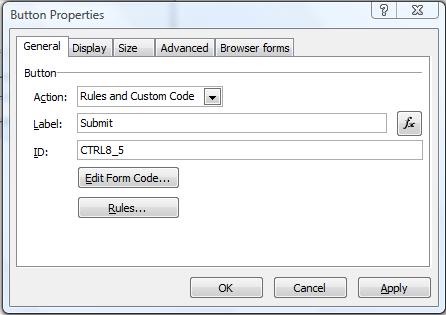
- Double-click the button that is now on the form. Change the Label to “Submit” then click Rules, then click Add.
- Do not set a condition, just click Add Action.
- Set the action to “Submit using a data connection”. The Email Submit connection will default since it is the only data connection we have created to submit. Click OK.
- Click Add Action, Set the action to close the form. Click OK 4 times to return to the form.
- Save the form.
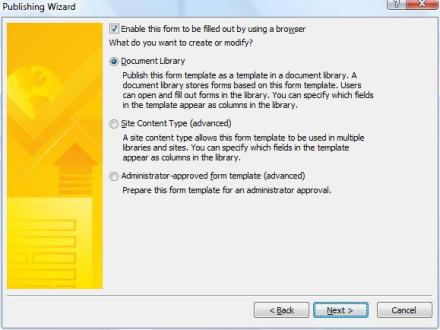
- Click File>Publish. Indicate “To a SharePoint server with or without InfoPath Forms Services”. Click Next.
- Enter the URL of the SharePoint site. Click Next.
- For this scenario, we will use a document library and need to ensure that the form can be used as browser based. Click Next.
- Indicate “Create a new document library” and click Next.
- Type a name for the library and a description of the form and library. Click Next.
- Now you are given the opportunity to “promote” the data to columns within the library that can be used in the site. However, since we are submitting the data as an email, this is not necessary in this case. Click Next.
- Verify the information is correct, click Publish, then click Close after it has published.
*This is my personal preference, to type all of the text first, before adding the controls, but you can add the controls as you enter the text if preferred.
Hovering the mouse over this control shows the name of the control as “field1”. This isn’t very useful information, so it is important that you rename the fields either as they are entered or after you have added them to the form.
It is your preference on formatting these buttons to appear immediately after the question mark on the same line, under the question, or even centered. Use the tools in the ribbon to do this. My preference is to have them on the same line, immediately following the question mark. Be certain that enough space is left, so that the text is appropriately associated with the buttons.
Now, you could stop here and have a good initial form, however, additional information about the workflow would be useful.

For this scenario, we will publish to SharePoint and allow the users to submit the form via email.
Since the form is being published to SharePoint as a browser form, click on each field so that the handles appear that allow you to change the size. Click and drag the size smaller by 1 pixel. This will set the size as a specific width instead of “100%”. The form will work without this, but the format of the email to the recipient will be very hard to read.
To fill out and submit your form, click the New button on the document library. If you wish to only have users go directly to the form, send them the link that appears in the address bar after you click “New” or post it as a link on your site.
 Guest Author: Lori Gowin, See the Point
Lori Gowin is a SharePoint Administrator/Designer. Since 1999, she has been supporting and managing Microsoft products and technologies. The last four years have been focused on SharePoint and the Microsoft Office Professional Suite. She has created InfoPath and SharePoint solutions in both the healthcare and education industries. In June of 2006, Lori received her MCSE.
Lori lives in Birmingham, Alabama with her husband and two sons. When not working with SharePoint, she enjoys reading, travelling, and watching sports.


 on
on
Hi Lori,
I’d been finding problem with your step at
count(preceding-sibling::*/Step) + 1
What I did thus is check Edit XPath(advanced)
and put this in
“count(../preceding-sibling::*) + 1″
and for some reason it will revert back to
“count(preceding-sibling::*) + 1″ with XPath unchecked(still working). However, if I were copy “count(preceding-sibling::*) + 1″ straight into the formula, it won’t work.
Quite temperamental…This seems to work for me instead. Hope it helps someone.
Is there a way to hide the email recipient’s name requested in step 36? Or is there a way to set it up so that when the user clicks the submit button in the InfoPath form, it simply sends it to the recipient without doing the added step that shows the recipient’s name to the user?
I stepped through this and it seems pretty straight forward. I’m curious as to how you’d use this (end user input to an IM solutions group)set up – information provided is only in email, but it’s structured. You get several folks completing input and going into a mail box, but then wouldn’t you want to bring it back into a “work process” for the receiver?
In step #38 we can enter a static email address. What if we want the user to enter the email address that it will be sent to? So we do not know the email address at the time of design, but rather as the form is being completed. How is that accomplished?
Thanks so much!
Hi
I am trying your ” count(preceding-sibling::*/Step) + 1 ” in my application it doesnot work..is there someother way i can do it..please let me know ASAP..