Data View Web Part, The Basics – Keep it Clean
Keep it Clean (your site, I mean)
When you add a data view web part to a page in your site, you’ll notice that when you Save, you get the following message:
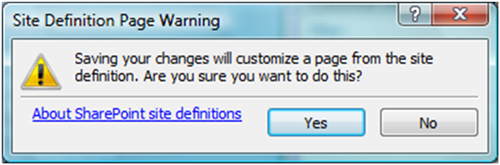
The answer to this is NO, not really. This is called “unghosting” a page, when you customize it away from the site definition. Back in SharePoint 2003, this was a big no-no, but in SharePoint 2007, it’s not the end of the world. The best practice, though, is to keep your sites nice and neat and tidy, and NOT unghost them if at all possible. Here’s a link to a discussion forum where someone asked about this.
This is pretty easy, and is applicable in most scenarios when using the data view web part. Basically, you create a blank web part page on your site, open that web part page in SharePoint Designer, and create your data view web part. Then, you save your (temporary) web part page, and click YES to the site definition page warning.
** One thing to remember about MOSS publishing sites, is that pages in page libraries cannot be edited in SPD at all, so you have to use this method in order to put DVWP’s on those pages.
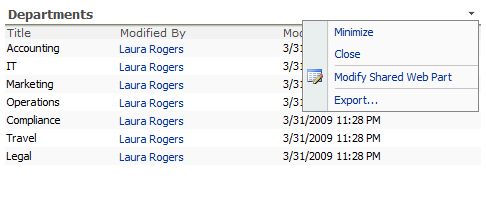
Then, here’s the trick… open the page in the browser, export it, and then simply import this web part onto whatever page (like default.aspx) you’d like it to be displayed on. Here’s how:
- Once you’re viewing your temporary web part page in the browser, click the drop-down box in the top right corner of the web part, and click <Export…>
- Save this file to your hard drive, or as I do, to a folder called “Pieces Parts”. Remember where you put it.
- Now, in the browser, go to the page on your site, such as default.aspx. Click <Site Actions> and <Edit Page>
- Click the <Add a Web Part> button, and click <Advanced web part gallery and options> at the bottom right.
- At the top of the web part toolpane on the right side of the page, click the word <Browse> and then on the drop-down, click <Import>
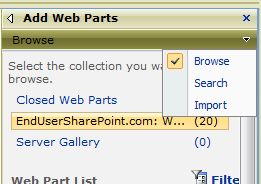
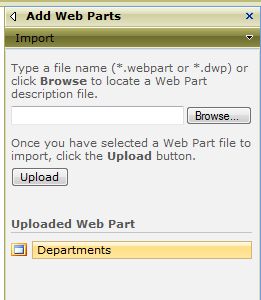
- Now the web part toolpane will look like this:
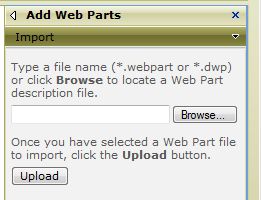
- Click <Browse…> to navigate to that web part that you saved to your hard drive back in step 2. Click <Open>. Click <Upload>
- Now, you’ll see your uploaded web part.
- Just drag it onto the page, into whatever web part zone you want it to be displayed in. Alternately, you can click the Add To drop-down box at the bottom of this web part toolpane, and select the zone you want, and click <Import>
- Now, you can just go delete that original web part page that you created this web part on, and if you ever need to modify this web part, you can create a new web part page, import the web part onto that page, and THEN edit that page in SharePoint designer, preview in the browser, and start all over from step 1.
Done. Now you’ve added a data view web part to a page, the proper and clean way. Another note about that.. having worked with data view web parts for 4 or 5 years (since SharePoint 2003), I know that I tend to unintentionally “hose up” sites when I’m editing them in SharePoint designer. So, this method ensures that anything I’ve done (bad) to the page won’t affect anything, and only the web part will be saved cleanly. Oh, and this is not to say that data view web parts can’t get hosed up. They can, which is one of the things I’ll be covering in my workshop series on this site, and teaching the pros and cons and how to get it right.
 Author: Laura Rogers, Birmingham, AL
Laura Rogers is currently a SharePoint Administrator at HealthSouth Corporation in Birmingham, Alabama. She has ten years of experience with Microsoft’s messaging and collaboration systems. This includes four years in SharePoint implementation, training, and customization. Laura has been a MCSE since 1999, with her most recent certifications being MCSE 2003 + Messaging, MCTS in MOSS and MCTS in WSS 3.0 Configuration. She also wrote a chapter in the Microsoft Office SharePoint Server 2007 Administrator’s Companion by Bill English.
- New Article Series: Laura Rogers on Data View Web Part Basics
- Data View Web Part, The Basics - Insert a DVWP on Your Page
- 6 Minute Screencast: Insert a Data View Web Part onto a SharePoint Page
- Data View Web Part, The Basics - Folders
- 3 Minute Screencast: Use DVWP to display all files, even those stored in folders!
- Data View Web Part, The Basics - Add a Hyperlink
- Data View Web Part, The Basics - Keep it Clean
- Data View Web Part, The Basics – Multiple Edit Forms
- 3 Minute Screencast: Data View Web Part, The Basics – Multiple Edit Forms
- Live Online Workshop - Data View Web Part Solutions: Part 2
- 5 Minute Screencast: SharePoint Web Services for Non-Developers
- 3 Minute Screencast: Merging SharePoint Document Libraries
- 2 Minute Screencast: Permissions Dashboard
- 4 Minute Screencast: Join View of SharePoint Lists
- Get it Together: Groups and Totals in the Data View Web Part (Screencast)
- SharePoint: Open Links in a New Browser Window (Screencast)
- How to Create a SharePoint Data View Web Part “Rollup” (Screencast)
- SharePoint: "New" Icon (Screencast)
- Display a SharePoint List on Another Site (Screencast)
- Customize the "no items" Display Text in SharePoint (Screencast)
- SharePoint: Displaying Calculated Column SUMS in a View (Screencast)


 on
on
There is a simpler way, I think.
The reason you can’t edit pages with SP Designer is that ‘Pages’ are list items, with an associated ‘Page Layout’. SharePoint Designer will let you edit the Page Layout, but not the page… …as there isn’t a file to edit.
Unless you detach a Page from it’s Page Layout. If you do that, SharePoint Designer goes and merges your Page and Page Layout. You can then open and edit the page in Designer, and add your DataView Web Part normally.
Right click on the ‘Page’ you want to edit in your pages library, and select ‘Detach’.
The disadvantage of this is that your page is no longer connected to your page layout. Changes to it won’t affect your page anymore :(
Thank you so much for this, Laura. As a beginner, this is just the kind of advice I need to help me keep things clean.
Thanks Laura. This was a big help to me. I’ve learned a lot from your site and workshops.
Thanks, Laura! For web parts that expect to see minimal modifications after initial development and deployment, this sounds like a great practice. I can immediately identify a number of pages that would benefit from being recreated using this process. And I will recommend it when applicable in the future.
Great post!
Rick
Thanks for this Laura, I love what can be done with the dvwp – and have made mockups of those things before – but have not been able to use any of it in production (yet) because of wanting to “keep it clean” — I am trying out your technique of importing an exported version of my dvwp – and I keep getting
“The specified view is invalid” when I try to import it on the non detached page
I am hoping it is something simple that you can steer me on – thanks
I have getting the exact same “specified view is invalid”, but only when the dvwp has the “SharePoint List Toolbar” option checked. If I don’t show the toolbar, it works fine.
But of course, I need the toolbar…Any ideas?
A little update on the specified view error
I opened the .webpart file – and did some “finding” on the term “view” I found a tag that had a long numeric value for the “viewflag”
LONGNUMBER
I cleared that out and it worked!
I have been stuggling to learn how to get this to all work and here are a few “gotcha’s” I’ve found:
1. in this case – I started by putting my listview webpart on a page – then set it to an existing view – in the wp props panel – then edited it to get it close to what I was after (like the correct fields and filtered etc..) Then I went into spd and converted it to xslt – that is probly where the “view” value came from = so follow Laura’s instructions above – and get the list in clean – then do the filtering and styling in SPD
2. you can’t have columns in your list – that are “broken” like if you’re experimenting with calculated columns and such (otherwise SPD can’t bring the list in as xslt) you get an error as soon as you conver to xslt (or add a dvwp)
Hope that helps somebody
LOVE THE DVWP!
the xml got stripped from my last comment
here it is with brackets in place of the greaterthan/lessthan tags
[property name="ViewFlag" type="string"]
LONGNUMBER I REMOVED
[/property]
Lifesaver, thanks
paisleygo,
Glad that is working for you but even after trying your suggestion, I still get Invalid View anytime I attempt to include the toolbar. Wonder why it worked for you and not for me.
make sure you are adding the dvwp back onto a page in the same site – as it hardcodes the ListID (GUID) so if you put it on a page in a different site – it will no longer know about that list- if you need to change the list ID – do some “finding” on the webpart file – for LIstID – it’s in there about 4 or 5 times
to find the list id to replace it with – go to the list settings page – and it will be in the url – (encoded) – I found this cool page to unencode it http://www.us-webmasters.com/Decode-URLs/
I have done that. Actually to figure out this toolbar issue, I am simply importing the exported dvwp on to the very same page I used to create it. Even when doing that, I get the invalid view error.
Again, if no toolbar, I am able to export and use fine anywhere (I replace ListId with ListName to avoid the GUID issue when using on different site)
Ben – I was curious if adding a toolbar would cause issues for me – so I tried it and when I add it in SPD I get a null reference error -in the design view even before trying to export it. I am out of ideas – but would love to hear more thoughts from people about how they go about troubleshooting this technique – Laura?
You can “unghost” a page, add the webparts you want, and then in SPD “Reset to Site Definition” the page you “unghosted”. The webparts you added will remain intact and will also maintain the site definition.
I have read in different articles to change ListId to ListName to avoid any problem in deployng DVWP to any other system. My problem is that i am using a list of another site in my DVWP. Basically the list in on root site while the page on which it is using via DVWP is on a subsite 2 levels below from root site. So i think only changing ListID to ListName will not be enough.
Can you tell me how to configure my new DVWP so that it can be deployed on other system where there will be list of same name on root site?
Hi Laura,
In my webpart I have multiple filters. But the isssue is that I cant retain the filter selections. For eg: I select Sponser filter and click a value, the dataview webpart shows relevant record. Now I select Type filter and click a value, the dataview webpart shows relevant selections for the two filters but then the selected value in Sponser filter becomes “All”. Can you help?