
Installing printers through SharePoint
 Guest Author: Dave Pyett
http://davepyett.wordpress.com/
A good while ago, there was a lot of discussion on the Microsoft Technet forums about how to use SharePoint to allow end users to install network based printers. A few ideas were batted back and forth and ultimately, it came down to uploading a bunch of links that pointed to each printer object on the closest server (i.e. \\servername\printername).
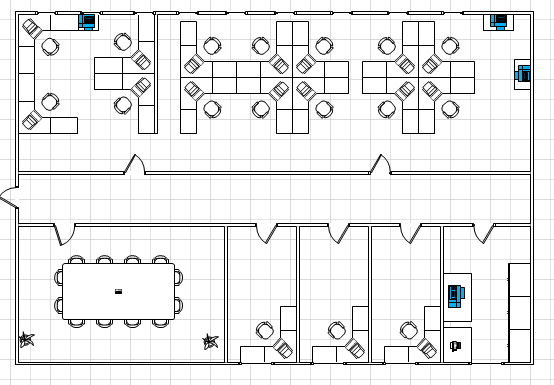
This worked fine and you could even add some custom columns to group them by office, floor number etc but it lacked some “finesse”. I thought I’d go about making this into a much more user friendly and graphical experience and came up with a pretty simple way to display a floor plan of the office which the user could then use to locate their closest printer and install it with a click. This is especially useful where staff members are visiting from other offices (and hence do not know the layout of the office and printer names).
So how is this achieved? It’s actually pretty simple but can take some time to set up. So let’s get cracking.
You will need:
- Visio to create your floor plans.
- Visio viewer installed on all client machines.
- A small vbs script for each printer. Note: you will need to ensure vbs files are allowed in your environment.
- A document library to store the scripts and Visio diagram(s).
Scripts:
Let’s start by setting up the scripts. Create a new txt file on your desktop and open it up. Copy and Paste in the following snippet of code (remembering to change the path to the printer):
' Printers.vbs - Windows Logon Script.
Set objNetwork = CreateObject("WScript.Network")
objNetwork.AddWindowsPrinterConnection \\SERVERNAME\PRINTERNAME
Save this file as YOURPRINTERNAME.vbs. Rinse and repeat for each printer. Once they have been created, upload them all to your document library. See, I told you it was easy!

Now we need to link these files to our floor plan. But wait, we don’t have a floor plan yet!
Floor Plan:
To create your floor plan, fire up Visio and design it accordingly. This part may take some time to get right, depending on how accurate you want to be and how experienced you are with Visio.
Hint: Your facilities department may already have access to existing Visio floor plans so check that route out first.
Once done, we now need to add some printer shapes to the appropriate places on your floor plan. I’ve filled in my printer symbols with a blue colour so they stand out a bit from the other shapes (mainly because I couldn’t find any quality printer shapes to download and the stock ones are a bit ugly).
Now you need to turn those printer shapes into hyperlinks. Do this by right-clicking the printer symbol and select Hyperlink from the menu.

Type in the URL to the relevant script in your document library, give it a useful description and click OK. Repeat this for each printer shape on your diagram. When you are happy, save the file and upload this into the same document library we created earlier.
Note that if you have multiple floors in your building, you can add each floor plan into its own page within your Visio file (remember to rename the pages as Floor 1, Floor 2 etc).
We’re nearly done so stay with me. All that’s left is to display your floor plan in SharePoint and we’re good to go.
Configure SharePoint:
Browse to the SharePoint page where you want to display the floor plan and click on Site Actions | Edit Page.
Add our good friend, then content editor web part (CEWP) to this page.
Open the source editor of the web part and paste in the following code (changing the path to the Visio file accordingly):
<OBJECT classid="CLSID:279D6C9A-652E-4833-BEFC-312CA8887857"
codebase="http://www.microsoft.com/downloads/info.aspx?na=90&p=&SrcDisplayLang=en&SrcCategoryId=&SrcFamilyId=d88e4542-b174-4198-ae31-6884e9edd524&u=http%3a%2f%2fdownload.microsoft.com%2fdownload%2f6%2ff%2f5%2f6f569198-e7d0-49af-b162-54a11f38d301%2fvisioviewer.exe"
id="viewer1" width="100%" height="500">
<param name="BackColor" value="16777120">
<param name="AlertsEnabled" value="1">
<param name="ContextMenuEnabled" value="1">
<param name="GridVisible" value="0">
<param name="HighQualityRender" value="1">
<param name="PageColor" value="16777215">
<param name="PageVisible" value="1">
<param name="PropertyDialogEnabled" value="1">
<param name="ScrollbarsVisible" value="1">
<param name="ToolbarVisible" value="1">
<param name="SRC" value="http://PATH TO YOUR VISIO FILE">
<param name="CurrentPageIndex" value="0">
<param name="Zoom" value="-1">
</object>
Customise these parameters as you need and click OK. The main points to customise here are the Height, BackColor and PageColor parameters as these will have the most impact on the look and feel of the webpart.
Now when the page refreshes, you should see your floor plan. If you created multiple pages, then these will be shown at the bottom of the diagram. Click one of your printer symbols to see it fire up the script and install the printer.

Note that the Visio viewer allows the user to zoom in and out and pan around the diagram so you get a pretty decent experience here and with SharePoint 2010 on the horizon the user experience will be even better due to the new Visio Services.
Guest Author: Dave Pyett
http://davepyett.wordpress.com/
Dave has been working in the IT industry for 10 years now but has only recently been introduced to the SharePoint world. Since discovering SharePoint a couple of years back, Dave has developed an ever growing passion for SharePoint and Social Media alike and is responsible for the day-to-day SharePoint administration/architecture within Scotland’s largest Chartered Accountancy firm
AWESOME! I did something similar once before in VBScript but it lacked the visual and easy web delivery. It was a login script that added a printer (if you had none) bases on our AD location attribute. Very nice work! Thanks for the write up. PS – This does require a print server and smaller shops may need a fancier VB script for direct IP add.
Great article. Also, I’ve used the CEWP for displaying Exchange inbox and public folders, and videos (using EUSP articles), but I didn’t know about using the CEWP for displaying Visio diagrams.
just wanted to say, way to take a simple concept and make it really really practical. Definately going to implement something like that for our department.
Thanks!
I think this is a very imaginative use of SharePoint and think it can add great value to an implementation, but there may be some server administrators that may find it alarming that you are uploading VBScript files into SharePoint. Are there any other methods that can get this accomplished without having to do the VBScript files, especially if the administrator has blocked these files?
Okay, I just confirmed in a client’s environment that the default install of SharePoint will block VBS files.
Hi Guys,
I did something very similar to this outside of SharePoint.
Chris, I am very interested if this causes similar administrative concerns.
I also used Visio, but saved the document as a web page, removing the need to deploy the Visio viewer.
I then added some VBS code to the page, and made sure that each printer was a button that called the VBS functions. There is also error handling for permissions errors.
-The user goes to the page, selects the floor of the building they are on.
-The user clicks on the printer they want to install and are prompted if they want to set the printer as the default.
One of the big challenges that I had was getting the site to be “Trusted” by my Windows workstations.
I have not tried to move this to SharePoint, but was one of the projects I am considering for the next year. The VBS is embedded directly into the HTM page.
Sub NetPrinter1 ( PrinterToMap )’ Sub to map printers that is passed parameters by OnClick events
On Error Resume Next
PrintServer = “”
Err.Clear
Dim UNCPath : UNCPath = “\\” & PrintServer & “\” & PrinterToMap
Set NetPrinter = CreateObject(”WScript.Network”)
NetPrinter.AddWindowsPrinterConnection UNCPath
If Err.Number = 0 Then
MsgBox PrinterToMap & ” has been installed.”,,”GlenPrint 2.0″
DefaultPrinter PrinterToMap
Elseif Err.Number = 70 Then
MsgBox “You do not have appropriate permissions to use ” & PrinterToMap & “. ” & VbCrLf & “Please check with your team lead or submit a ticket at http://helpdesk.“,,”GlenPrint 2.0″
End If
NetPrinter1 = Err.Number
End Sub
Sub DefaultPrinter( PrinterToMap )
Const wshYes = 6
Const wshNo = 7
Const wshYesNoDialog = 4
Const wshQuestionMark = 32
PrintServer = “”
Set objShell = CreateObject(”Wscript.Shell”)
intReturn = objShell.Popup(”Would you like to make ” & PrinterToMap & ” your default printer?”, _
10, “GlenPrint 2.0″, wshYesNoDialog + wshQuestionMark)
If intReturn = wshYes Then
Set objPrinter = CreateObject(”WScript.Network”)
objPrinter.SetDefaultPrinter “\\” & PrintServer & “\” & PrinterToMap
MsgBox PrinterToMap & ” is now your default printer.”,,”GlenPrint 2.0″
End If
End Sub
<link rel="shortcut icon" href="http:///favicon.ico” />
Welcome to GlenPrint
<area href="../floor2.htm" shape="rect" coords="108, 457, 227, 540" onclick=netprinter1('’) />
Chris,
Totally agree on the vbs front. This was something that I struggled with as I didn’t want to use these. Couldn’t find another file format that would work (outside of the default block list in SharePoint). Shame that the block list affects the whole system and you can’t allow certain files for given library.
I’ll keep looking for an alternative and if I come up with something, will post a follow-up.
If anyone knows of an alternative, please get in touch.
Very cool Justin. I like the embedded code to work around .VBS blocked file type.
We have our SharePoint Intranet in the IE “Trusted Sites” via GPO and it has proved helpful for many things like this where you want extra rich functionality.
http://www.tomshardware.com/forum/219955-46-adding-trusted-sites-group-policy/
Justin,
I don’t see anything that would be a problem with your solution. It still make some server administrators weary, but since the code is embedded in the web page it should work similar to javascript. However, remember that VBScript may not fire in browsers other than IE (there may be plug-ins for other browsers, but I’m definately not an authority on browsers).
As Jeff points out, as long as the site is in the Trusted Sites or Intranet Zone of IE, you should face no issues with your solution.
Thanks for the feed back! I am fortunate to have a standardized and controlled environment to deploy this in. This was my first real VBS project, and was deployed in 2005 to support our HQ relocation. I was on a small desktop team responsible for moving and setting up about 600 users and over 900 PCs. The new building had a whole new printer naming convention and was a much larger space than we had previously. Using this code, we empowered the 600 users to locate and install their own printers, avoiding calls to the helpdesk or visits from my desktop crew. At the same time the site is an online map of the building that showed printers, conference rooms, bathrooms, soda/ice/coffee machines, offices, and cube numbers. People used the site for more than just installing printers; they used it to become more familiar with the new building. Win/Win
The code has worked flawlessly and is still in production today.
Thanks for the tip on the GPO, I believe that is how we have it set now. The big challenge was convincing the Change Committee that we weren’t going to break anything! …and we didn’t.
This great article has spawned some great ideas within our company. Just curious if there is a similar viewer for Firefox?
Roxanne,
Great that you found it useful. I’m not aware of a visio viewer for Firefox. An alternative would be to install the ie tab extension for firefox and use the IE engine for the page where you are displaying the CEWP. Just did a quick test on my machine and this works OK.
Thanks Dave for this great idea. When you have a lot of print queues, making the vbs files for each can be tedious. So I made a vbs script to auto create the vbs files for each print queue on a particular server.
———————————————————————
‘This script will create vbs scripts for each print queue on the server
‘Be sure to create a subfolder “printers” before running
Dim ServerName, Computer, PrintQueue
‘ Change the Server Name
ServerName = “Your Server Name”
‘ Converts name to uppercase
uServerName=ucase(ServerName)
Dim fso, winfile, adlogfile
Const ForWriting = 2, ForAppending = 8
Set fso = CreateObject(”Scripting.FileSystemObject”)
‘Create Log file in a csv format
Set adlogfile = fso.OpenTextFile(ServerName&”-printers.txt”, ForWriting, True)
adlogfile.writeline “PrinterName;FileName;Description”
Set Computer = GetObject(”WinNT://” & uServerName & “,Computer”)
Computer.Filter = Array(”PrintQueue”)
‘ Creates the vbs file per print queue
For Each PrintQueue In Computer
‘ Create file system objects to create user account import files for external systems
cleanname=ucase(PrintQueue.PrinterName)
printername=replace(cleanname,”\\”&uServerName&”\”,”")
‘Uncomment the following if you want to see each print queue before its created
‘wscript.echo printername
filedate= “printers\”&printername&”.vbs”
Set winfile = fso.OpenTextFile(filedate, ForWriting, True)
winfile.writeline “Set objNetwork = CreateObject(”&chr(34)&”WScript.Network”&chr(34)&”)”
winfile.writeline “objNetwork.AddWindowsPrinterConnection “&chr(34)&PrintQueue.PrinterName&chr(34)
adlogfile.writeline printername&”;”&filedate&”;”&PrintQueue.Description
‘ Close export files
winfile.close
set winfile=nothing
set cleanname=nothing
set filedate=nothing
set printername=nothing
Next
adlogfile.close