
Collapsible Web Parts in a Zone Using jQuery for SharePoint 2007
 Guest Author: Brandon Anderson
Simply put, this plug-and-play solution will add a “+” or “-“ to every web part in a given web part zone, allowing users to click the web part title to control the visible state of the web part. You can control the default state of each web part by setting the Chrome State on the web part.
On past projects I have made web parts collapsible by wrapping web part zones with code in the page layout. The disadvantage with this approach is that it is not adjustable by the client without modifying the page layout. A project I just wrapped up required the flexibility for site owners to add or remove web parts that automatically became collapsible. This project was for SharePoint 2010, but I converted the solution to work with SharePoint 2007.
Solution
This solution will work for WSS 2007 and MOSS 2007, and it makes use of Mark Miller’s Scripting Resource Center. Please follow Mark’s instructions so you have the proper libraries to follow along below. My code includes paths to these libraries and references them by name, so it is important to have your Scripting Resource Center at the root of your site collection and that you use the filenames as given below. The script, CSS, HTML, and images for this solution will be stored in your Scripting Resource Center library, to which you will reference from a Content Editor Web Part you drop on your page. I am also supplying the pre-configured Content Editor Web Parts as .dwp files that you can add to your web par gallery or import onto the page.
Step 1. Create the Scripting Resource Center libraries.
See http://www.endusersharepoint.com/2010/01/05/build-a-sharepoint-scripting-resource-center/. I assume you have created your Scripting Resource Center at the root of your site collection and assigned it the path /ScriptingResourceCenter (any deviations will require adjustments to the solution’s HTML file).
Step 2. Upload the jQuery library into the “Resources-jQuery” library of your Scripting Resource Center.
You may or may not have a jQuery library already.
- If you already have your jQuery library version of choice, upload it into your “Resources-jQuery” library.
- If you do not currently have a copy of the jQuery library, go to http://jquery.com and click the “download(jQuery);” button. Upload this file into your “Resources-jQuery” library.
Note: In the code provided, I assume you have uploaded the latest jQuery library version as of the time of this post, which is v1.4.2, and that the file is named jquery-1.4.2.min.js. If you are using a different version or file name, you will need to update the solution’s HTML file (spuiguy_collapsible_web_parts_in_zone_2007.html) to use the correct file name.
Step 3. Upload the JavaScript, CSS, and HTML files into the “Resources-Scripts” library of your Scripting Resource Center.
Download the following files from my Box.net folder and upload to /ScriptingResourceCenter/ResourcesScripts:
- spuiguy_collapsible_web_parts_in_zone_2007.css
- spuiguy_collapsible_web_parts_in_zone_2007.html
- spuiguy_collapsible_web_parts_in_zone_2007.js
- spuiguy_collapsible_web_parts_in_zone_2007_instance.html
Note: The script in spuiguy_collapsible_web_parts_in_zone_2007.html that tests for and writes the reference to the jQuery library is borrowed from Christina Wheeler’s post “Transparent Overlays for SharePoint Interface Enhancement.”
Step 4. Upload the images into the “Resources-Images” library of your Scripting Resource Center.
Download the following images from my SPUIGuy blog and upload to /ScriptingResourceCenter/ResourcesImages:
Step 5. Upload the Content Editor Web Parts into your site collection’s web part gallery.
Download the following web parts from my Box.net folder and upload into your site collection’s web part gallery (located at /_catalogs/wp/Forms/AllItems.aspx). The web parts will be named “SPUIGuy: Collapsible Web Parts in a Zone 2007” and “SPUIGuy: Collapsible Web Parts in a Zone 2007 Instance,” respectively.
- SPUIGuy Collapsible Web Parts in a Zone 2007.dwp
- SPUIGuy Collapsible Web Parts in a Zone 2007 Instance.dwp
Step 6. Add the Content Editor Web Parts to your page.
On the page you wish to use this script, add the “SPUIGuy: Collapsible Web Parts in a Zone 2007” web part to any web part zone that will not be collapsible. Next, add the “SPUIGuy: Collapsible Web Parts in a Zone 2007 Instance” web part to the web part zone(s) for which you want to enable the expand/collapse. You can add the “Instance” web part to as many web part zones on a page as you wish, but add at most one per web part zone; also, put only one “SPUIGuy: Collapsible Web Parts in a Zone 2007” web part on the page.
If for any reason you need to change the path to the solution’s HTML files, edit that web part and change the Content Link property. In our example, we’re using the Content Link field value “/ScriptingResourceCenter/ResourcesScripts/spuiguy_collapsible_web_parts_in_zone_2007.html” for the “SPUIGuy: Collapsible Web Parts in a Zone 2007” web part and the Content Link field value “/ScriptingResourceCenter/ ResourcesScripts/spuiguy_collapsible_web_parts_in_zone_2007_instance.html” for the “Instance” web part.
Step 7. Set the chrome for your web parts.
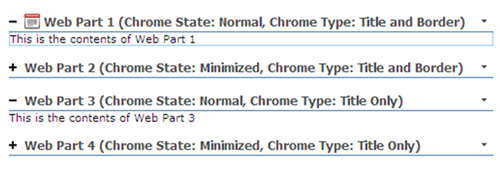
The Chrome Type setting for the web parts you want to make collapsible must be either “Title and Border” (often same as “Default” out-of-the-box) or “Title Only.”
For web parts you want to be expanded upon page load, set the web part’s Chrome State to “Normal.” For those you want to be collapsed upon page load, set the Chrome State to “Minimized.”
Step 8. Now you see it. Now you don’t. Whoa, there it is again.
If you use this solution and the implementation is viewable by the public, please leave a link in the comments. I’d love to see how it’s being used.
Notes
- You may experience a delay between time the web part is written to the page and when the solution’s stylistic treatment is applied. This is due to the loading of the jQuery library and the solution’s script file.
- This solution will only work for WSS 2007 and MOSS 2007. I will work on a 2010 version and let you know when it’s ready.
- This solution was tested in IE 7, IE 8, and Firefox 3.6.
- Any deviations from the paths and filenames used by the solution will require adjustments to either the solution’s HTML file, the web part’s Content Link path, or both.
- In the code provided, I assume you have uploaded the latest jQuery library version as of the time of this post, which is v1.4.2 and that the file is named jquery-1.4.2.min.js. If you are using a different version or file name, you will need to update the solution’s HTML file (spuiguy_collapsible_web_parts_in_zone_2007.html) to use the correct file name.
- If you do not want to make this web part available in the gallery, you have the option to import the web part onto the page on which you wish to use it using the standard web part import process.
Guest Author: Brandon Anderson
Brandon Anderson is a SharePoint user interface and look-and-feel specialist. He brings over 10 years experience with front-end web development to SharePoint implementations requiring customized branding. For the past 3 years, Brandon has worked extensively with the UI customization of SharePoint sites, both public and restricted-access, for clients of various sizes and industries. Brandon is the lead Microsoft SharePoint front-end developer for Ironworks Consulting (www.ironworks.com) and hosts the blog SPUIGuy (spuiguy.wordpress.com), where he writes about the user interface customization of SharePoint. Follow Brandon on Twitter @SPUIGuy.
- SharePoint: Using jQuery to Wrap Web Parts and Achieve the Unachievable
- Using jQuery to Wrap Web Parts and Achieve the Unachievable: The Packaged Solution
- Collapsible Web Parts in a Zone Using jQuery for SharePoint 2007
- Collapsible Web Parts in a Zone Using jQuery for SharePoint 2007
- SharePoint: Using jQuery to Wrap Web Parts and Achieve the Unachievable
- Using jQuery to Wrap Web Parts and Achieve the Unachievable: The Packaged Solution
- Collapsible Web Parts in a Zone Using jQuery for SharePoint 2007
- Collapsible Web Parts in a Zone Using jQuery for SharePoint 2007


 on
on
My company doesn’t allow me to access box.net site. Can someone please pass me the files any other way?
Shalin, if you would like to direct message me on Twitter @spuiguy with your email address I can email them. Unfortunately, I can’t upload these file types to my blog, otherwise I’d put them there.
Hi Brandon Nice Article
I was trying to do this with Dataview webpart but no Luck will this work with DVWP ?have you tried with DVWP?Basically what i did is took Jquery,Css and paste it in Webpart page which have four DVWPS.
Used + and – images from _layouts/images.May be i am doing something wrong here
Ron
I have not tested with a DVWP, but I think as long as the DVWP is in a web part zone and you follow the steps above it should work. When I get a chance, I’ll test it out with a DVWP.
Can we have this working for Sharepoint 2010.. I would love to do something like this/…