
SharePoint: Extending the DVWP – Part 1: Layout Enhancement – Rearranging Columns – Default and Edit Templates
 Author: Jim Bob Howard
You probably know from reading Laura Rogers‘ posts that one of the great things you can do with the Dataview Web Part (DVWP) is use it to edit list items without ever having to leave your list page. (See Laura’s post: 3 Minute Screencast: Data View Web Part, The Basics – Multiple Edit Forms.)
I want to show you how you can extend that functionality even further.
I have used the information from Laura’s screencast many times since I first watched it. One problem I recently ran into is that SPD adds the links to the left and my requirements were to have them on the right.
So I moved them.
Note: For this article, we’ll only be looking at the Default and Edit Templates. We’ll look at the Insert Template in a future article.
What Won’t Work
First, let’s talk about what won’t work. Moving the column in Design seems like it would work, but doesn’t:
Non-working Steps
From the Design pane in SPD:
- Right-click on the link column and choose Select > Column.
- Right-click again and choose Cut.
- Right-click on the right-most column and choose Insert > Column to the Right.
- Right-click on the new column and choose Paste.
- Right-click on the right-most column (still empty) and choose Delete > Delete Columns
At first, this will appear to work, but you’ll soon see that the links have gotten messed up on the Edit Template: the save and cancel links have been replaced with the edit and delete links from the Default Template, but they haven’t moved to the right column like we planned.
To do it right, we’ll need to edit the XSL (eXtensible Stylesheet Language) for the page. For more information on XSLT Templates, see Marc Anderson’s excellent series, Unlocking the Mysteries of Data View Web Part XSL Tags.
Rearranging the Columns
We’ll need to move three things, because this page is divided into three functional areas, all of which help draw the column that contains the edit and delete column:
- the table header row,
- the column in the Default Template, and
- the data column in the Edit Template.
- First move the header cell…
- In the Design pane in split mode, click on the cell above the top pair of edit / delete links
- The Code pane will now show where in the code that this is being drawn
- Since we’re moving the links column to the far right, we’ll also need to move this header cell over to correspond with that column.
- Simply change…
- Then move the default data cell…
- Again, from the Design pane in split view, click on first cell next to the edit/delete links (not the links themselves)
- Notice that the part you want to move is actually inside a block that checks to see what mode we’re in (if test="$dvt_1_automode = ‘1′"). Don’t worry about all of those details, just know that this portion of the template is what causes the edit and delete links to be drawn for each particular row.
Move the entire <xsl:if> block down to the end of the list, which will cause it to be drawn last (read: on the far right) on the row:
Click on the cell above the edit/delete links
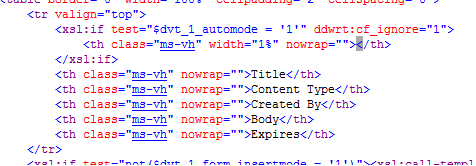
The grey box shows where the cell is that is drawing this blank space above the edit/delete links
<tr valign="top">
    <xsl:if test="$dvt_1_automode = '1'" ddwrt:cf_ignore="1">
        <th class="ms-vh" width="1%" nowrap=""></th>
    </xsl:if>
    <th class="ms-vh" nowrap="">Title</th>
    <th class="ms-vh" nowrap="">Content Type</th>
          . . .
    <th class="ms-vh" nowrap="">Expires</th>
</tr>
…to…
<tr valign="top">
    <th class="ms-vh" nowrap="">Title</th>
    <th class="ms-vh" nowrap="">Content Type</th>
          . . .
    <th class="ms-vh" nowrap="">Expires</th>
    <xsl:if test="$dvt_1_automode = '1'" ddwrt:cf_ignore="1">
        <th class="ms-vh" width="1%" nowrap=""></th>
    </xsl:if>
</tr>
In the Design pane, click on the first field to find the code in the Code pane.
<xsl:if test="$dvt_1_automode = '1'" ddwrt:cf_ignore="1">
    <td class="ms-vb" width="1%" nowrap="">
        <xsl:call-template name="dvt_1.automode">
            …
        </xsl:call-template>
    </td>
</xsl:if>
<td class="ms-vb">
    <xsl:value-of select="@Title"/>
</td>
<td class="ms-vb">
    <xsl:value-of select="@ContentType"/>
</td>
. . .
<td class="ms-vb">
    <xsl:value-of select="ddwrt:FormatDate(string(@Expires), 1033, 5)"/>
</td>
…to…
<td class="ms-vb">
    <xsl:value-of select="@Title"/>
</td>
<td class="ms-vb">
    <xsl:value-of select="@ContentType"/>
</td>
. . .
<td class="ms-vb">
    <xsl:value-of select="ddwrt:FormatDate(string(@Expires), 1033, 5)"/>
</td>
<xsl:if test="$dvt_1_automode = '1'" ddwrt:cf_ignore="1">
    <td class="ms-vb" width="1%" nowrap="">
        <xsl:call-template name="dvt_1.automode">
            …
        </xsl:call-template>
    </td>
</xsl:if>
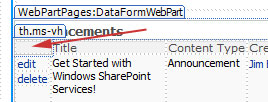
Save the page and look at it in the browser; it now looks similar to this:

The edit/delete links and the space in the header have moved to the far right
But Wait… There’s More
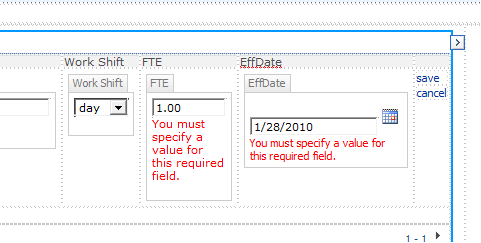
Since we’re working with a DVWP, and since we’ve turned on the edit and delete links, we have another view we need to modify so that our links are on the right in both views.
If you save this page and open it up in your browser, clicking on an edit link does not open the EditForm.aspx form, but instead will redraw this page with all of the editable fields for that record replaced with editable controls.

Edit template, as seen from the browser. Notice the header row doesn’t line up right.
To see what it looks like in SPD:
- Click on the arrow (or chevron) that appears when you hover over the webpart, and
- Choose Edit Template from the Data View Preview list.
- Click on one of the fields in the Display pane (not the links, but one of the actual fields), and we’ll find that we’re in a different template in the Code pane: dvt_1.rowedit. Again, we’ll move the entire <xsl:if> block:
- Again, we’ll move the template call from the top to the bottom since each of these is simply a <td> block within the same <tr>.
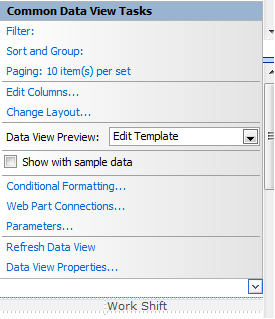
Data View Preview = Edit Template
Notice that we now have an issue with our page: the headers don’t line up…

Headers are off by one (Title is over the links; Content Type is over Title; et.al.)
That’s because both templates use the same header row, but draw their own data rows. But, we can easily fix that by repeating our previous steps to move the save/cancel cell to the far right.
<xsl:template name="dvt_1.rowedit">
  <xsl:param name="Pos" />
  <tr>
    <xsl:if test="$dvt_1_automode = '1'" ddwrt:cf_ignore="1">
      <td class="ms-vb" width="1%" nowrap="nowrap">
        <xsl:call-template name="dvt_1.automode">
          …
        </xsl:call-template>
      </td>
    </xsl:if>
    <td class="ms-vb">
      <SharePoint:formfield … FieldName="Title" ... />
      <SharePoint:fielddescription … />
    </td>
    <td class="ms-vb">
      <xsl:value-of select="@ContentType" />
    </td>
    . . .
    <td class="ms-vb">
      <SharePoint:formfield … FieldName="Expires" ... />
      <SharePoint:fielddescription … />
    </td>
  </tr>
</xsl:template>
<xsl:template name="dvt_1.rowedit">
  <xsl:param name="Pos" />
  <tr>
    <td class="ms-vb">
      <SharePoint:formfield … FieldName="Title" ... />
      <SharePoint:fielddescription … />
    </td>
    <td class="ms-vb">
      <xsl:value-of select="@ContentType" />
    </td>
    . . .
    <td class="ms-vb">
      <SharePoint:formfield … FieldName="Expires" ... />
      <SharePoint:fielddescription … />
    </td>
    <xsl:if test="$dvt_1_automode = '1'" ddwrt:cf_ignore="1">
      <td class="ms-vb" width="1%" nowrap="nowrap">
        <xsl:call-template name="dvt_1.automode">
          …
        </xsl:call-template>
      </td>
    </xsl:if>
  </tr>
</xsl:template>
But now that we’ve done that in the Code pane and click on the Design pane, it reverts to Default view, so we have to switch back to Edit Template like we did in Step 2, above, to see how our changes look.
Design view with the save/cancel block moved to the right side
And there you have it: Action links on the right-hand side of a DVWP for edit and/or delete.
The final page layout now looks like this:

Default Template

Edit Template
Next time in the Extending the DVWP series, we’ll do the same thing to the Insert Template.
Author: Jim Bob Howard
Jim Bob Howard is a web designer / webmaster in the healthcare industry. He has been working with SharePoint since March 2009 and enjoys sharing what he has learned. He is a moderator and frequent contributor to Stump the Panel, and answers SharePoint questions on Twitter (@jbhoward) and via email ([email protected]).
- SharePoint: Extending the DVWP - Part 1: Layout Enhancement - Rearranging Columns - Default and Edit Templates
- SharePoint: Extending the DVWP - Part 2: Layout Enhancement - Rearranging Columns - Insert Template
- SharePoint: Extending the DVWP – Part 3: Getting it All on One Line - DVWP Function Action Links
- SharePoint: Extending the DVWP – Part 4: Turning DVWP Action Links into Buttons
- SharePoint: Extending the DVWP – Part 5: Doing Stuff Before Save on Submit - PreSaveAction()
- SharePoint: Extending the DVWP – Part 6: Examining the Form Action Links
- SharePoint: Extending the DVWP – Part 7: Creating a Form Action Workflow
- SharePoint: Extending the DVWP – Part 8: Creating a Form Action Workflow - The After Math
- SharePoint: Extending the DVWP – Part 9: Oops! Failed Setting Processor Stylesheet
- SharePoint: Extending the DVWP – Part 10: Passing Workflow Variables to a Form Action Workflow
- SharePoint: Extending the DVWP – Part 11: Getting More Form Fields to the Workflow
- SharePoint: Extending the DVWP – Part 12: Adding More Form Fields from the Data
- SharePoint: Extending the DVWP – Part 13: Putting PreSaveAction() to Work – Creating Variables
- SharePoint: Extending the DVWP – Part 14: Putting PreSaveAction() to Work with jQuery
- SharePoint: Extending the DVWP – Part 15: User-Managed Dropdowns with Site Columns
- SharePoint: Extending the DVWP – Part 16: User-Managed Dropdowns - Loading Data
- SharePoint: Extending the DVWP – Part 17: User-Managed Dropdowns – Creating a Relationship list
- SharePoint: Extending the DVWP – Part 18: User-Managed Dropdowns – Loading the Relationship list – Part 1
- SharePoint: Extending the DVWP – Part 19: User-Managed Dropdowns – Loading the Relationship list – Part 2
- SharePoint: Extending the DVWP – Part 20: Cascading Dropdowns - Applying the jQuery
- SharePoint: Extending the DVWP – Part 21: Cascading Dropdowns - Three-tier Cascade
- SharePoint: Extending the DVWP – Part 22: Creating Title Based on Other Fields with jQuery
- SharePoint: Extending the DVWP – Part 23: Creating Title Based on Other Fields with a Workflow
- SharePoint: Extending the DVWP – Part 24: A Note to Readers
- SharePoint: Extending the DVWP – Part 25: Using an Audit Trail by Creating List Items with SPServices
- SharePoint: Extending the DVWP – Part 26: Modifying the Edit Template
- SharePoint: Extending the DVWP – Part 27: Adding an Alternate Edit Template to a DVWP
- SharePoint: Extending the DVWP – Part 28: Massage the Remove Template
- SharePoint: Extending the DVWP – Part 29: Modifying Form Action Workflows on the remove Template
- SharePoint: Extending the DVWP – Part 30: Using EasyTabs with Filtered DVWPs to Make Data Manageable
- SharePoint: Extending the DVWP – Part 31: Filling in Default Data on the insert Template with jQuery
- SharePoint: Extending the DVWP – Part 32: Filling in Default Data on the insert Template with Multiple DVWPs
- SharePoint: Extending the DVWP – Part 33: Modifying Total and Subtotal Row Layouts in DVWP
- SharePoint: Extending the DVWP – Part 34: Using Icons for Form Action Links
- SharePoint: Extending the DVWP – Part 35: Putting it All Together
- SharePoint: Extending the DVWP – Bonus: Fixing the Insert Form Action When "No Matching Items"
- SharePoint: Extending the DVWP – Bonus: Creating a Title Based on Dropdowns with jQuery


Jim Bob,
Really nice article!
Seems like a lot of steps for something that should work OOTB (in 5 steps).
Those 5 steps are working fine for ‘regular/ standard’ columns/fields (not the edit/save + delete + insert), aren’t they?
Greg
Thanks, Greg!
Yes, they would work for a “regular” column move. But, for that type of move, there’s an easier method.
Hover over the DVWP and click the arrow (or chevron) box,
Click on Edit Columns…
Use the Move Up and Move Down buttons to put them in the order you want
Click OK
Blessings,
Jim Bob
Thanks!
I think a lot of people are reluctant to use DVWP b/c they are not as intuitive as a List Form webpart and dont offer – at least without tweeks – some of those ‘basic’ features you would expect.
Greg
True. The DVWP is anything but ‘basic.’ ;)
If you want basic, the List Form Webpart is your buddy.
If you need to go beyond basic, the DVWP gives quite a bit of bang for the buck (as I was just saying in the STP forum): some very easy, wizard-based enhancements; plus “anything you want” via the XSL.
Blessings,
Jim Bob
I’m trying to do something similar only in my situation it’s a join view. Is it possible to allow the user to have the edit option with a joined DVWP?
When you edit, what data are you wanting to change? Remember in a joined situation, the data is connected by a relationship and it would be hard to update both lists at the same time. I don’t think the SPDataSourceControl has facility to update multiple datasources. If you were to edit, it would be for one of the joined lists only.
But if you’re ok with that, the technique is very similar. Its just extra td’s in the template. You should be able to make the exact same changes as prescribed for display as for edit, you would only be able to show one of the lists data fields.
Unless of course you CAN update multiple datasources.
You can’t edit multiple DataSources in the same DVWP. You can make the page “feel” like that’s what’s happening by tricky placement of things, but each DVWP can only update a single DataSource.
M.
Actually, Marc, you can… but it requires a form action workflow, or jQuery and SPServices, of course. ;)
I’ll work out an example to include in this series.
You got me; with code all things are possible. ;-) What I meant was that the DVWP itself couldn’t do it.
M.
Hi,
We have a series of XML’s coming in Everyday, how do i show them on the data View Webpart, i configured for one, but that is not dynamic. Please advice
Thanks,
Vidya
It depends on what your XML looks like. Marc Anderson’s new eBook is a great way to get started understanding the XSLT behind the DVWP.
Here’s the link to the book: http://ebook-dvwpxsl-01.eventbrite.com/
Blessings,
Jim Bob
PS: If you still have specific detailed questions, please post them to the Stump the Panel forum (http://www.endusersharepoint.com/STP) so, the other moderators and I will do our best to reply to you quickly.
Note that this article’s link to ” Unlocking the Mysteries of Data View Web Part XSL Tags.” is no longer valid – I believe that http://www.endusersharepoint.com/2010/01/19/unlocking-the-mysteries-of-data-view-web-part-xsl-tags-part-1-overview/ will work for the link.