
SharePoint: Extending the DVWP – Part 2: Layout Enhancement – Rearranging Columns – Insert Template
 Author: Jim Bob Howard
In my last article, I showed you how to move the edit/delete links in the DVWP from the left side of the page, to the right.
Rinse, Repeat…
Of course, if we added the insert link, we need to do the same thing with the Insert Template.
- Switch Views
Switch to the Insert Template, by clicking on the arrow (or chevron) that appears when you hover over the webpart in the Design pane. - Find the template
This time, we’re looking for the template named dvt_1.rowinsert. Click on a field (not the actual save/cancel links) in the Display pane to go directly to the template in the Code pane: - Edit the Template
Again, we’ll move the template call to the bottom of the list, which will put it rightmost on our table: - Check the Display
Since we edited the code, when we click on the Display pane, it goes back to the Default template. When we switch back to the Insert Template, it now looks like this:
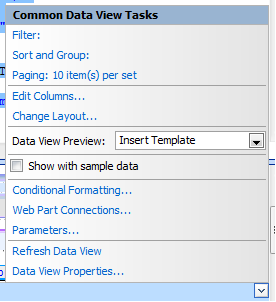
Choose the Insert Template to preview
Sure enough, it’s out of line like the Edit Template was:
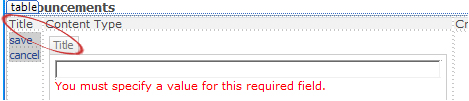
Links on the left again!
<xsl:template name="dvt_1.rowinsert">
    <xsl:param name="IsInsertMode" />
    <xsl:variable name="Pos">_new</xsl:variable>
    <tr>
        <xsl:choose>
            <xsl:when test="$IsInsertMode = '1'">
                <xsl:if test="$dvt_1_automode = '1'" ddwrt:cf_ignore="1">
                    <td class="ms-vb" width="1%" nowrap="nowrap">
                        <xsl:call-template name="dvt_1.automode">
                            …
                      </xsl:call-template>
                    </td>
                </xsl:if>
                <td class="ms-vb">
                    <SharePoint:formfield … FieldName="Title" … />
                    <SharePoint:fielddescription … />
                </td>
                <td class="ms-vb">
                    <xsl:value-of select="@ContentType" />
                </td>
                . . .
                <td class="ms-vb">
                    <SharePoint:formfield … FieldName="Expires" … />
                    <SharePoint:fielddescription … />
                </td>
            </xsl:when>
            <xsl:otherwise>
                <td class="ms-vb" colspan="99">
                    <a href="javascript: {…code…}">insert</a>
                </td>
            </xsl:otherwise>
        </xsl:choose>
    </tr>
</xsl:template>
<xsl:template name="dvt_1.rowinsert">
    <xsl:param name="IsInsertMode" />
    <xsl:variable name="Pos">_new</xsl:variable>
    <tr>
        <xsl:choose>
            <xsl:when test="$IsInsertMode = '1'">
                <td class="ms-vb">
                    <SharePoint:formfield … FieldName="Title" … />
                    <SharePoint:fielddescription … />
                </td>
                <td class="ms-vb">
                    <xsl:value-of select="@ContentType" />
                </td>
                . . .
                <td class="ms-vb">
                    <SharePoint:formfield … FieldName="Expires" … />
                    <SharePoint:fielddescription … />
                </td>
                <xsl:if test="$dvt_1_automode = '1'" ddwrt:cf_ignore="1">
                    <td class="ms-vb" width="1%" nowrap="nowrap">
                        <xsl:call-template name="dvt_1.automode">
                            …
                      </xsl:call-template>
                    </td>
                </xsl:if>
            </xsl:when>
            <xsl:otherwise>
                <td class="ms-vb" colspan="99">
                    <a href="javascript: {…code…}">insert</a>
                </td>
            </xsl:otherwise>
        </xsl:choose>
    </tr>
</xsl:template>

Save and Cancel are now on the right
And there you have it: Action links on the right-hand side of a DVWP for insert.
The final page layout for the Insert Template now looks like this:

…which, for those of you keeping score, looks very similar to the Default and Edit Templates we edited last time.


For more information on XSLT Templates, see Marc Anderson’s excellent series, Unlocking the Mysteries of Data View Web Part XSL Tags.
And keep an eye out for the next installment of Extending the DVWP, where we’ll talk about Turning DVWP Action Links into Buttons.
Author: Jim Bob Howard
Jim Bob Howard is a web designer / webmaster in the healthcare industry. He has been working with SharePoint since March 2009 and enjoys sharing what he has learned. He is a moderator and frequent contributor to Stump the Panel, and answers SharePoint questions on Twitter (@jbhoward) and via email ([email protected]).
- SharePoint: Extending the DVWP - Part 1: Layout Enhancement - Rearranging Columns - Default and Edit Templates
- SharePoint: Extending the DVWP - Part 2: Layout Enhancement - Rearranging Columns - Insert Template
- SharePoint: Extending the DVWP – Part 3: Getting it All on One Line - DVWP Function Action Links
- SharePoint: Extending the DVWP – Part 4: Turning DVWP Action Links into Buttons
- SharePoint: Extending the DVWP – Part 5: Doing Stuff Before Save on Submit - PreSaveAction()
- SharePoint: Extending the DVWP – Part 6: Examining the Form Action Links
- SharePoint: Extending the DVWP – Part 7: Creating a Form Action Workflow
- SharePoint: Extending the DVWP – Part 8: Creating a Form Action Workflow - The After Math
- SharePoint: Extending the DVWP – Part 9: Oops! Failed Setting Processor Stylesheet
- SharePoint: Extending the DVWP – Part 10: Passing Workflow Variables to a Form Action Workflow
- SharePoint: Extending the DVWP – Part 11: Getting More Form Fields to the Workflow
- SharePoint: Extending the DVWP – Part 12: Adding More Form Fields from the Data
- SharePoint: Extending the DVWP – Part 13: Putting PreSaveAction() to Work – Creating Variables
- SharePoint: Extending the DVWP – Part 14: Putting PreSaveAction() to Work with jQuery
- SharePoint: Extending the DVWP – Part 15: User-Managed Dropdowns with Site Columns
- SharePoint: Extending the DVWP – Part 16: User-Managed Dropdowns - Loading Data
- SharePoint: Extending the DVWP – Part 17: User-Managed Dropdowns – Creating a Relationship list
- SharePoint: Extending the DVWP – Part 18: User-Managed Dropdowns – Loading the Relationship list – Part 1
- SharePoint: Extending the DVWP – Part 19: User-Managed Dropdowns – Loading the Relationship list – Part 2
- SharePoint: Extending the DVWP – Part 20: Cascading Dropdowns - Applying the jQuery
- SharePoint: Extending the DVWP – Part 21: Cascading Dropdowns - Three-tier Cascade
- SharePoint: Extending the DVWP – Part 22: Creating Title Based on Other Fields with jQuery
- SharePoint: Extending the DVWP – Part 23: Creating Title Based on Other Fields with a Workflow
- SharePoint: Extending the DVWP – Part 24: A Note to Readers
- SharePoint: Extending the DVWP – Part 25: Using an Audit Trail by Creating List Items with SPServices
- SharePoint: Extending the DVWP – Part 26: Modifying the Edit Template
- SharePoint: Extending the DVWP – Part 27: Adding an Alternate Edit Template to a DVWP
- ExSharePoint: Extending the DVWP – Part 28: Massage the Remove Template
- SharePoint: Extending the DVWP – Part 29: Modifying Form Action Workflows on the remove Template
- SharePoint: Extending the DVWP – Part 30: Using EasyTabs with Filtered DVWPs to Make Data Manageable
- SharePoint: Extending the DVWP – Part 31: Filling in Default Data on the insert Template with jQuery
- SharePoint: Extending the DVWP – Part 32: Filling in Default Data on the insert Template with Multiple DVWPs
- SharePoint: Extending the DVWP – Part 33: Modifying Total and Subtotal Row Layouts in DVWP
- SharePoint: Extending the DVWP – Part 34: Using Icons for Form Action Links
- SharePoint: Extending the DVWP – Part 35: Putting it All Together
- SharePoint: Extending the DVWP – Bonus: Fixing the Insert Form Action When "No Matching Items"
- SharePoint: Extending the DVWP – Bonus: Creating a Title Based on Dropdowns with jQuery


Hello Jim,
Thank you sir for these excellent articles! I am happy that you took the time to write them. I wanted to know if you have had any trouble getting the insert link to work on the no matching items template. I inserted it on that template, but for some reason, it won’t render the insert template from there. I was told it is possible, but I can’t seem to get it to work. It posts back without any errors, but renders the wrong template. It just won’t do it without a record in the recordset. I am using SPD 2010 and a DVWP, and the page is filtered with a query string parameter. What steps am I missing? Thanks again.
Thanks, Richard. And you’re welcome.
Yes, I’ve run into that same issue with the DVWP. Definitely a bug that wipes out the appropriate template call when the list is empty. YMMV, but I’ve seen it only after I’ve edit the “empty” message. When it’s the default message, everything seems to work fine. But once I edit it, the link no longer appears.
In the SPD Design pane, the work around is to check the “Show sample data” box, which tells SPD to simulate having data. This allows you to work with the link, at least. In the actual rendered page, it’s a bit more complicated once it’s been wiped out. Sounds like an addendum to the series that I need to write. ;)
I’ll do that.
Blessings,
Jim Bob