
SharePoint: Extending the DVWP – Part 3: Getting it All on One Line – DVWP Function Action Links
 Author: Jim Bob Howard
In the last two articles, we talked about moving the function action link columns in the Default, Edit, and the Insert Templates. I want to show you one more tip that might help you with some real estate issues on this kind of page.
Dataview Web Part (DVWP) views that can display everything on one line look a little strange if the edit/delete block takes up two lines. Let’s see how we can easily get both on the same line.
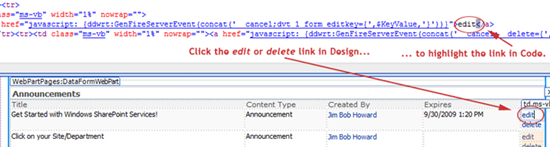
Here’s what we’re starting with:
This row is only two lines because of the stacked edit and delete links
And this is where we want to go:

Now that both links are on the same row, each row only takes up more than one if the data requires it, rather than the links forcing it.
Getting it All on One Line
This block of HTML is not a straight td like the others, it’s actually an xsl:if statement that then calls a template by passing the ID of the list item so that each block knows which item it’s editing or deleting.
So, let’s go to the template to see how it looks.
- Find the code
The name of the template we’re looking for is dvt_1.automode, but it’s easier to get to it by clicking on one of the edit or delete links in the Design pane and letting that take you to the right place in the Code pane. - Edit the code
Since we know this is such a small snippet of the page, it’s obvious that this represents all the rows within a two-row table. We want them side-by-side in one row, so we’re simply going to make it a one-row table by combining these two into one <tr> tag with two <td> tags inside. It will stay well-formed and we’ll be fine.
SharePoint doesn’t indent this piece of HTML very well. Here’s what we find:
<xsl:otherwise><tr>
        <td class="ms-vb" width="1%" nowrap="">
        <a href="javascript: {…code…}">edit</a>        </td></tr><tr><td class="ms-vb" width="1%" nowrap=""><a href="javascript: {…code…}">delete</a></td></tr></xsl:otherwise>
I’ve re-indented it to make it a little easier to read:
<xsl:otherwise>
  <tr>
    <td class="ms-vb" width="1%" nowrap="">
      <a href="javascript: {…code…}">edit</a>    </td>
  </tr>
  <tr>
    <td class="ms-vb" width="1%" nowrap="">
      <a href="javascript: {…code…}">delete</a>    </td>
  </tr>
</xsl:otherwise>
Lines 2174-5 are contained with other code on line 2172 in the non-indented code block above this.
Notice that this is inside an xsl:otherwise block, which in XSL, is a clause within an xsl:when block. That tells us that other portions of the page may be using this same template. A further clue is that the table tag is not in this block; it starts with a tr tag, which must always be nested inside a table.
But…
Just delete the highlighted rows above (or the /tr and tr tags in the first block):
<xsl:otherwise>
<tr>
<td class="ms-vb" width="1%" nowrap="">
 <a href="javascript: {…code…}">edit</a> 
</td>
<td class="ms-vb" width="1%" nowrap="" style="border-left: 1px black solid">
 <a href="javascript: {…code…}">delete</a> 
</td>
</tr>
</xsl:otherwise>
Notice the style section in line 2175: this puts an obvious line between the edit and delete links so they’re not all run together, but still take up the least amount of real estate possible. And the   adds a non-breaking space to both sides of the links to give them a more pleasant spatial aspect from surrounding text.
Unlike the last two articles, we won’t do the same thing for the Edit and Insert Templates. Instead, we’re going to make them look and act like buttons in the next article, Extending the DVWP – Turning DVWP Form Actions Into Buttons.
Author: Jim Bob Howard
Jim Bob Howard is a web designer / webmaster in the healthcare industry. He has been working with SharePoint since March 2009 and enjoys sharing what he has learned. He is a moderator and frequent contributor to Stump the Panel, and answers SharePoint questions on Twitter (@jbhoward) and via email ([email protected]).
- SharePoint: Extending the DVWP - Part 1: Layout Enhancement - Rearranging Columns - Default and Edit Templates
- SharePoint: Extending the DVWP - Part 2: Layout Enhancement - Rearranging Columns - Insert Template
- SharePoint: Extending the DVWP – Part 3: Getting it All on One Line - DVWP Function Action Links
- SharePoint: Extending the DVWP – Part 4: Turning DVWP Action Links into Buttons
- SharePoint: Extending the DVWP – Part 5: Doing Stuff Before Save on Submit - PreSaveAction()
- SharePoint: Extending the DVWP – Part 6: Examining the Form Action Links
- SharePoint: Extending the DVWP – Part 7: Creating a Form Action Workflow
- SharePoint: Extending the DVWP – Part 8: Creating a Form Action Workflow - The After Math
- SharePoint: Extending the DVWP – Part 9: Oops! Failed Setting Processor Stylesheet
- SharePoint: Extending the DVWP – Part 10: Passing Workflow Variables to a Form Action Workflow
- SharePoint: Extending the DVWP – Part 11: Getting More Form Fields to the Workflow
- SharePoint: Extending the DVWP – Part 12: Adding More Form Fields from the Data
- SharePoint: Extending the DVWP – Part 13: Putting PreSaveAction() to Work – Creating Variables
- SharePoint: Extending the DVWP – Part 14: Putting PreSaveAction() to Work with jQuery
- SharePoint: Extending the DVWP – Part 15: User-Managed Dropdowns with Site Columns
- SharePoint: Extending the DVWP – Part 16: User-Managed Dropdowns - Loading Data
- SharePoint: Extending the DVWP – Part 17: User-Managed Dropdowns – Creating a Relationship list
- SharePoint: Extending the DVWP – Part 18: User-Managed Dropdowns – Loading the Relationship list – Part 1
- SharePoint: Extending the DVWP – Part 19: User-Managed Dropdowns – Loading the Relationship list – Part 2
- SharePoint: Extending the DVWP – Part 20: Cascading Dropdowns - Applying the jQuery
- SharePoint: Extending the DVWP – Part 21: Cascading Dropdowns - Three-tier Cascade
- SharePoint: Extending the DVWP – Part 22: Creating Title Based on Other Fields with jQuery
- SharePoint: Extending the DVWP – Part 23: Creating Title Based on Other Fields with a Workflow
- SharePoint: Extending the DVWP – Part 24: A Note to Readers
- SharePoint: Extending the DVWP – Part 25: Using an Audit Trail by Creating List Items with SPServices
- SharePoint: Extending the DVWP – Part 26: Modifying the Edit Template
- SharePoint: Extending the DVWP – Part 27: Adding an Alternate Edit Template to a DVWP
- SharePoint: Extending the DVWP – Part 28: Massage the Remove Template
- SharePoint: Extending the DVWP – Part 29: Modifying Form Action Workflows on the remove Template
- SharePoint: Extending the DVWP – Part 30: Using EasyTabs with Filtered DVWPs to Make Data Manageable
- SharePoint: Extending the DVWP – Part 31: Filling in Default Data on the insert Template with jQuery
- SharePoint: Extending the DVWP – Part 32: Filling in Default Data on the insert Template with Multiple DVWPs
- SharePoint: Extending the DVWP – Part 33: Modifying Total and Subtotal Row Layouts in DVWP
- SharePoint: Extending the DVWP – Part 34: Using Icons for Form Action Links
- SharePoint: Extending the DVWP – Part 35: Putting it All Together
- SharePoint: Extending the DVWP – Bonus: Fixing the Insert Form Action When "No Matching Items"
- SharePoint: Extending the DVWP – Bonus: Creating a Title Based on Dropdowns with jQuery


Where can I find parts 1 & 2?
Thanks!
Never mind, just found them!