SharePoint: Extending the DVWP – Part 4: Turning DVWP Action Links into Buttons
 Author: Jim Bob Howard
Continuing the series, Extending the DVWP, I’d like to make a quick announcement that some of these articles will be very short, and some of them will be a bit longer. That said, today’s tip will be very short, but…
The impact could really be great!
In the first two articles in this series, Extending the DVWP: Layout Enhancement – Rearranging Columns…, we moved the action links from their default left-most column position over to the right-most column. In the last article, I showed you a quick technique for saving vertical real estate on the Default Template (what you see when you first come to the page), by keeping the edit and delete links on the same line. But we didn’t do that with the Edit and Insert Templates.
And with good reason.
Since the Edit and Insert Templates are actually data entry forms, they typically take up more vertical real estate than the Default Template, so the vertical presentation of the links makes more sense.
But they could still use some help. Wouldn’t it be nice to have them stand out and look a little more like buttons?
We can easily do that with CSS.
Turning Links into Buttons
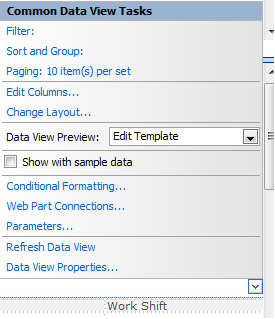
- Switch to the Edit template by clicking on the arrow (or chevron) button that appears when you hover over the DVWP, and choose Edit template from the Data View Preview dropdown.
- To find the links in code, click on the save link in the Design pane, which will bring the link HTML into view in the Code pane.
- We’ll simply change the class and add align="center".
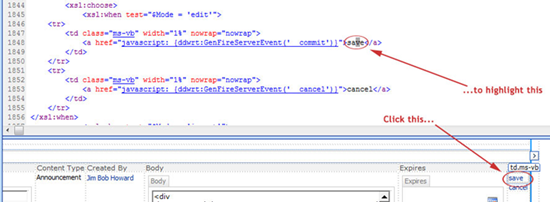
<xsl:when test="$Mode = 'edit'">
    <tr>
        <td class="ms-vb" width="1%" nowrap="nowrap">
            <a href="javascript: {ddwrt:GenFireServerEvent('__commit')}">save</a>
        </td>
    </tr>
    <tr>
        <td class="ms-vb" width="1%" nowrap="nowrap">
            <a href="javascript: {ddwrt:GenFireServerEvent('__cancel')}">cancel</a>
        </td>
    </tr>
</xsl:when>
to
<xsl:when test="$Mode = 'edit'">
    <tr>
        <td class="ms-buttonactivehover" width="1%" nowrap="nowrap" align="center">
            <a href="javascript: {ddwrt:GenFireServerEvent('__commit')}">Save</a>
        </td>
    </tr>
    <tr>
        <td class="ms-buttonactivehover" width="1%" nowrap="nowrap" align="center">
            <a href="javascript: {ddwrt:GenFireServerEvent('__cancel')}">Cancel</a>
        </td>
    </tr>
</xsl:when>
Personally, I think the text looks better in Title Case when displayed as buttons, I have changed the first letter of each to uppercase.
And now it looks like this…

Modified css to make links look like buttons
Do the same thing for the Insert Template and you now have links that look and act like buttons.
Next: Changing the way the links work with PreSaveAction().
Author: Jim Bob Howard
Jim Bob Howard is a web designer / webmaster in the healthcare industry. He has been working with SharePoint since March 2009 and enjoys sharing what he has learned. He is a moderator and frequent contributor to Stump the Panel, and answers SharePoint questions on Twitter (@jbhoward) and via email ([email protected]).
- SharePoint: Extending the DVWP - Part 1: Layout Enhancement - Rearranging Columns - Default and Edit Templates
- SharePoint: Extending the DVWP - Part 2: Layout Enhancement - Rearranging Columns - Insert Template
- SharePoint: Extending the DVWP – Part 3: Getting it All on One Line - DVWP Function Action Links
- SharePoint: Extending the DVWP – Part 4: Turning DVWP Action Links into Buttons
- SharePoint: Extending the DVWP – Part 5: Doing Stuff Before Save on Submit - PreSaveAction()
- SharePoint: Extending the DVWP – Part 6: Examining the Form Action Links
- SharePoint: Extending the DVWP – Part 7: Creating a Form Action Workflow
- SharePoint: Extending the DVWP – Part 8: Creating a Form Action Workflow - The After Math
- SharePoint: Extending the DVWP – Part 9: Oops! Failed Setting Processor Stylesheet
- SharePoint: Extending the DVWP – Part 10: Passing Workflow Variables to a Form Action Workflow
- SharePoint: Extending the DVWP – Part 11: Getting More Form Fields to the Workflow
- SharePoint: Extending the DVWP – Part 12: Adding More Form Fields from the Data
- SharePoint: Extending the DVWP – Part 13: Putting PreSaveAction() to Work – Creating Variables
- SharePoint: Extending the DVWP – Part 14: Putting PreSaveAction() to Work with jQuery
- SharePoint: Extending the DVWP – Part 15: User-Managed Dropdowns with Site Columns
- SharePoint: Extending the DVWP – Part 16: User-Managed Dropdowns - Loading Data
- SharePoint: Extending the DVWP – Part 17: User-Managed Dropdowns – Creating a Relationship list
- SharePoint: Extending the DVWP – Part 18: User-Managed Dropdowns – Loading the Relationship list – Part 1
- SharePoint: Extending the DVWP – Part 19: User-Managed Dropdowns – Loading the Relationship list – Part 2
- SharePoint: Extending the DVWP – Part 20: Cascading Dropdowns - Applying the jQuery
- SharePoint: Extending the DVWP – Part 21: Cascading Dropdowns - Three-tier Cascade
- SharePoint: Extending the DVWP – Part 22: Creating Title Based on Other Fields with jQuery
- SharePoint: Extending the DVWP – Part 23: Creating Title Based on Other Fields with a Workflow
- SharePoint: Extending the DVWP – Part 24: A Note to Readers
- SharePoint: Extending the DVWP – Part 25: Using an Audit Trail by Creating List Items with SPServices
- SharePoint: Extending the DVWP – Part 26: Modifying the Edit Template
- SharePoint: Extending the DVWP – Part 27: Adding an Alternate Edit Template to a DVWP
- SharePoint: Extending the DVWP – Part 28: Massage the Remove Template
- SharePoint: Extending the DVWP – Part 29: Modifying Form Action Workflows on the remove Template
- SharePoint: Extending the DVWP – Part 30: Using EasyTabs with Filtered DVWPs to Make Data Manageable
- SharePoint: Extending the DVWP – Part 31: Filling in Default Data on the insert Template with jQuery
- SharePoint: Extending the DVWP – Part 32: Filling in Default Data on the insert Template with Multiple DVWPs
- SharePoint: Extending the DVWP – Part 33: Modifying Total and Subtotal Row Layouts in DVWP
- SharePoint: Extending the DVWP – Part 34: Using Icons for Form Action Links
- SharePoint: Extending the DVWP – Part 35: Putting it All Together
- SharePoint: Extending the DVWP – Bonus: Fixing the Insert Form Action When "No Matching Items"


 on
on
Excellent tip! I just used this and works great. It’s always the little things…
Isn’t it, though? :) Glad it helped.
Blessings,
Jim Bob
Dude you rock!
:D Wow! Thanks.
Hi Jim,
This could be even further enhanced for folks that would want to make SP2007
‘look like’ SP2010 and the new inline editing function – which is pretty cool to have OOTB.
http://www.sharepoint911.com/blogs/jennifer/Lists/Posts/Post.aspx?List=03eb5002%2Ddb5e%2D4f06%2Dbd2d%2D3b7b00d3de82&ID=34
You can use the excellent SP2007 default images reference from Peter Allen at
http://www.bitsofsharepoint.com/ExamplePoint/Site/SharePointLayoutImages.aspx
and use the default images like
CRIT_16.GIF
EDIT.GIF or
SAVE.GIF
Like Matt says, it’s always the little things!
Greg
Great tips, Greg!
I’ll take a look and maybe write an addendum to this article using those suggestions. Thanks!
Blessings,
Jim Bob
Jim,
Sent to you via email some snapshots and a revised xsl template for the dvt_1.automode.
Greg
Thanks. Did some of that myself. ;)
Looking forward to reading the email when I get home. ;)
P.S. I didn’t use SAVE.GIF. Instead I left those as the text-links-that-look-like-buttons. But on the default template, I used EDITITEM.GIF, DELITEM.GIF, and NEWITEM.GIF.