
SharePoint: Extending the DVWP – Part 12: Adding More Form Fields from the Data
 Author: Jim Bob Howard
Before we wipe out old data with new stuff, wouldn’t be nice to know what’s being lost so you can decide if you’d rather keep it, or maybe save a copy somewhere else for nostalgic purposes?
What Changed?
By comparing the data when the page was loaded with what it looks like when the Save button is clicked, we can tell what’s changed and then decide what we want to do based on what’s changed. In the last article, we learned about the asp:label control which, even though it is not editable on the form, is available to form action workflow through Form Fields.
We can add any column from our data source(s) to the form simply by using the same method to add them as a label.
From SharePoint Designer (SPD):
- Switch to the Edit Template
- Click in the cell (on any row) where you want the label stored (making sure that you don’t have an existing form field selected or it will be replaced)
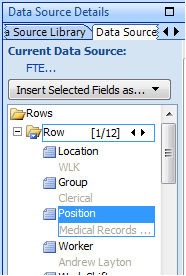
- Select from the Data Source Details tool pane the column you want to store here
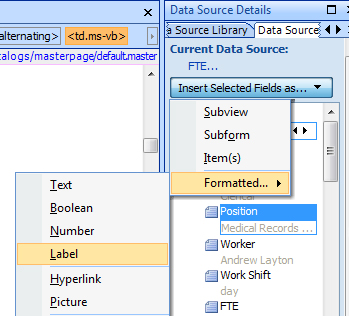
- Click Insert Selected Fields as … and choose Formatted… -> Label
- The change is visible in the Design and Code panes
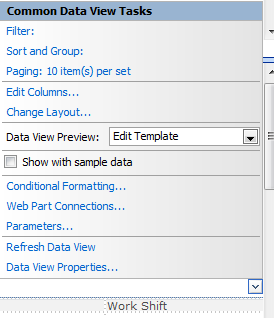
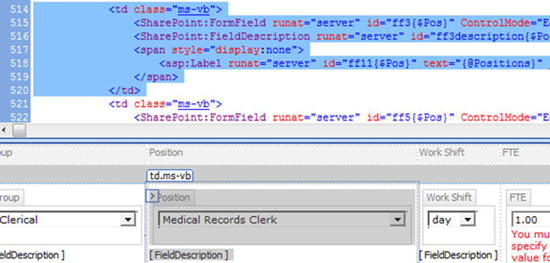
- Now we just need to hide it, by changing…
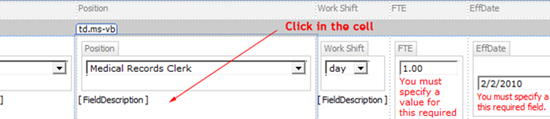
Click in the cell (not on the data). We’ll add the label here.
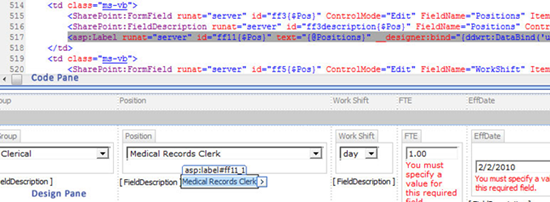
<td class="ms-vb">
        <SharePoint:FormField runat="server" id="ff3{$Pos}" ControlMode="Edit" FieldName="Positions" … />
        <SharePoint:FieldDescription runat="server" id="ff3description{$Pos}" FieldName="Positions" … />
        <asp:Label runat="server" id="ff11{$Pos}" text="{@Positions}" … />
</td>
…to
<td class="ms-vb">
        <SharePoint:FormField runat="server" id="ff3{$Pos}" ControlMode="Edit" FieldName="Positions" … />
        <SharePoint:FieldDescription runat="server" id="ff3description{$Pos}" FieldName="Positions" … />
        <span style="display:none">
                <asp:Label runat="server" id="ff11{$Pos}" text="{@Positions}" … />
        </span>
</td>
A Snapshot in Time
The label is now hidden, but still bound to the database, so it will always show what data looked like when the page was loaded. The user can’t change it.
Hidden labels provide a snapshot of the data from the moment the page loaded.
Repeat the process for every column for which you need a view of pre-edited content. For maintainability, it might be helpful to have each hidden label in the same table cell as the corresponding form field. But since they’ll all be hidden, you could also put them all together inside one span tag.
Next Time: Have you been wondering how to use PreSaveAction() that I mentioned awhile back? In the next installment of Extending the DVWP, we’ll start filling in the "do some stuff" with really useful stuff.
Author: Jim Bob Howard
Jim Bob Howard is a web designer / webmaster in the healthcare industry. He has been working with SharePoint since March 2009 and enjoys sharing what he has learned. He is a moderator and frequent contributor to Stump the Panel, and answers SharePoint questions on Twitter (@jbhoward) and via email ([email protected]).
- SharePoint: Extending the DVWP - Part 1: Layout Enhancement - Rearranging Columns - Default and Edit Templates
- SharePoint: Extending the DVWP - Part 2: Layout Enhancement - Rearranging Columns - Insert Template
- SharePoint: Extending the DVWP – Part 3: Getting it All on One Line - DVWP Function Action Links
- SharePoint: Extending the DVWP – Part 4: Turning DVWP Action Links into Buttons
- SharePoint: Extending the DVWP – Part 5: Doing Stuff Before Save on Submit - PreSaveAction()
- SharePoint: Extending the DVWP – Part 6: Examining the Form Action Links
- SharePoint: Extending the DVWP – Part 7: Creating a Form Action Workflow
- SharePoint: Extending the DVWP – Part 8: Creating a Form Action Workflow - The After Math
- SharePoint: Extending the DVWP – Part 9: Oops! Failed Setting Processor Stylesheet
- SharePoint: Extending the DVWP – Part 10: Passing Workflow Variables to a Form Action Workflow
- SharePoint: Extending the DVWP – Part 11: Getting More Form Fields to the Workflow
- SharePoint: Extending the DVWP – Part 12: Adding More Form Fields from the Data
- SharePoint: Extending the DVWP – Part 13: Putting PreSaveAction() to Work – Creating Variables
- SharePoint: Extending the DVWP – Part 14: Putting PreSaveAction() to Work with jQuery
- SharePoint: Extending the DVWP – Part 15: User-Managed Dropdowns with Site Columns
- SharePoint: Extending the DVWP – Part 16: User-Managed Dropdowns - Loading Data
- SharePoint: Extending the DVWP – Part 17: User-Managed Dropdowns – Creating a Relationship list
- SharePoint: Extending the DVWP – Part 18: User-Managed Dropdowns – Loading the Relationship list – Part 1
- SharePoint: Extending the DVWP – Part 19: User-Managed Dropdowns – Loading the Relationship list – Part 2
- SharePoint: Extending the DVWP – Part 20: Cascading Dropdowns - Applying the jQuery
- SharePoint: Extending the DVWP – Part 21: Cascading Dropdowns - Three-tier Cascade
- SharePoint: Extending the DVWP – Part 22: Creating Title Based on Other Fields with jQuery
- SharePoint: Extending the DVWP – Part 23: Creating Title Based on Other Fields with a Workflow
- SharePoint: Extending the DVWP – Part 24: A Note to Readers
- SharePoint: Extending the DVWP – Part 25: Using an Audit Trail by Creating List Items with SPServices
- SharePoint: Extending the DVWP – Part 26: Modifying the Edit Template
- SharePoint: Extending the DVWP – Part 27: Adding an Alternate Edit Template to a DVWP
- SharePoint: Extending the DVWP – Part 28: Massage the Remove Template
- SharePoint: Extending the DVWP – Part 29: Modifying Form Action Workflows on the remove Template
- SharePoint: Extending the DVWP – Part 30: Using EasyTabs with Filtered DVWPs to Make Data Manageable
- SharePoint: Extending the DVWP – Part 31: Filling in Default Data on the insert Template with jQuery
- SharePoint: Extending the DVWP – Part 32: Filling in Default Data on the insert Template with Multiple DVWPs
- SharePoint: Extending the DVWP – Part 33: Modifying Total and Subtotal Row Layouts in DVWP
- SharePoint: Extending the DVWP – Part 34: Using Icons for Form Action Links
- SharePoint: Extending the DVWP – Part 35: Putting it All Together
- SharePoint: Extending the DVWP – Bonus: Fixing the Insert Form Action When "No Matching Items"
- SharePoint: Extending the DVWP – Bonus: Creating a Title Based on Dropdowns with jQuery


Jim Bob,
This series is just GREAT. I didn’t see a ‘lot’ of comments but just think that people are playing ‘catch-up’ with the high quality of it and the tremendous improvements you bring to the DVWP.
I can already see it as the next EUSP e-book!
Thanks a lot for your sharing your knowledge,
Greg
Thanks for the encouragement, Greg!
I’m glad it’s proving useful for folks.
Blessings,
Jim Bob
Hi Jim,
Thank you for taking the time to write this series – the later articles in particular have been very enlightening. Keep up the good work!
Thanks, Nathan.
I knew that some of the early articles were going to be pretty basic, but wanted to put them in place so I could refer to them in future ones… especially the 40th or so, which will show how I tied all of these pieces together in one project. ;)
I appreciate the feedback and encouragement.
Blessings,
Jim Bob