
SharePoint: Extending the DVWP – Part 13: Putting PreSaveAction() to Work – Creating Variables
 Author: Jim Bob Howard
Earlier in this series, we talked about the basics of Doing Stuff Before Save on Submit by using the PreSaveAction() function, which is called by default from the OK button on the NewForm and EditForm. We’ll have to call it explicitly from the DVWP, but we’ll derive the same benefit of being able to act on the information supplied by the user before the data is committed to the database.
Edit to the Content Editor Web Part (CEWP)
You could add the PreSaveAction() JavaScript section directly to the page in SharePoint Designer (SPD). You could even add it to the master page, if that made sense for your project. But, I usually add it to a Content Editor Web Part (CEWP).
Several articles on EUSP (including my How to Add a Title to a Web Part Page that Doesn’t Have One) provide an easy step-by-step guide to adding a CEWP to a page, so I won’t repeat the steps here. We’ll start with adding our function to the CEWP.
In your browser, with your DVWP page open:
- Click Site Actions -> Edit Page
- On your webpart, click edit -> Modify Shared Web Part
- In the right pane, click Source Editor…
- If you plan to use the jQuery and/or SPServices JavaScript libraries (which I will, below), add them first
- If you are using jQuery when the page loads, make sure PreSaveAction() is outside the ready() function
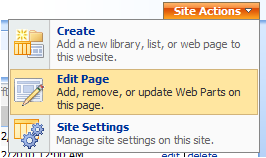
Site Actions -> Edit Page
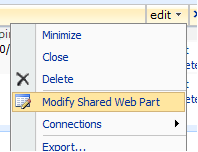
Edit -> Modified Shared Web Part
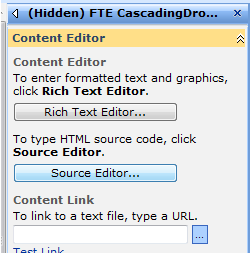
Click Source Editor… to open code window
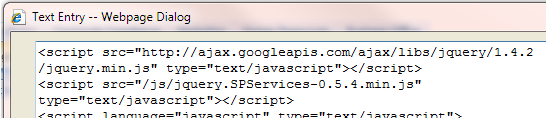
Be sure to get latest version of both jQuery and SPServices
<script language="javascript" type="text/javascript">
          $(document).ready(function() { // stuff that happens when the page loads
               ...
               ...
          }); // This is the END of the ready() function

          function PreSaveAction() { // stuff that happens before commit on "OK" or "Save"
               ...
               ...
               return true; // or false, if things go wrong
          };
</script>
For the rest of this article, we’ll be working from line 9 down
Audit Trail with jQuery
It’s not always enough to know how the data looks right now; we often need to know how it got that way. So we want to take a snapshot of the data right before it changes and explain what is changing.
jQuery and Marc Anderson’s jQuery Library for SharePoint Services (SPServices) provide a remarkably easy solution for writing to an audit list.
The Form Control = Current User Data
Finding the content of our form fields is pretty straightforward: it’s simply the value of the input control whose name contains the ff# of our control, starting with a ‘$’ and ending with a ‘_’.
In other words, if our control looks like this in SPD:
<SharePoint:FormField runat="server" id="ff3{$Pos}" … />
Click on the control in the Design pane to highlight this XSLT block in the Code pane
It will look like this when we view source from the browser:
<input name="ctl00$m$g_ae046c3b_1d8e_4427_95e7_41f5d9c0e374$ff3_1$ctl00$ctl01" type="text" value="Administrative Assistant" id="ctl00_m_g_ae046c3b_1d8e_4427_95e7_41f5d9c0e374_ff3_1_ctl00_ctl01" … />
Click the edit form action link before viewing the source. Find $ff3_ in the source. This will be the only input with a name that includes $ff3_
So, we can access it with jQuery like this:
$("input[name*=$ff3_]").val();
Literally, find all input controls with a name that contains ‘$ff3_’ (there will only be one) and return the value of the value attribute
The Label = Current List Data
Label content is easy to find, too: it’s the text value of a span tag with an id that contains the ff# wrapped with ‘_’.
In other words, if our control looks like this in SPD:
<asp:Label runat="server" id="ff11{$Pos}" … />
Click on the visible control in the Design pane to get close to this XSLT block in the Code pane
It will look like this when we view source from the browser:
<span id="ctl00_m_g_ae046c3b_1d8e_4427_95e7_41f5d9c0e374_ff11_1">Medical Records Clerk</span>
Click the edit form action link before viewing the source. Find _ff11_ in the source. This will be the only controlwith an id that includes _ff11_
So, we can access it with jQuery like this:
$("span[id*=_ff11_]").text();
Literally, find all span blocks with an id that contains ‘_ff11_’ (there will only be one) and return the text that is inside tag
Creating Variables
With these two pieces of information, we can create ‘old’ and ‘new’ variables, so we can write them out to our audit trail.
function PreSaveAction() {

    var txtNewPos = $("input[name*=$ff3_]").val();
    var txtOldPos = $("span[id*=_ff11_]").text();

    …

    return true;
};
Repeat for each column you want to record in your audit list.
Now that we have our data into variables, next time we’ll finally do something with them.
Author: Jim Bob Howard
Jim Bob Howard is a web designer / webmaster in the healthcare industry. He has been working with SharePoint since March 2009 and enjoys sharing what he has learned. He is a moderator and frequent contributor to Stump the Panel, and answers SharePoint questions on Twitter (@jbhoward) and via email ([email protected]).
- SharePoint: Extending the DVWP - Part 1: Layout Enhancement - Rearranging Columns - Default and Edit Templates
- SharePoint: Extending the DVWP - Part 2: Layout Enhancement - Rearranging Columns - Insert Template
- SharePoint: Extending the DVWP – Part 3: Getting it All on One Line - DVWP Function Action Links
- SharePoint: Extending the DVWP – Part 4: Turning DVWP Action Links into Buttons
- SharePoint: Extending the DVWP – Part 5: Doing Stuff Before Save on Submit - PreSaveAction()
- SharePoint: Extending the DVWP – Part 6: Examining the Form Action Links
- SharePoint: Extending the DVWP – Part 7: Creating a Form Action Workflow
- SharePoint: Extending the DVWP – Part 8: Creating a Form Action Workflow - The After Math
- SharePoint: Extending the DVWP – Part 9: Oops! Failed Setting Processor Stylesheet
- SharePoint: Extending the DVWP – Part 10: Passing Workflow Variables to a Form Action Workflow
- SharePoint: Extending the DVWP – Part 11: Getting More Form Fields to the Workflow
- SharePoint: Extending the DVWP – Part 12: Adding More Form Fields from the Data
- SharePoint: Extending the DVWP – Part 13: Putting PreSaveAction() to Work – Creating Variables
- SharePoint: Extending the DVWP – Part 14: Putting PreSaveAction() to Work with jQuery
- SharePoint: Extending the DVWP – Part 15: User-Managed Dropdowns with Site Columns
- SharePoint: Extending the DVWP – Part 16: User-Managed Dropdowns - Loading Data
- SharePoint: Extending the DVWP – Part 17: User-Managed Dropdowns – Creating a Relationship list
- SharePoint: Extending the DVWP – Part 18: User-Managed Dropdowns – Loading the Relationship list – Part 1
- SharePoint: Extending the DVWP – Part 19: User-Managed Dropdowns – Loading the Relationship list – Part 2
- SharePoint: Extending the DVWP – Part 20: Cascading Dropdowns - Applying the jQuery
- SharePoint: Extending the DVWP – Part 21: Cascading Dropdowns - Three-tier Cascade
- SharePoint: Extending the DVWP – Part 22: Creating Title Based on Other Fields with jQuery
- SharePoint: Extending the DVWP – Part 23: Creating Title Based on Other Fields with a Workflow
- SharePoint: Extending the DVWP – Part 24: A Note to Readers
- SharePoint: Extending the DVWP – Part 25: Using an Audit Trail by Creating List Items with SPServices
- SharePoint: Extending the DVWP – Part 26: Modifying the Edit Template
- SharePoint: Extending the DVWP – Part 27: Adding an Alternate Edit Template to a DVWP
- SharePoint: Extending the DVWP – Part 28: Massage the Remove Template
- SharePoint: Extending the DVWP – Part 29: Modifying Form Action Workflows on the remove Template
- SharePoint: Extending the DVWP – Part 30: Using EasyTabs with Filtered DVWPs to Make Data Manageable
- SharePoint: Extending the DVWP – Part 31: Filling in Default Data on the insert Template with jQuery
- SharePoint: Extending the DVWP – Part 32: Filling in Default Data on the insert Template with Multiple DVWPs
- SharePoint: Extending the DVWP – Part 33: Modifying Total and Subtotal Row Layouts in DVWP
- SharePoint: Extending the DVWP – Part 34: Using Icons for Form Action Links
- SharePoint: Extending the DVWP – Part 35: Putting it All Together
- SharePoint: Extending the DVWP – Bonus: Fixing the Insert Form Action When "No Matching Items"
- SharePoint: Extending the DVWP – Bonus: Creating a Title Based on Dropdowns with jQuery


Hi Jim,
I am working with SPD 2010 and I don’t see any labels (except one) for the column headers. Also, in view source, I don’t see any span tags. The column headers look like this instead: Date Awarded. Has it changed in 2010? Thank you!
Dear Richard,
It certainly could have changed if you’re using SP 2010 (the SPD version wouldn’t change the HTML generated by SharePoint). I don’t have either, so I can’t see how it would look in my environment.
As with all things jQuery, your configuration is likely to generate HTML slightly differently. Which is why I usually try to walk you through how I came up with the selectors I use. That way, if yours is different, you can make the necessary adjustments.
If you continue to struggle with this one, jump over to Stump the Panel (third item from the left on the menu bar above this article), so you can post code snippets and we can help you parse through what you’re seeing.
Blessings,
Jim Bob
Since I’m using a multi-item dvwp in edit mode, the source shows my text boxes as “_ff11_” followed by the row number returned ( for instance “_ff11_3″).
What changes would need to be made to still implement this audit trail you’re describing?
15 $(”input[name*=$ff3_]“).val();
Literally, find all input controls with a name that contains ‘$ff3_’ (there will only be one) and return the value of the value attribute
That should work, Brad. Did it?
Yup, I put modified the wildcard search selector so the id end with $ff_ # instead of just contains. If I had more than 10 items, my ff_1, ff_10, etc were also selected. So the code uses a for loop and searches for $=”ff1_” & i & “]” etc.
I added some business logic to control some validation and some regex validation to check for dates and numbers.
The loop appends a space to the fields that haven’t changed so that everything always gets saved even if it hasn’t changed.