
SharePoint: Extending the DVWP – Part 23: Creating Title Based on Other Fields with a Workflow
 Author: Jim Bob Howard
When working with cascading dropdowns and the Relationship lists that accompany them, the important part of the Relationship list is that the site columns we’re relating are set. The Title of the list time doesn’t matter to the cascading process.
However, from a human maintenance standpoint, that Title can make things a whole lot easier. Last time, we automated its creation using jQuery. I know not everyone enjoys jQuery as much as I do. But, I have good news for you…
You can do almost the same thing with a workflow.
Creating a Title Within a Workflow
Of course, you’ll need SharePoint Designer to create the workflow. So, launch that and open your site:

Site opened in SharePoint Designer
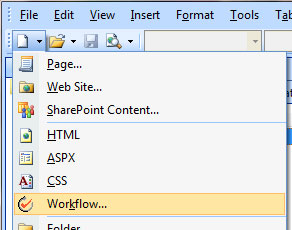
- Click the arrow next to the new document icon and choose Workflow:
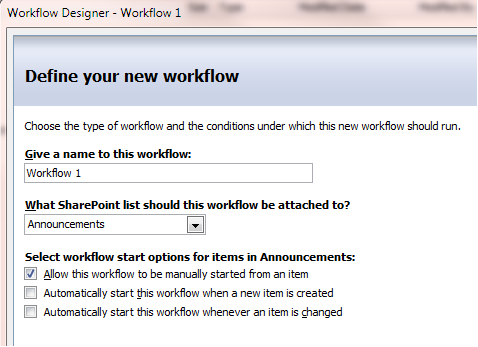
- Give it a name
- Choose the list
- Uncheck "manual start" and check "on create start"
- Click Next
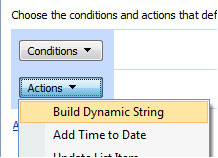
- Then click Actions and choose Build Dynamic String
- Click on dynamic string
- Click Add Lookup
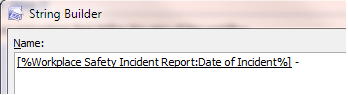
- Leave Source as Current Item, and set Field to the first field you want to be part of the Title. In mine, I want Date of Incident:
- Click OK
- Click Add Lookup again
- Click OK twice
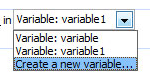
- Click on Variable: variable 1
- Name it
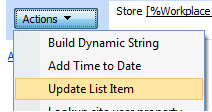
- Click Actions and choose Update List Item
- Click this list
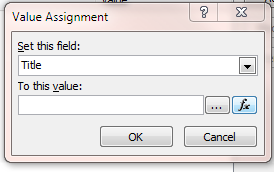
- Click Add and choose Title under Set this field
- Click the fx button
- Click OK three times
- Click Finish
Site opened in SharePoint Designer
You may see this message:
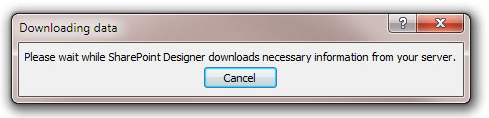
…if so, just wait and then you’ll see the Workflow wizard


Type a space, a dash, and another space (or whatever naming convention you want):
This time, choose the second field you want to use (I’ll use Type of Incident):

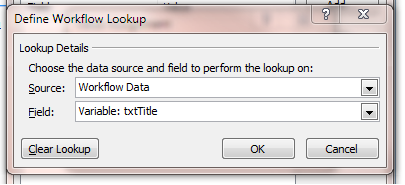
Then click on Create a new variable…
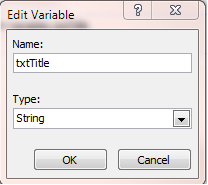
Change the Source to Workflow Data and Field to txtTitle
Now you have a "dynamic" Title.
Caveats
The downsides to using a workflow are irritating, but not necessarily show-stoppers.
- The most obvious downside is that the Title is not set immediately. The workflow takes a little time to process. In the meantime, it will be blank and could confuse users, mess up sorting on that field, and generally look less than optimal.
- Any field used in the Title must either be required or you must check for it in the workflow and give a default if not found. If you’ve worked with workflows for any time, you’ll know that using conditionals and branching is non-trivial.
- If the workflow ends with an error, your Title may never be set.
- If the fields used to set the Title change, it’ll be out of sync. To get it back in sync, you’ll have to write a WF that runs on create AND change, but you’ll have to keep track of the fields and check to see IF they changed before changing the Title.
- If you’re keeping track of versions, you’ll have a new version every time the Title gets set or reset.
- Showstopper: If the creator doesn’t have Edit permissions (e.g. Contribute w/o Edit), this WF will fail because the workflow runs under their ID so Update List Item will be denied access.
Next time: We’ll look at creating list items with SPServices next.
Author: Jim Bob Howard
Jim Bob Howard is a web designer / webmaster in the healthcare industry. He has been working with SharePoint since March 2009 and enjoys sharing what he has learned. He is a moderator and frequent contributor to Stump the Panel, and answers SharePoint questions on Twitter (@jbhoward) and via email ([email protected]).
- SharePoint: Extending the DVWP - Part 1: Layout Enhancement - Rearranging Columns - Default and Edit Templates
- SharePoint: Extending the DVWP - Part 2: Layout Enhancement - Rearranging Columns - Insert Template
- SharePoint: Extending the DVWP – Part 3: Getting it All on One Line - DVWP Function Action Links
- SharePoint: Extending the DVWP – Part 4: Turning DVWP Action Links into Buttons
- SharePoint: Extending the DVWP – Part 5: Doing Stuff Before Save on Submit - PreSaveAction()
- SharePoint: Extending the DVWP – Part 6: Examining the Form Action Links
- SharePoint: Extending the DVWP – Part 7: Creating a Form Action Workflow
- SharePoint: Extending the DVWP – Part 8: Creating a Form Action Workflow - The After Math
- SharePoint: Extending the DVWP – Part 9: Oops! Failed Setting Processor Stylesheet
- SharePoint: Extending the DVWP – Part 10: Passing Workflow Variables to a Form Action Workflow
- SharePoint: Extending the DVWP – Part 11: Getting More Form Fields to the Workflow
- SharePoint: Extending the DVWP – Part 12: Adding More Form Fields from the Data
- SharePoint: Extending the DVWP – Part 13: Putting PreSaveAction() to Work – Creating Variables
- SharePoint: Extending the DVWP – Part 14: Putting PreSaveAction() to Work with jQuery
- SharePoint: Extending the DVWP – Part 15: User-Managed Dropdowns with Site Columns
- SharePoint: Extending the DVWP – Part 16: User-Managed Dropdowns - Loading Data
- SharePoint: Extending the DVWP – Part 17: User-Managed Dropdowns – Creating a Relationship list
- SharePoint: Extending the DVWP – Part 18: User-Managed Dropdowns – Loading the Relationship list – Part 1
- SharePoint: Extending the DVWP – Part 19: User-Managed Dropdowns – Loading the Relationship list – Part 2
- SharePoint: Extending the DVWP – Part 20: Cascading Dropdowns - Applying the jQuery
- SharePoint: Extending the DVWP – Part 21: Cascading Dropdowns - Three-tier Cascade
- SharePoint: Extending the DVWP – Part 22: Creating Title Based on Other Fields with jQuery
- SharePoint: Extending the DVWP – Part 23: Creating Title Based on Other Fields with a Workflow
- SharePoint: Extending the DVWP – Part 24: A Note to Readers
- SharePoint: Extending the DVWP – Part 25: Using an Audit Trail by Creating List Items with SPServices
- SharePoint: Extending the DVWP – Part 26: Modifying the Edit Template
- SharePoint: Extending the DVWP – Part 27: Adding an Alternate Edit Template to a DVWP
- ExSharePoint: Extending the DVWP – Part 28: Massage the Remove Template
- SharePoint: Extending the DVWP – Part 29: Modifying Form Action Workflows on the remove Template
- SharePoint: Extending the DVWP – Part 30: Using EasyTabs with Filtered DVWPs to Make Data Manageable
- SharePoint: Extending the DVWP – Part 31: Filling in Default Data on the insert Template with jQuery
- SharePoint: Extending the DVWP – Part 32: Filling in Default Data on the insert Template with Multiple DVWPs
- SharePoint: Extending the DVWP – Part 33: Modifying Total and Subtotal Row Layouts in DVWP
- SharePoint: Extending the DVWP – Part 34: Using Icons for Form Action Links
- SharePoint: Extending the DVWP – Part 35: Putting it All Together
- SharePoint: Extending the DVWP – Bonus: Fixing the Insert Form Action When "No Matching Items"
- SharePoint: Extending the DVWP – Bonus: Creating a Title Based on Dropdowns with jQuery


 on
on
Jim,
What drawbacks to you see to the jQuery option?
Seems that if you are confortable with jQuery and already using it on the same page, the workflow option is less reliable.
Correct?
Greg
Dear Greg,
Correct. I prefer not to use the workflow option for this, but I present it as a contrast for how great the jQuery option is. ;) I think jQuery FAR excels the workflow in this case.
But, if you aren’t already using jQuery, but ARE already using a workflow (and the other caveats don’t apply or can be mitigated), then you might as well throw the Title-naming into the workflow.
Blessings,
Jim Bob
Hello Jim,
I need your assistance, I have created a workflow in share point designer as shown above but then, it does not send emails. Other things work, it populates the group it is not sending email.
I get errors like this:
10/8/2010 11:43 PM Error System Account
The e-mail message cannot be sent. Make sure the outgoing e-mail settings for the server are configured correctly.
Can you help to tell me what to do? Are there still settings I need to set before the workflow will work.
Other workflows in their own documet library works
Emmana
Hello Jim,
I have used your example to create a title from other fields using Workflow and it works great. However one of the fields I am using is a People or Group type. When I select that field as part of my title, what is created is “Domain\JSmith”. What I really what it to say is John Smith. Is there a way I can get the full name?
Terry
Dear Terry,
Yes, but it’s a little tricky. Three options of the top of my head:
1. Install the SPDActivities.codeplex.com project, which will give you a Lookup User Info action in the workflow. Using that, you can look up “Display Name” which is what you’re looking for; and you can put that in the Title field.
2. By Nintex Workflow, which allows calls to SharePoint Web Services and will allow you to do the same thing. (This is about the fourth time this week I’ve recommended Nintex, but I’m not associated with them in any way. As I’ve stated elsewhere, I haven’t even used it; but colleagues I admire greatly speak very highly of it. The pricetag is up there, but the increased WF functionality appears to be exemplary!)
3. Instead of a workflow, use the technique in Part 22 of this series to look up the user name with jQuery and SPServices and store it in the Title field when the item is saved the first time.
Hope that helps!
Blessings,
Jim Bob