
SharePoint: Extending the DVWP – Part 26: Modifying the Edit Template
 Author: Jim Bob Howard
Editing a list item often involves more fields than when you are simply viewing the item. The default view of a list doesn’t always show all of the fields for the item. But, if you’re going to edit it, you need access to all of the fields… or, at least, all of the ones you want the user to edit.
In our Full-time Employee (FTE) example, we’re going to filter employees by Location on individual location pages. So, it won’t be necessary to display the Location again in the list item. On each page, we’ll also group by a field named "Group," so again, we won’t need to display Group on the row.

Default DVWP Multi-item View with Edit/Delete functions turned on (and moved to the right)
But, when it’s time to edit, we need to be able to edit the employee’s Location and Group. You could create an "edit" view which includes everything and require that the user switch to that if they want to edit (non-intuitive training issue). Or you could add the fields to the default view so they’ll show up on the edit template, too. But when they’re not being edited, you’ve wasted a bunch of real estate that ends up being redundant or irrelevant.
Besides, when you start working with form fields, you’ll quickly run out of real estate and/or force a left/right scroll (which is NEVER good).

Edit template with all fields in default location. Even stretched out, not everything fits on the screen
Let’s look at one option for fitting all the extra fields onto the page.

Modified Edit Template for DVWP Multi-item View
Notice that we’re taking up two rows here, when the default keeps everything on one row, like this:
<xsl:template name="dvt_1.rowedit">
    <xsl:param name="Pos" />
    <tr>
        <td class="ms-vb">
            <SharePoint:FormField runat="server" id="ff4{$Pos}" ControlMode="Edit" FieldName="Title" ItemId="{@ID}" {code} />
            <SharePoint:FieldDescription runat="server" id="ff4description{$Pos}" FieldName="Title" ControlMode="Edit" />
        </td>
        <td class="ms-vb">
            <SharePoint:FormField runat="server" id="ff3{$Pos}" ControlMode="Edit" FieldName="Positions" ItemId="{@ID}" {code} />
            <SharePoint:FieldDescription runat="server" id="ff3description{$Pos}" FieldName="Positions" ControlMode="Edit" />
        </td>
        <td class="ms-vb">
            <SharePoint:FormField runat="server" id="ff5{$Pos}" ControlMode="Edit" FieldName="WorkShift" ItemId="{@ID}" {code} />
            <SharePoint:FieldDescription runat="server" id="ff5description{$Pos}" FieldName="WorkShift" ControlMode="Edit" />
        </td>
        <td class="ms-vb">
            <SharePoint:FormField runat="server" id="ff6{$Pos}" ControlMode="Edit" FieldName="FTE" ItemId="{@ID}" {code} />
            <SharePoint:FieldDescription runat="server" id="ff6description{$Pos}" FieldName="FTE" ControlMode="Edit" />
        </td>
        <td class="ms-vb">
            <SharePoint:FormField runat="server" id="ff7{$Pos}" ControlMode="Edit" FieldName="EffDate" ItemId="{@ID}" {code} />
            <SharePoint:FieldDescription runat="server" id="ff7description{$Pos}" FieldName="EffDate" ControlMode="Edit" />
        </td>
        <xsl:if test="$dvt_1_automode = '1'" ddwrt:cf_ignore="1">
            <td class="ms-vb" width="1%" nowrap="">
                <xsl:call-template name="dvt_1.automode">
                    <xsl:with-param name="KeyField">ID</xsl:with-param>
                    <xsl:with-param name="KeyValue" select="ddwrt:EscapeDelims(string(@ID))" />
                    <xsl:with-param name="Mode">edit</xsl:with-param>
                    <xsl:with-param name="Pos" select="$Pos"/>
                </xsl:call-template>
            </td>
        </xsl:if>
    </tr>
</xsl:template>
Sample XSLT of default Edit Template: "dvt_1.rowedit"
In the modified view, we need to add the Site/Department, and the Group.
Since this template is a complete row (TR), we can break it into to two rows very easily by "breaking" it into two rows. This is a very simple process which consists of closing one row and opening another, by inserting </tr><tr> between the TD’s where we want the split to occur:
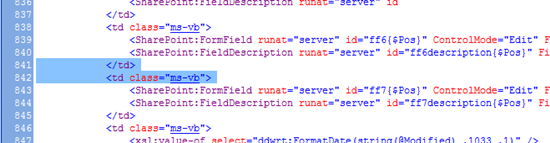
Before
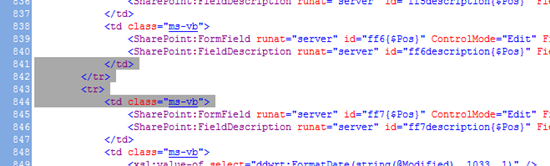
After
If we refresh the Design pane, it’ll look pretty nasty because we have four columns on the top row and two on the bottom. But before we do that, let’s clean up the table and make room for the additional columns we want to show. While we’re still in the code pain, let’s add two more TDs to the bottom row.
    <tr>
        <td class="ms-vb"></td>
        <td class="ms-vb"></td>
        <td class="ms-vb">
            <SharePoint:FormField runat="server" id="ff7{$Pos}" ControlMode="Edit" FieldName="EffDate" ItemId="{@ID}" {code} />
            <SharePoint:FieldDescription runat="server" id="ff7description{$Pos}" FieldName="EffDate" ControlMode="Edit" />        </td>
Of course, since we’re working with the edit template, when the Design pane refreshes it goes back to the default template and we have to switch back to edit.
Even with the data split over two rows, the textbox in my example takes up a ridiculous amount of space:

Textbox taking up a lot more space than it needs to
That’s easily fixed by adding the DisplaySize attribute to the FormField tag:
<SharePoint:FormField runat="server" id="ff4{$Pos}" ControlMode="Edit" FieldName="Title" ItemId="{@ID}" {code} DisplaySize="35" />
Now, just add the columns you want:
- Click in the table cell where the column should go
- Find the column in the Data Source Details pane
- Right click the column and click Insert as List Form Field
Of course, the column headings won’t match up for the bottom row, so you’ll need to add labels to make those obvious to the user.
You can copy the main header row and insert it between the rows you created when you split the default…
<tr>
<th class="ms-vh" nowrap="" style="height: 22px">Location</th>
<th class="ms-vh" nowrap="" style="height: 22px">Group</th>
<th class="ms-vh" nowrap="" style="height: 22px">Effective Date</th>
<th class="ms-vh"> </th>
</tr>

Edit Template with two rows
Or you can simply add some labels, which looks a little cleaner…
<strong>Site/Department: </strong> . . .
From a visual standpoint, it’s still a bit confusing on the page:

Edit Template in the middle of a list of view records
What am I doing here? Am I inserting, editing, deleting? Which row am I working on? From a UI perspective, this layout no workie, so we’re going to put a colored box around the record to make it stand out and let the user know where they’re actually working.
Now, we’re going to run into similar issues with the insert and delete templates, so let’s make each one a different color to give another visual clue to what action we’re taking. To me, green makes sense for insert, and red for delete. So, I’ll take the last part of RGB and make update blue.
Using CSS, create classes for the border decorations to help differentiate the templates:
.ed-l {border-left:medium #0099FF ridge;}
.ed-r {border-right:medium #0099FF ridge;}
.ed-t {border-top:medium #0099FF ridge;}
.ed-b {border-bottom:medium #0099FF ridge;}

.in-l {border-left:medium lime ridge;}
.in-r {border-right:medium lime ridge;}
.in-t {border-top:medium lime ridge;}
.in-b {border-bottom:medium lime ridge;}

.dl-l {border-left:medium red ridge;}
.dl-r {border-right:medium red ridge;}
.dl-t {border-top:medium red ridge;}
.dl-b {border-bottom:medium red ridge;}
Then, for each TD add the appropriate classes:
<xsl:template name="dvt_1.rowedit">
    <xsl:param name="Pos" />
    <tr>
        <td class="ms-vb ed-l ed-t">
            . . .
        </td>
        <td class="ms-vb ed-t">
            . . .
        </td>
        <td class="ms-vb ed-t">
            . . .
        </td>
        <td class="ms-vb ed-r ed-t">
            . . .
        </td>
    </tr>
    <tr>
        <td class="ms-vb ed-b ed-l">
            . . .
        </td>
        <td class="ms-vb ed-b">
            . . .
        </td>
        <td class="ms-vb ed-b">
            . . .
        </td>
        <xsl:if test="$dvt_1_automode = '1'" ddwrt:cf_ignore="1">
            <td class="ms-vb ed-b ed-r" width="1%" nowrap="">
                <xsl:call-template name="dvt_1.automode">
            . . .
                </xsl:call-template>
            </td>
        </xsl:if>
    </tr>
</xsl:template>
Now the edit template looks like this:

Now it’s obvious what we’re doing: Editing Marcia Walsh’s information
Repeat this process with the insert template.
Next Time, we’ll continue Extending the DVWP by adding an alternate edit template for the remove form action.
Author: Jim Bob Howard
Jim Bob Howard is a web designer / webmaster in the healthcare industry. He has been working with SharePoint since March 2009 and enjoys sharing what he has learned. He is a moderator and frequent contributor to Stump the Panel, and answers SharePoint questions on Twitter (@jbhoward) and via email ([email protected]).
- SharePoint: Extending the DVWP - Part 1: Layout Enhancement - Rearranging Columns - Default and Edit Templates
- SharePoint: Extending the DVWP - Part 2: Layout Enhancement - Rearranging Columns - Insert Template
- SharePoint: Extending the DVWP – Part 3: Getting it All on One Line - DVWP Function Action Links
- SharePoint: Extending the DVWP – Part 4: Turning DVWP Action Links into Buttons
- SharePoint: Extending the DVWP – Part 5: Doing Stuff Before Save on Submit - PreSaveAction()
- SharePoint: Extending the DVWP – Part 6: Examining the Form Action Links
- SharePoint: Extending the DVWP – Part 7: Creating a Form Action Workflow
- SharePoint: Extending the DVWP – Part 8: Creating a Form Action Workflow - The After Math
- SharePoint: Extending the DVWP – Part 9: Oops! Failed Setting Processor Stylesheet
- SharePoint: Extending the DVWP – Part 10: Passing Workflow Variables to a Form Action Workflow
- SharePoint: Extending the DVWP – Part 11: Getting More Form Fields to the Workflow
- SharePoint: Extending the DVWP – Part 12: Adding More Form Fields from the Data
- SharePoint: Extending the DVWP – Part 13: Putting PreSaveAction() to Work – Creating Variables
- SharePoint: Extending the DVWP – Part 14: Putting PreSaveAction() to Work with jQuery
- SharePoint: Extending the DVWP – Part 15: User-Managed Dropdowns with Site Columns
- SharePoint: Extending the DVWP – Part 16: User-Managed Dropdowns - Loading Data
- SharePoint: Extending the DVWP – Part 17: User-Managed Dropdowns – Creating a Relationship list
- SharePoint: Extending the DVWP – Part 18: User-Managed Dropdowns – Loading the Relationship list – Part 1
- SharePoint: Extending the DVWP – Part 19: User-Managed Dropdowns – Loading the Relationship list – Part 2
- SharePoint: Extending the DVWP – Part 20: Cascading Dropdowns - Applying the jQuery
- SharePoint: Extending the DVWP – Part 21: Cascading Dropdowns - Three-tier Cascade
- SharePoint: Extending the DVWP – Part 22: Creating Title Based on Other Fields with jQuery
- SharePoint: Extending the DVWP – Part 23: Creating Title Based on Other Fields with a Workflow
- SharePoint: Extending the DVWP – Part 24: A Note to Readers
- SharePoint: Extending the DVWP – Part 25: Using an Audit Trail by Creating List Items with SPServices
- SharePoint: Extending the DVWP – Part 26: Modifying the Edit Template
- SharePoint: Extending the DVWP – Part 27: Adding an Alternate Edit Template to a DVWP
- ExSharePoint: Extending the DVWP – Part 28: Massage the Remove Template
- SharePoint: Extending the DVWP – Part 29: Modifying Form Action Workflows on the remove Template
- SharePoint: Extending the DVWP – Part 30: Using EasyTabs with Filtered DVWPs to Make Data Manageable
- SharePoint: Extending the DVWP – Part 31: Filling in Default Data on the insert Template with jQuery
- SharePoint: Extending the DVWP – Part 32: Filling in Default Data on the insert Template with Multiple DVWPs
- SharePoint: Extending the DVWP – Part 33: Modifying Total and Subtotal Row Layouts in DVWP
- SharePoint: Extending the DVWP – Part 34: Using Icons for Form Action Links
- SharePoint: Extending the DVWP – Part 35: Putting it All Together
- SharePoint: Extending the DVWP – Bonus: Fixing the Insert Form Action When "No Matching Items"
- SharePoint: Extending the DVWP – Bonus: Creating a Title Based on Dropdowns with jQuery


Holy Smokes! That’s good stuff !!!!!
Thanks, George.
Hi Jim,
How can I apply font style to the SharePoint:FieldDescription text area … I need to set a default bigger font-size for the text appearing in the text area…..
This is one problem for which a quick reply is much appreciated…..
But, also the Controls that fly out in the rich text editor (eg. the Font-size, color) also dont appear when we are on tabs and appears only on the last tab due to some positioning we have done……….. How can I supercede that and make the fly outs come on top………
Thanks in advance…..
Dear Thendral,
The FieldDescription renders as text on the resulting page. Simply wrap it in a tag with a style= or class= to change the way it looks.
I’ll have to test the rich-text fly out controls, or perhaps Christophe has experience with that issue. Try posting your issue in the the Easy Tabs forum on STP.
Blessings,
Jim Bob
Sorry… that should have been: “Simply wrap it in a SPAN tag…”
Thanks a lot Jim ……… We got a JavaScript workaround for it………. but, your suggestion seems quite simple….. will try it……… Thanks again……….
Jim your posts are excellent, I love this series as I’ve been able to implement quite a bit from what you’ve posted.
However I have an issue with the edit templates for several DVWP I set up.
I have my column header width set using percentage (so it scales with various resolutions and screens), but ran into an issue when the edit fields could only be static using the ‘DisplaySize=’ attribute.
Is there a way to set them to a percentage?
Example of my problem: http://img191.imageshack.us/img191/7590/92201032830pm.jpg
Hello Jim,
I also really appreciate your articles and have learned a lot. Thank you. I had trouble with the CSS because it is was completely new to me, but this worked. I wrapped the CSS code within this: /* CSS goes here */ , and placed it within a content editor web part on the page. Thanks again.
The tags were removed. (style type=”text/css”) /* CSS goes here */ (/style) – Replace the parenthesis with HTML tags.
That will definitely work.
The other thing you could do is search in your DVWP for a style tag and just add your CSS there. If you don’t find an existing block, search for PlaceHolderTitleAreaClass and place it inside that tag set. (If it’s empty [that is, it ends with />], you’ll have to remove the ‘/’ and then close the tag with </asp:Content> .)
Blessings,
Jim Bob
Hi Jim,
IE-8 will render the CSS when accessing a local site on my development machine, but not a hosted site. SPD designer 2010, however, does render the CSS, even while accessing the hosted site. Do you have any idea why?
Thank you.
Dear Jim,
It is working now. At first, I tried to embed the CSS code directly onto the master page. It wouldn’t work with the hosted site for some reason. So, I created a css file from notepad, and imported it into SP. After adding a link tag “” to the header in the master page to reference it, the CSS worked.
Thank you.
Richard
I have set up my first edit template – and I am loving your articels about how to do this. BUT (there’s always a but isn’t there) I want to have paging for the webpart – and it isn’t working properly when I add the “edit” feature. The paging is set to show things in batch of 50 – but as soon as you switch to the edit mode – its shows a little 1-17 at the bottom – and then when you save (or cancel) and go back to the normal view – the 1-17 is still there. Has anyone else run accross this?
Follow the discussion on paisleygo’s question in the Stump the Panel forum:
http://www.endusersharepoint.com/STP/viewtopic.php?f=9&t=1940&start=0
Blessings,
Jim Bob
Hi Jim,
I have attached a document library to a dvwp and used the edit option. Then when I filtered the document library based on Location (name of column) and edit it, the filtering goes out and it shows all the documents. Is there a way I can retain the filter on the document library after editing. I was able to see only two options in the dvwp, expand by default or collapse by default, so i was kind of stuck.
Thanks,
Vijay.
Hmm… I’ll have to look at that.
Here’s what I’m guessing is happening:
1. The filtering column is passed to the form via the GenFireServerEvent.
2. The edit key is also passed to the form via the GenFireServerEvent.
3. The edit form action supplies a redirect URL for when the Save or Cancel button is clicked. That URL doesn’t go through the GenFireServerEvent and doesn’t include the filtering information.
4. Also, since the redirect is a URL, rather than a GenFireServerEvent, the filtering column isn’t passed back to the form.
Therefore, no filtering occurs.
To retain the filter after editing (or inserting, for that matter), you will need to get that column filter information back to the DVWP.
When I have a chance, I’ll work on a solution for that and post an article here if I get it working.