
SharePoint: Extending the DVWP – Part 29: Modifying Form Action Workflows on the remove Template
 Author: Jim Bob Howard
Marty McFly: "Heavy!"
Doc Brown: "There’s that word again! Is there something wrong with the Earth’s gravitational pull in the future?"
If the last few articles have been a bit heavy, hopefully today’s will be a little lighter, because we’ve already done some of this in Parts 7 thru 12, when we first created form action workflows.
But don’t skip this one.
There are some potential pitfalls we want to avoid with the work we’ll be doing today. I’ll draw special attention as we come to them so you’ll definitely know when you’re getting close.
Shall we?
Meanwhile, Back at the Ranch…
When we last saw our hero, the mild-mannered edit template had almost completed the transformation to the superhero known as remove template.

But not quite…
The Terminated and Resigned buttons are form action links but, right now, they’re still acting like the Save link on the edit template. So, let’s finish the transformation of our superhero.
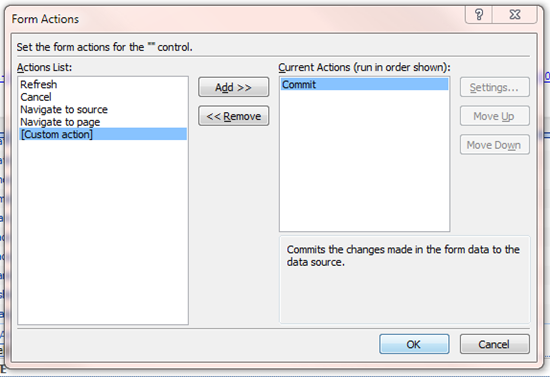
- In SharePoint Designer (SPD), right-click on Terminated and choose Form Actions
- If you have already created a [Custom Action] for your edit template, it will show up here, too. Do NOT click the Settings… button! If you do, you will be editing the workflow that really should only be associated with the Save button on the edit template.
- Right-click on Terminated and choose Form Actions again.
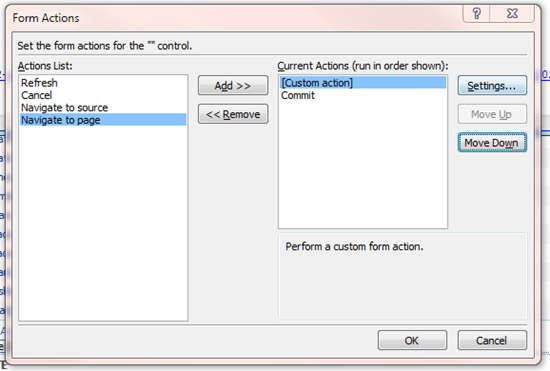
- Click [Custom Action], then Add >> to start creating a new workflow for this link.
- Click Move Up to make sure the workflow runs first.
- THEN, you can click the Settings… button to configure the workflow.
Pitfall Alert!!!
Instead, click the [Custom Action], then << Remove, and then OK. This will remove all connection to the Save workflow.
Remove the existing [Custom action] to disconnect this form action link from it.
Now that you’re starting with a clean slate, you can begin setting up the workflow this form action will call
Workflow, She Wrote
We’ve been through writing to the Audit list using SPServices in the PreSaveAction() and we’ve talked about how we can get our form data and other variables into the workflow.
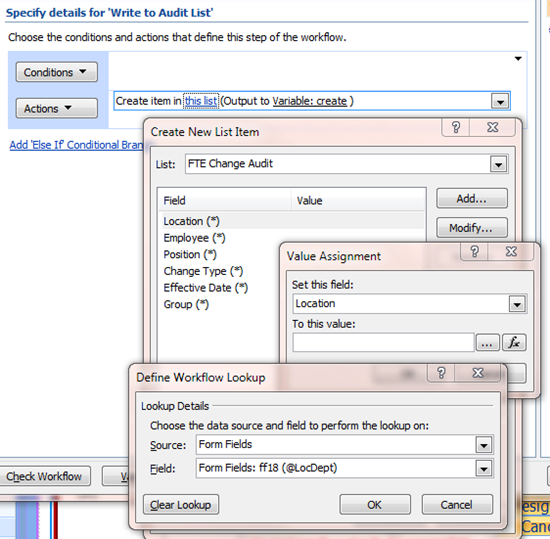
Since we made labels out of our controls (except Effective Date), we’ll have access to all of them in the workflow. So let’s use the Create List Item action:
- Choose your audit list and all of the required fields will be displayed for you. Simply walk through each one, clicking Modify… for each and choosing your form fields for the value:
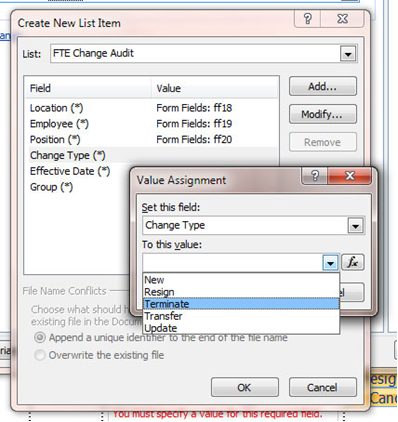
- When you get to Change Type, choose Terminate from the choice field list
- When you’re all done, click OK, Finish, and OK. (If you come back to edit this later, see Pitfall Alert! below before clicking second OK.)
- Make note of the workflow number in the pop-up that displays next. (You might want to add a comment to your XSLT to make it easy to remember which you’re working with later.)
- Rinse and repeat for the Resign button.
Required fields will automatically be added to the Create New List Item dialog
Pitfall Alert!!!
If you build on this example using the techniques we discussed in Part 10: Passing Workflow Variables to a Form Action Workflow, DON’T click the second OK. Doing so will overwrite the changes you made to pass in workflow variables.
Just remember that the form action and the workflow are two separate entities. To have access to your form fields and workflow variables in the workflow, you have to go thru the form action as shown. BUT, if you don’t want your variables overwritten, don’t click OK on the Form Actions once you’ve done your initial creation of the workflow.
When you’re done using the Design pane to step through the remove template, be sure to switch the template names back
<xsl:template name="dvt_1.rowremove">
    <xsl:param name="Pos" />
    <tr>
        . . .
    </tr>
</xsl:template>
<xsl:template name="dvt_1.rowedit">
    <xsl:param name="Pos" />
    <tr>
        . . .
    </tr>
</xsl:template>
…goes back to…
<xsl:template name="dvt_1.rowedit">
    <xsl:param name="Pos" />
    <tr>
        . . .
    </tr>
</xsl:template>
<xsl:template name="dvt_1.rowremove">
    <xsl:param name="Pos" />
    <tr>
        . . .
    </tr>
</xsl:template>
Next time, we’ll keep Extending the DVWP by adding some filters and Easy Tabs to make it easier to keep things separate, while grouping them into easier-to-maintain collections.
Author: Jim Bob Howard
Jim Bob Howard is a web designer / webmaster in the healthcare industry. He has been working with SharePoint since March 2009 and enjoys sharing what he has learned. He is a moderator and frequent contributor to Stump the Panel, and answers SharePoint questions on Twitter (@jbhoward) and via email ([email protected]).
- SharePoint: Extending the DVWP - Part 1: Layout Enhancement - Rearranging Columns - Default and Edit Templates
- SharePoint: Extending the DVWP - Part 2: Layout Enhancement - Rearranging Columns - Insert Template
- SharePoint: Extending the DVWP – Part 3: Getting it All on One Line - DVWP Function Action Links
- SharePoint: Extending the DVWP – Part 4: Turning DVWP Action Links into Buttons
- SharePoint: Extending the DVWP – Part 5: Doing Stuff Before Save on Submit - PreSaveAction()
- SharePoint: Extending the DVWP – Part 6: Examining the Form Action Links
- SharePoint: Extending the DVWP – Part 7: Creating a Form Action Workflow
- SharePoint: Extending the DVWP – Part 8: Creating a Form Action Workflow - The After Math
- SharePoint: Extending the DVWP – Part 9: Oops! Failed Setting Processor Stylesheet
- SharePoint: Extending the DVWP – Part 10: Passing Workflow Variables to a Form Action Workflow
- SharePoint: Extending the DVWP – Part 11: Getting More Form Fields to the Workflow
- SharePoint: Extending the DVWP – Part 12: Adding More Form Fields from the Data
- SharePoint: Extending the DVWP – Part 13: Putting PreSaveAction() to Work – Creating Variables
- SharePoint: Extending the DVWP – Part 14: Putting PreSaveAction() to Work with jQuery
- SharePoint: Extending the DVWP – Part 15: User-Managed Dropdowns with Site Columns
- SharePoint: Extending the DVWP – Part 16: User-Managed Dropdowns - Loading Data
- SharePoint: Extending the DVWP – Part 17: User-Managed Dropdowns – Creating a Relationship list
- SharePoint: Extending the DVWP – Part 18: User-Managed Dropdowns – Loading the Relationship list – Part 1
- SharePoint: Extending the DVWP – Part 19: User-Managed Dropdowns – Loading the Relationship list – Part 2
- SharePoint: Extending the DVWP – Part 20: Cascading Dropdowns - Applying the jQuery
- SharePoint: Extending the DVWP – Part 21: Cascading Dropdowns - Three-tier Cascade
- SharePoint: Extending the DVWP – Part 22: Creating Title Based on Other Fields with jQuery
- SharePoint: Extending the DVWP – Part 23: Creating Title Based on Other Fields with a Workflow
- SharePoint: Extending the DVWP – Part 24: A Note to Readers
- SharePoint: Extending the DVWP – Part 25: Using an Audit Trail by Creating List Items with SPServices
- SharePoint: Extending the DVWP – Part 26: Modifying the Edit Template
- SharePoint: Extending the DVWP – Part 27: Adding an Alternate Edit Template to a DVWP
- SharePoint: Extending the DVWP – Part 28: Massage the Remove Template
- SharePoint: Extending the DVWP – Part 29: Modifying Form Action Workflows on the remove Template
- SharePoint: Extending the DVWP – Part 30: Using EasyTabs with Filtered DVWPs to Make Data Manageable
- SharePoint: Extending the DVWP – Part 31: Filling in Default Data on the insert Template with jQuery
- SharePoint: Extending the DVWP – Part 32: Filling in Default Data on the insert Template with Multiple DVWPs
- SharePoint: Extending the DVWP – Part 33: Modifying Total and Subtotal Row Layouts in DVWP
- SharePoint: Extending the DVWP – Part 34: Using Icons for Form Action Links
- SharePoint: Extending the DVWP – Part 35: Putting it All Together
- SharePoint: Extending the DVWP – Bonus: Fixing the Insert Form Action When "No Matching Items"
- SharePoint: Extending the DVWP – Bonus: Creating a Title Based on Dropdowns with jQuery


Hi Jim,
I am getting an error whenever I try to initiate a form action workflow for both save and delete form actions. I thought it might be a missing $POS variable in dvt_1.automode template, but SPD 2010 adds that variable for me. The error is inside the browser, not SPD. Thanks!
Richard
Bounce it over to STP and tell me what error you’re getting.
Blessings,
Jim Bob
The issue is resolved! SPD 2010 adds a $Pos variable to the dvt_1.automode template when you create a form action workflow. Delete that variable, and follow the instructions here:
http://www.endusersharepoint.com/2010/06/10/sharepoint-extending-the-dvwp-%e2%80%93-part-9-oops-failed-setting-processor-stylesheet/comment-page-1/#comment-101806. The workflow will then work. Thanks.