
SharePoint: Extending the DVWP – Part 33: Modifying Total and Subtotal Row Layouts in DVWP
 Author: Jim Bob Howard
We’re in the home stretch… just a couple more tweaks to our DVWP to make it work a little better and then we’ll put all the pieces together.
Totally Awesome
To really make this worthwhile, we should do some grouping within our filtered views, along with some totals and sub-totals.
First, let’s turn on the grouping and see what we get OOTB.
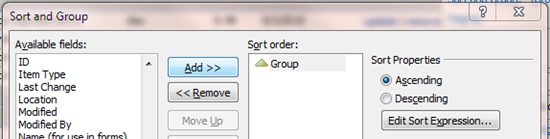
- In SharePoint Designer (SPD), hover over your DVWP in the Design pane and click the chevron (right arrow), then click on Sort and Group
- Choose the fields you want to use for grouping and/or sorting and click Add > >
- For our purposes, we’re already filtering the DVWP by Location; grouping by it would be redundant. So we want to go down to the next level and group by Group. And we’ll sort by Worker name, per my requirements. It might instead make sense to sort by Position, depending on how the managers are most comfortable working with the data.

Click Sort and Group near the top of Common Data View Tasks
Anything you choose in the Available fields and Add > > to the Sort order will be sorted according to the Sort Properties.
All choices are sorted…
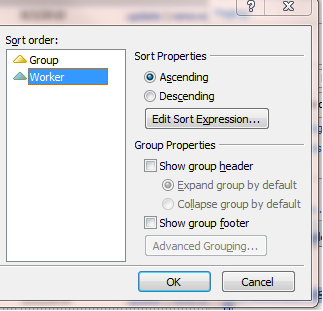
…but not all choices are grouped.

Option 1: Showing column totals per group

Option 2: Showing group footer
It doesn’t really matter which option you choose because we’re going to be changing it in just a bit anyway. That said, I’ll be working from Option 2.
So, here’s our "before" and "after":

For the rest of this article, we’ll take care of the Group headers and footers (1-3).
Modifying Group Headers and Footers
The lowest-hanging fruit on this tree is (1) —the Group header. With only one grouping, it’s pretty redundant (and ugly) to indicate that this section is grouped in a Group, so let’s get rid of that text and just display the name of the Group.
- In SPD split view, click on any one of the Group headers in the Design pane to bring up the stylesheet in the Code pane.
- Delete the first four lines shown in the figure above.
- Click in the Design pane

Click on the Group name in the Design pane to find the corresponding XSLT in the Code pane
    <b>
        <xsl:value-of select="$fieldtitle" />
    </b>
    <xsl:if test="$fieldtitle">: </xsl:if>
Delete this part

Subtotal Count
At first blush, it looks like we might not have to do anything to (2). And that’s true, if you like the way it looks. I want it to stand out a little more.
- In the SPD split view, click on any of the Group footers
- I like to have the subtotals a little darker and use the same background colors that are already in the grid. So, for every TD in this TR, I changed the class from ms-vh to ms-gb2 ms-alternating. I also prefer to have the label left-justified with the column title and data:
- Click in the Design for the reveal.

<td class="ms-gb2 ms-alternating" nowrap="">
Count : <xsl:value-of select="count($nodeset)" /></td>
<td class="ms-gb2 ms-alternating" nowrap="">
<xsl:text disable-output-escaping="yes" ddwrt:nbsp-preserve="yes">&nbsp;</xsl:text>
</td>
<td class="ms-gb2 ms-alternating" nowrap="">
<xsl:text disable-output-escaping="yes" ddwrt:nbsp-preserve="yes">&nbsp;</xsl:text>
</td>
Adding a Subtotal Sum
On the same line with the count, I also need a calculation (3) of all the FTE hours for that Group.
- Click on the empty cell beneath the last row in the Group
- In the Code pane, this td tag will be highlighted. Replace…
- To give it a meaningful title while keeping the subtotal lined up with the rest of the FTE amounts, we’ll need to put the title in the next cell to the left. Click it in Design to highlight it in Code.
- The only problem at this point is that putting the text in that td causes the smaller column of Work Shift to be artificially wide. So, let’s extend the subtitle into the previous td, too:

We’re going to put an FTE subtotal here…
<xsl:text disable-output-escaping="yes" ddwrt:nbsp-preserve="yes">&nbsp;</xsl:text>
…with…
<xsl:value-of select="format-number(sum($nodeset/@FTE),'#0.00')"/>
This will give us a sum() of all the @FTE amounts in this nodeset, which at this point are just the ones in this Group.
This time, we’ll replace…
<xsl:text disable-output-escaping="yes" ddwrt:nbsp-preserve="yes">&nbsp;</xsl:text>
…with…
<nobr>Total <xsl:value-of select="$nodeset/@Group" /> FTE :</nobr>
Here we’re just inserting the Group name for this nodeset.
Simply delete the preceding td and give this one a colspan of 2.
<td class="ms-gb2 ms-alternating" nowrap="" colspan="2" align="right"></td>
For aesthetic purposes, we’ve also right-aligned the td.
Page Totals
For the page totals (4 and 5), it would be great if those stood out a bit more, even if they’re just bigger. We’ll use the accounting style of a double line to show page totals.
- Click on the Count cell (4), as before.
- First, we’ll move the ms-alternating class to the tr so we don’t have to keep repeating it.
- We’ll remove the class attribute for all the td’s on this row. But, we’ll also add in a border-top to create the double-line accounting style:
- SharePoint adds an xsl:text tag to put a space before the Count title. I didn’t like it, so I removed it. In the rest of the TD’s—if they’re empty ones, the space is required to make the border-top appear.
- This time, our sum() will come from $Rows, rather than $nodeset:
- The title will need to extend into the previous cell again. This time, it will be a total for the Location, rather than the Group:
    <tr valign="top" class="ms-alternating">
</tr>
    <td nowrap="" style="border-top:medium black double">
	</td>
<xsl:value-of select="format-number(sum($Rows/@FTE),'#0.00')"/>
<td style="border-top:medium black double" nowrap="" colspan="2" align="right"> Total <xsl:value-of select="$Rows/@LocDept" /> FTE :</td>
Since we’re going to use this same DVWP template for all of our Locations, it’s probably easier to "look up" the name of the Location. If you’ve used abbreviations like I have, you may want to type out the long name of the Location for this DVWP, since there’s only one per webpart.
Almost there
It’s looking better already.

Next time: One last tweak we’ll do next time: Icons for the Form action links.
Author: Jim Bob Howard
Jim Bob Howard is a web designer / webmaster in the healthcare industry. He has been working with SharePoint since March 2009 and enjoys sharing what he has learned. He is a moderator and frequent contributor to Stump the Panel, and answers SharePoint questions on Twitter (@jbhoward) and via email ([email protected]).
- SharePoint: Extending the DVWP - Part 1: Layout Enhancement - Rearranging Columns - Default and Edit Templates
- SharePoint: Extending the DVWP - Part 2: Layout Enhancement - Rearranging Columns - Insert Template
- SharePoint: Extending the DVWP – Part 3: Getting it All on One Line - DVWP Function Action Links
- SharePoint: Extending the DVWP – Part 4: Turning DVWP Action Links into Buttons
- SharePoint: Extending the DVWP – Part 5: Doing Stuff Before Save on Submit - PreSaveAction()
- SharePoint: Extending the DVWP – Part 6: Examining the Form Action Links
- SharePoint: Extending the DVWP – Part 7: Creating a Form Action Workflow
- SharePoint: Extending the DVWP – Part 8: Creating a Form Action Workflow - The After Math
- SharePoint: Extending the DVWP – Part 9: Oops! Failed Setting Processor Stylesheet
- SharePoint: Extending the DVWP – Part 10: Passing Workflow Variables to a Form Action Workflow
- SharePoint: Extending the DVWP – Part 11: Getting More Form Fields to the Workflow
- SharePoint: Extending the DVWP – Part 12: Adding More Form Fields from the Data
- SharePoint: Extending the DVWP – Part 13: Putting PreSaveAction() to Work – Creating Variables
- SharePoint: Extending the DVWP – Part 14: Putting PreSaveAction() to Work with jQuery
- SharePoint: Extending the DVWP – Part 15: User-Managed Dropdowns with Site Columns
- SharePoint: Extending the DVWP – Part 16: User-Managed Dropdowns - Loading Data
- SharePoint: Extending the DVWP – Part 17: User-Managed Dropdowns – Creating a Relationship list
- SharePoint: Extending the DVWP – Part 18: User-Managed Dropdowns – Loading the Relationship list – Part 1
- SharePoint: Extending the DVWP – Part 19: User-Managed Dropdowns – Loading the Relationship list – Part 2
- SharePoint: Extending the DVWP – Part 20: Cascading Dropdowns - Applying the jQuery
- SharePoint: Extending the DVWP – Part 21: Cascading Dropdowns - Three-tier Cascade
- SharePoint: Extending the DVWP – Part 22: Creating Title Based on Other Fields with jQuery
- SharePoint: Extending the DVWP – Part 23: Creating Title Based on Other Fields with a Workflow
- SharePoint: Extending the DVWP – Part 24: A Note to Readers
- SharePoint: Extending the DVWP – Part 25: Using an Audit Trail by Creating List Items with SPServices
- SharePoint: Extending the DVWP – Part 26: Modifying the Edit Template
- SharePoint: Extending the DVWP – Part 27: Adding an Alternate Edit Template to a DVWP
- ExSharePoint: Extending the DVWP – Part 28: Massage the Remove Template
- SharePoint: Extending the DVWP – Part 29: Modifying Form Action Workflows on the remove Template
- SharePoint: Extending the DVWP – Part 30: Using EasyTabs with Filtered DVWPs to Make Data Manageable
- SharePoint: Extending the DVWP – Part 31: Filling in Default Data on the insert Template with jQuery
- SharePoint: Extending the DVWP – Part 32: Filling in Default Data on the insert Template with Multiple DVWPs
- SharePoint: Extending the DVWP – Part 33: Modifying Total and Subtotal Row Layouts in DVWP
- SharePoint: Extending the DVWP – Part 34: Using Icons for Form Action Links
- SharePoint: Extending the DVWP – Part 35: Putting it All Together
- SharePoint: Extending the DVWP – Bonus: Fixing the Insert Form Action When "No Matching Items"
- SharePoint: Extending the DVWP – Bonus: Creating a Title Based on Dropdowns with jQuery


A lot of nice detail! Excellent post.
Stacy
SharePoint Developer
Thanks, Stacy!
Blessings,
Jim Bob
In the group header i need to reformat the heading when the user chooses to group by Date or Percent complete. Could you please tell us how we can reformat these values so that they look like they do in the grid, i.e, 3% and 12/10/2010, instead of the default 0.300000 and 12/10/2010 12:00:00.
Thanks
Dean
Dear Dean,
In my example, I don’t give the user the choice of changing how the data is grouped. So, let’s take a look at your situation and come up with a solution to do what you need.
I have created a new forum entry on STP (http://www.endusersharepoint.com/STP/viewtopic.php?f=9&t=2090) so we can talk it out.
Blessings,
Jim Bob
Hi
thank you for great post!
I got problem with “sum(”
“format-number(count($nodeset/@Hours” gives count result,
but “format-number(sum($nodeset/@Hours” returns empty value
what might be the reason?
/sarunas
Probably because @Hours isn’t a number that can summed well. Try putting your format-number() inside the sum() rather than outside.
e.g. sum(format-number($nodeset/@Hours))
Make sure that Hours actually looks like a number, meaning it can’t have commas in it if your Hours are over 1000. Alternately, it may be that your sum() is what is going over 1000 and are then having trouble being number-formatted.
…does that help?
Blessings,
Jim Bob
I ran across this post in a google search…. you better believe I’ll be going back to part 1 of the post and reading all the way through. Thanks for this post and I’m looking forward to reading through the series.
I’m having an issue with grouping In a multi-item view where I’ve grouped a task list (displayed in a data view web part) by priority. I have “show group header” checked and the group is expanded by default. I have no options checked in the advanced grouping options. The group header is repeating for each task so I might have a header for “Normal Priority” displayed 20 times if there are 20 tasks with a normal priority instead of them all being grouped under one “normal priority” header.
Below this multi-view I have inserted a joined subview. I have added grouping to the subview as well (which displays) but I want the subview collapsed by default. Choosing this option seems to have no effect in the joined subview. The option works fine in the multi-item view. Any ideas?
Dave – Keep an eye out over the next few weeks. We’re putting the entire series together as an eBook, along with a couple of “Bonus” chapters. If you’re subscribed to our newsletter, you’ll get 50% off. — Mark
Dave,
Great questions! Let’s bounce it over to Stump the Panel http://www.EndUserSharePoint.com/STP so we can walk through the code to see where the issue is on your page.
Blessings,
Jim Bob