
SharePoint: Extending the DVWP – Part 35: Putting it All Together
 Author: Jim Bob Howard
The “Real” Title: How I Created a SharePoint List to Replace an Excel Spreadsheet That Was Being Routed Around to 15 Managers Every Month by Creating a Web Part Page for Each Manager Which Displays an Editable Table of Employee Information Filtered into Easy-to-Read and –Update Tabs, Using Site Columns, Cascading Dropdowns, DVWPs, EasyTabs, Form Action Workflows, PreSaveAction(), SPServices/jQuery, XSLT, and CSS.
At last, we arrive at part 35 of Extending the DVWP. For the last 18 weeks, we’ve been assembling tools, techniques, and trial-and-error to put together a robust solution to solve a simple problem:
Problem: "I have an Excel document that I re-create every month and email out to 15 managers. Each manager is responsible for one of fifteen worksheets, but I send all the sheets to every manager, hoping they make updates to the right areas. I also cross my fingers that they only enter data in certain fields and don’t obliterate my formulas.
"Is there a way we can do this better via SharePoint?"
Our solution needs the following:
- Avoid routing documents through email
- Allow each manager easy access to view and update their own data
- Give the curator a view of all employees across all locations
- Audit changes to the current data, allowing historic reporting
- Make regular changes as easy as possible
- Make irregular changes as intuitive as possible
- Give the manager multiple views of employees, gathered by employee type
- Provide group sub-totals and page totals
It will look something like this:
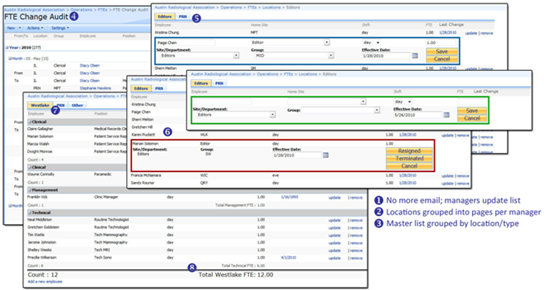
Getting Started
The web part that looks most like an Excel spreadsheet is the Data View Web Part (DVWP), which will allow us to show all of the employees for a Location with on-the-page edit options. So we’ll start with a DVWP, but extend it to meet our needs.
Everything for this project will be contained within its own subsite so that the default page and the Quick Launch navigation column will all pertain to the Full-Time Employee (FTE) project. The easiest way to start creating pages that function like the default page (and, therefore, include the Quick Launch) is to create them in SPD from the default page.
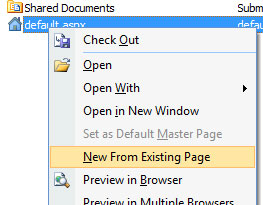
Right-click default.aspx to open context menu, then click New from Existing Page
We won’t need all of these webparts, but it’s a good place to start:
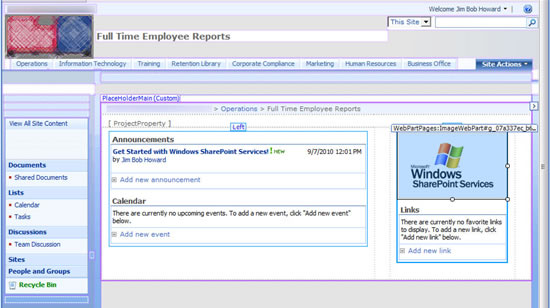
Our new webpart page based on default.aspx for our site
Assuming the possibility that we’ll want to use Share Documents for… well, documents we want to share… we’ll save our new page in a new document library called Locations.
- From the Web Site tab, right-click in the window to open the context menu
- Choose Document Libraries and Document Library, then give the new library a name
- From the tab of your new document, Save it to your new library
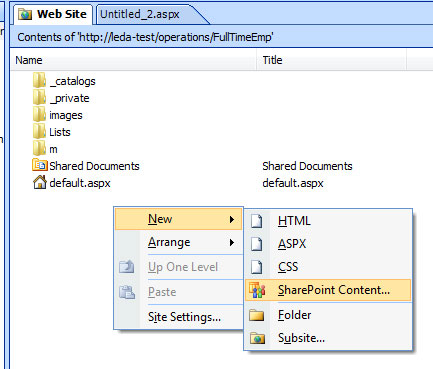
Right-click in window, then choose New -> SharePoint Content…
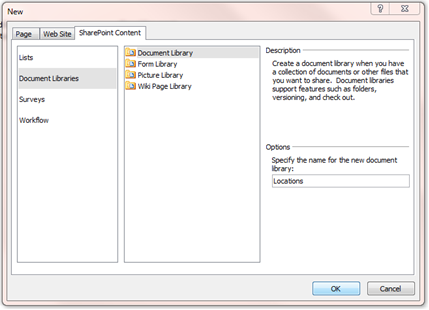
Choose Document Libraries and Document Library, give it a name
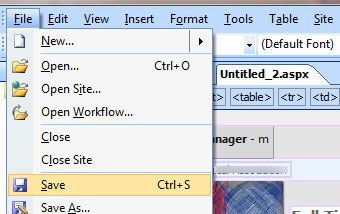
Save the new page into the new document library. I called mine LocationsMaster.
Now we have a page we can work with. In my case, I don’t need the Right web zone. Rather than just deleting the zone, I’ll remove the TDs that hold the Right zone and the space between it and the Left zone.
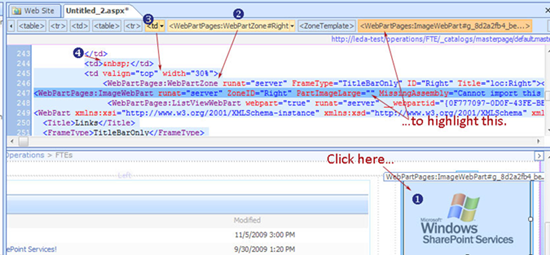
Easy as 1-2-3 … uh, 4
- In Split view, click on the Image web part in the Design pane. This will select the HTML/XSL for the entire web part (dark blue, above) in the Code pane, as well as highlight the ImageWebPart in the Tag Bar.
- If you click on the Tag Bar tab for the WebPartZone#Right, the HTML/XSL for the entire web zone—and any included web parts—will be selected, but not the TD that contains it.
- The tab just to the left of that one will select the entire TD tag.
- But we want to delete the preceding sibling TD, too, so we’ll hold the Shift key and click to the left of the TD tag on line 244 above (your line numbers may vary) to select it, as well.
The Delete key will get rid of it all for us.
In the Design pane, we see that there’s still a big gaping hole where the right zone was.
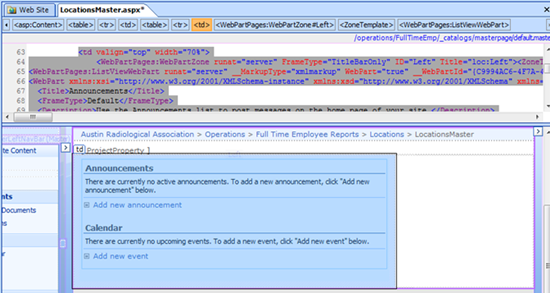
Removing the Right web part zone left a big hole on the page. We’ll fill that in.
To stretch the Left zone over to where the Right used to be:
- Click on a web part in the Left zone, then
- Click the closest td tab in the Tag Bar, which will
- Bring the td tag to the top of the Code pane, where you’ll
- Notice that the width is set to 70%.
- Change that to 100% and you’ll get your real estate back. Well…
- You’ll find that there’s one more td below this one, so
- Delete it and your DVWP will be wall-to-wall
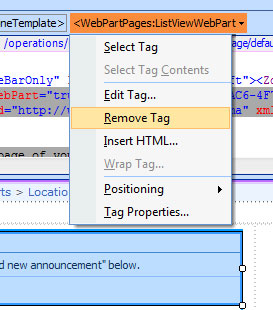
For Announcements and Calendar, we don’t want to delete the zone, just the web parts. So, for each of them:
- Click on the web part in Design,
- Hover over the highlighted tab in the Tag Bar,
- Click the arrow to open the context menu, and
- Choose Remove Tag
Now we can add our DVWP.
Adding the DVWP
Now we have the shell of our page weathered-in, we are ready to finish. Let’s add our first DVWP.
- Click the link in the zone to highlight it in SPD.
- Click Insert -> SharePoint Controls -> Data View
- SPD continues to walk us through the process.
- SPD will shift over to the Data Source Details tab where you can choose the fields you want to include.
- When you have the fields you want, click Insert Selected Fields as…

Follow the instructions on the link.
This will make that zone ready to receive the DVWP.

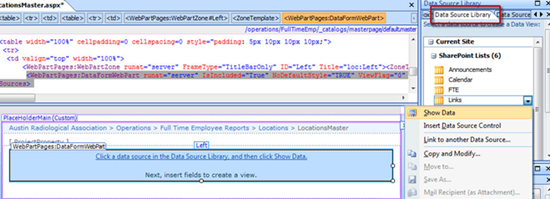
On the Data Source Library tab, click on the dropdown for the list that contains your data. Then, click Show Data.
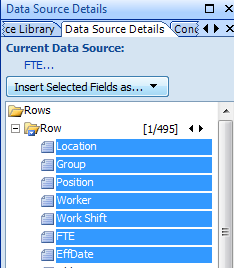
Note: SPD will put the fields on the DVWP in left-to-right order according to the order you click them in the Data Source Details window. Hold down the Ctrl key to click on multiple columns out of the displayed order.
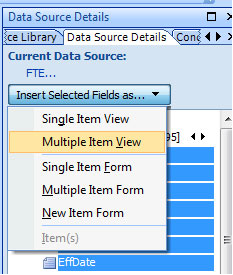
…and choose Multiple Item View.
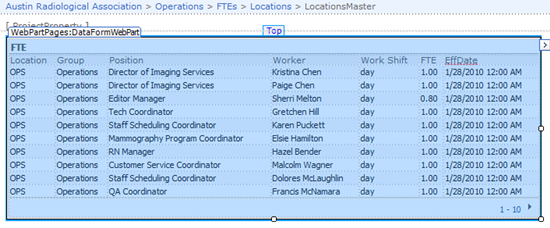
Initial load of the DVWP
Now that we have it on the page, we can start massaging the page through wizards and minor XSL changes.
Massaging the DVWP
One thing I definitely want is for my project to use multiple DVWPs to manage the data, rather than look at it in blocks of ten records at a time.
Massage Data View Properties: Paging
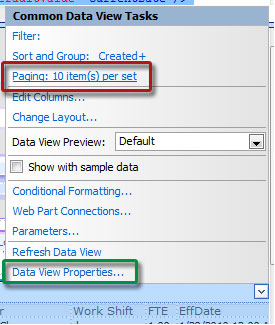
The red-boxed link opens the Data View Properties dialog box to the Paging tab
You could also get there from the menu: Data View -> Paging…
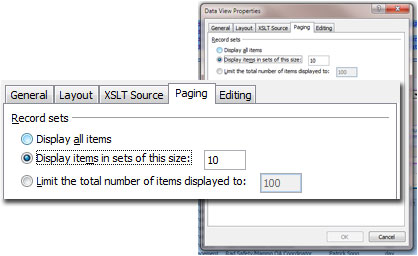
By default, paging is set to 10 items. We’ll check Display all items.
While we’re here, let’s change a couple of other settings.
Massaging Data View Properties: Column Heading Sorting
It’s nice to let the user do some sorting within the page, so we’ll turn that on from the General tab.
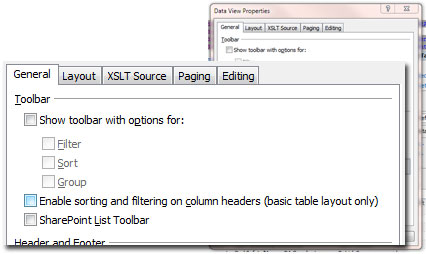
No Toolbar settings are checked by default. We’ll Enable sorting and filtering on column headers.
Massaging Data View Properties: Editing
We want the user to insert, edit, and delete right from the DVWP, so let’s turn those on from the Editing tab.
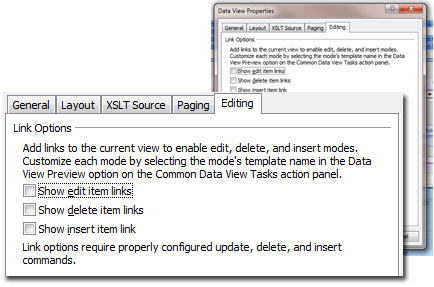
All Link options are turned off by default. We’ll check all three boxes.
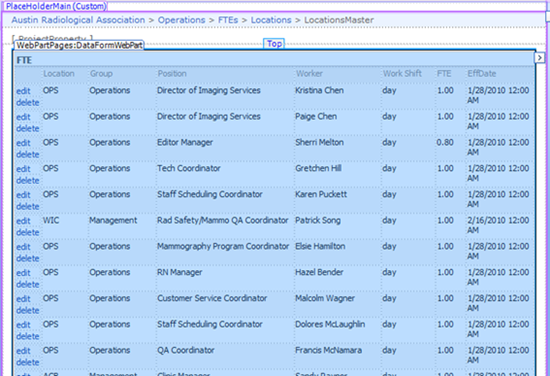
The first few extensions to the DVWP: inline editing, no paging, and column header-based sort/filter.
Mine took awhile to load in SPD because I have 486 records. I certainly don’t want my users having to load that much data at once, so let’s add some filters and grouping.
Massaging Data View Properties: Filtering
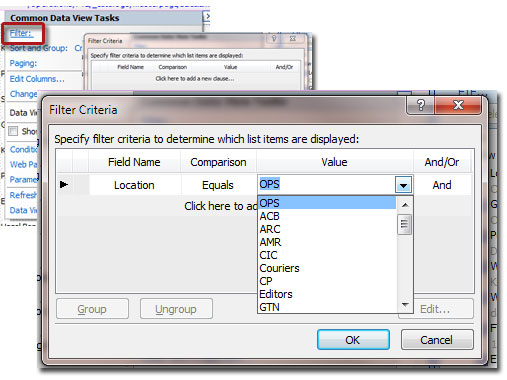
Filtering the DVWP will allow us to segment the list according to Location
Like Paging, you can get to the Filter Criteria dialog from the menu: Data View -> Filter…
Massaging Data View Properties: Sort and Group
While we’re working with the tasks, we’ll sort and group the data chunk we’ve created.
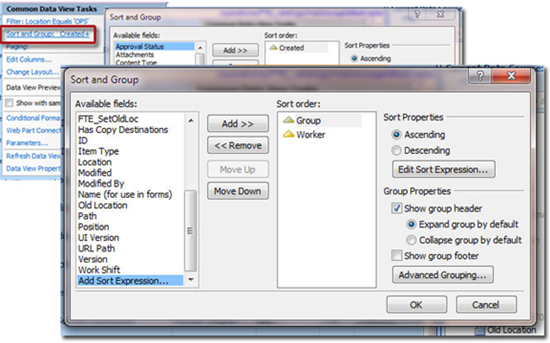
The default is to sort ascending by Created. We’ll group by Group and sort by Worker, both ascending.
Massaging Data View Properties: Edit Columns…
Now that we’ve filtered by Location and grouped by Group, we don’t need those columns visible anymore.
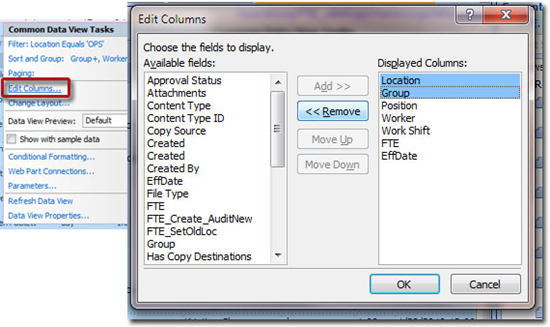
Remove the Location and Group columns by highlighting them and clicking << Remove.
Massaging Data View Layout: Titles, Headers, and Formatting
Just a couple more tweaks to make before we start building out our extended solution.
Title
Since we’re going to use this same web part for multiple locations, we need to make a quick change to the page title.
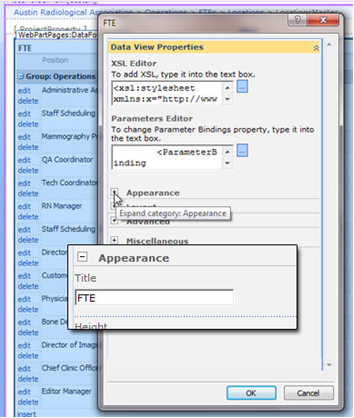
The web part title defaults to the name of the List whose data we’re displaying. We’ll change it to Operations to reflect our filtering options.
Headers
Now that I’ve created my list and loaded all my data, HR has decided to change their nomenclature: they want to see "Job Title" instead of "Position," "Employee" for "Worker," "Shift" rather than "Work Shift," and "Effective" in place of "EffDate."
Each column header is handled by a template call to dvt.headerfield, passing in the display name.
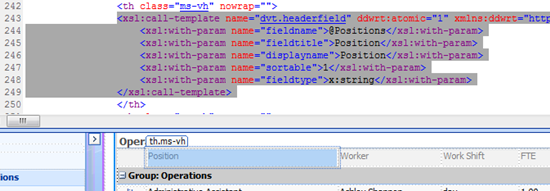
Click the column header in Design to highlight the template call in the Code pane.
In this template, fieldtitle and displayname are the two we have to update to change the text on the header row (see line 245-6):
<xsl:call-template name="dvt.headerfield" ddwrt:atomic="1" xmlns:ddwrt="http://schemas.microsoft.com/WebParts/v2/DataView/runtime">

    <xsl:with-param name="fieldname">@Positions</xsl:with-param>

    <xsl:with-param name="fieldtitle">Job Title</xsl:with-param>

    <xsl:with-param name="displayname">Job Title</xsl:with-param>

    <xsl:with-param name="sortable">1</xsl:with-param>

    <xsl:with-param name="fieldtype">x:string</xsl:with-param>

</xsl:call-template>
After we changed the column titles
Formatting
The time on the Effective Date is really meaningless; it’s always 12:00 AM. Let’s hide it by changing the data format.
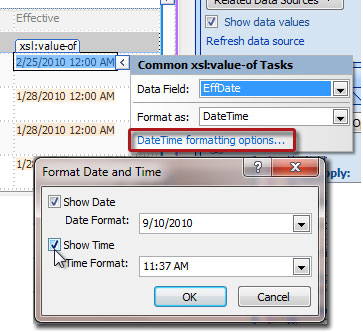
Dates show the time by default. We’ll uncheck Show Time to make it just a date. We could also change how the date is displayed.
Extending the DVWP
Now that we’ve finished massaging the way it looks, we can start Extending the DVWP.
The first thing is to Rearrange the Columns to get the edit and delete links on the right side of the page. We’ll have to do that for the default template, the edit template, and the insert template.
Next, we’ll put those form action links all on one line and then turn some of them into buttons.
Once we have them looking the way we want them, we’ll open them up, see how they work, add a PreSaveAction(), add a workflow, rearrange some things, and then fix what we broke.
Then, we’ll pass some workflow variables to the workflows, pass some form variables, and then add a few more. And we’ll add more variables that we can use with jQuery and the PreSaveAction() for form validation or writing to an audit trail.
To make data entry and modifications easier for the user, we’ll set up some site columns, load them with data, and create relationship lists between the site columns (and load those one of two ways). Then we’ll put those site columns and relationships to work with cascading dropdowns (both two and three-tier cascades).
Sometimes, when we’re loading massive amounts of data, it’s nice to have some fields defaulted for us. For instance, in our relationship lists, the Title is almost superfluous. It just tells us what data is in the relationship columns. We can let SharePoint fill that data in for us with jQuery. Alternately, we could fire up a workflow to do it instead.
Now that our data is flowing well, we can set up an audit trail to capture any changes made to the list.
Since our edit template looks like our default template, it may confuse our users as to which form they’re on. So, we can modify the edit template with some easy graphical elements to make it obvious where we are. And we can create another version of the edit template to capture information when a list item is deleted. This remove template can be massaged separately to meet our needs. We can even modify its form action workflows independent of the edit template.
To make things easier for the amounts of data we’re displaying to disparate users, we’ll want to reuse the web part we’ve created using Christophe Humbert’s Easy Tabs code for the Content Editor Web Part (CEWP). For each page we create following the steps above, we’ll add as many DVWPs as we want for each section, changing the filtering and sorting as it makes sense.
Before we save the webpart, though, we might want to make a few more changes to the insert template to fill in default data. But since we’re using multiple DVWPs, we’ll need to make special considerations so that our defaults land on the right tab.
Finally, to make it look even nicer, we’ll massage the way total and subtotal rows look and replace some of our form action links with icons.
Reusing Our Web Part
It took us 18 weeks to get here. It would be horrible to have to recreate each of those steps every time you want to add a new tab, or a new Location. Fortunately, we don’t have to. We can just export the webpart we created and reuse it.
We’ll do this from the browser.
- Click Site Actions -> Edit Page.
- Click edit -> Export…
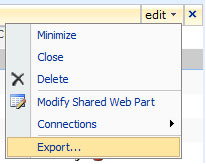
Save it somewhere easy to find.
Then whenever we want to use it, we’ll simply:
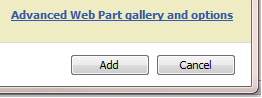
- Click the Add a Web Part button
- Click Advanced Web Part gallery and options
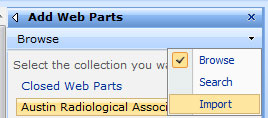
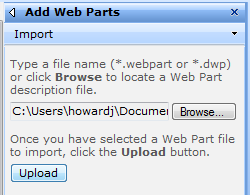
- Click the Browse dropdown and choose Import
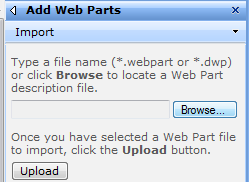
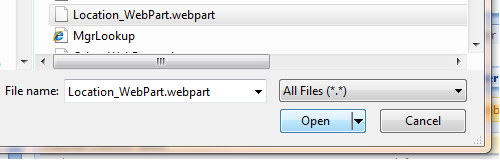
- Click the Browse… button
- Locate your webpart and click Open
- Click the Upload button
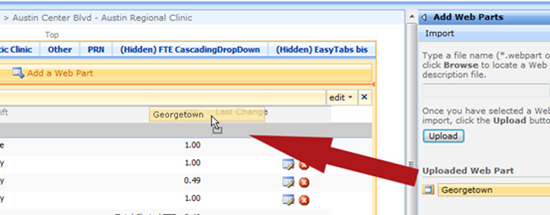
- Drag the webpart onto the page
- Repeat for each tab you want on the page
- Adjust the filtering, sorting and grouping for each tab, as above
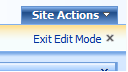
- Finally, click Exit Edit Mode
Goal!
Even though we’ve reached the end of the Extending the DVWP series, we’ve really only touched the tip of the iceberg of functionality available from the Data View Web Part. Keep checking back on EndUserSharePoint for more great ways to harness the power of the DVWP.
It’s been a pleasure to present this series and I look forward to hearing what great things YOU are doing with the DVWP.
Bonus
The question recently came up on Stump the Panel asking how to get around the "feature" that causes the insert form action link to go away when the list is empty. My solution is a bonus article to this series. Watch for it!
Author: Jim Bob Howard
Jim Bob Howard is a web designer / webmaster in the healthcare industry. He has been working with SharePoint since March 2009 and enjoys sharing what he has learned. He is a moderator and frequent contributor to Stump the Panel, and answers SharePoint questions on Twitter (@jbhoward) and via email ([email protected]).
- SharePoint: Extending the DVWP - Part 1: Layout Enhancement - Rearranging Columns - Default and Edit Templates
- SharePoint: Extending the DVWP - Part 2: Layout Enhancement - Rearranging Columns - Insert Template
- SharePoint: Extending the DVWP – Part 3: Getting it All on One Line - DVWP Function Action Links
- SharePoint: Extending the DVWP – Part 4: Turning DVWP Action Links into Buttons
- SharePoint: Extending the DVWP – Part 5: Doing Stuff Before Save on Submit - PreSaveAction()
- SharePoint: Extending the DVWP – Part 6: Examining the Form Action Links
- SharePoint: Extending the DVWP – Part 7: Creating a Form Action Workflow
- SharePoint: Extending the DVWP – Part 8: Creating a Form Action Workflow - The After Math
- SharePoint: Extending the DVWP – Part 9: Oops! Failed Setting Processor Stylesheet
- SharePoint: Extending the DVWP – Part 10: Passing Workflow Variables to a Form Action Workflow
- SharePoint: Extending the DVWP – Part 11: Getting More Form Fields to the Workflow
- SharePoint: Extending the DVWP – Part 12: Adding More Form Fields from the Data
- SharePoint: Extending the DVWP – Part 13: Putting PreSaveAction() to Work – Creating Variables
- SharePoint: Extending the DVWP – Part 14: Putting PreSaveAction() to Work with jQuery
- SharePoint: Extending the DVWP – Part 15: User-Managed Dropdowns with Site Columns
- SharePoint: Extending the DVWP – Part 16: User-Managed Dropdowns - Loading Data
- SharePoint: Extending the DVWP – Part 17: User-Managed Dropdowns – Creating a Relationship list
- SharePoint: Extending the DVWP – Part 18: User-Managed Dropdowns – Loading the Relationship list – Part 1
- SharePoint: Extending the DVWP – Part 19: User-Managed Dropdowns – Loading the Relationship list – Part 2
- SharePoint: Extending the DVWP – Part 20: Cascading Dropdowns - Applying the jQuery
- SharePoint: Extending the DVWP – Part 21: Cascading Dropdowns - Three-tier Cascade
- SharePoint: Extending the DVWP – Part 22: Creating Title Based on Other Fields with jQuery
- SharePoint: Extending the DVWP – Part 23: Creating Title Based on Other Fields with a Workflow
- SharePoint: Extending the DVWP – Part 24: A Note to Readers
- SharePoint: Extending the DVWP – Part 25: Using an Audit Trail by Creating List Items with SPServices
- SharePoint: Extending the DVWP – Part 26: Modifying the Edit Template
- SharePoint: Extending the DVWP – Part 27: Adding an Alternate Edit Template to a DVWP
- SharePoint: Extending the DVWP – Part 28: Massage the Remove Template
- SharePoint: Extending the DVWP – Part 29: Modifying Form Action Workflows on the remove Template
- SharePoint: Extending the DVWP – Part 30: Using EasyTabs with Filtered DVWPs to Make Data Manageable
- SharePoint: Extending the DVWP – Part 31: Filling in Default Data on the insert Template with jQuery
- SharePoint: Extending the DVWP – Part 32: Filling in Default Data on the insert Template with Multiple DVWPs
- SharePoint: Extending the DVWP – Part 33: Modifying Total and Subtotal Row Layouts in DVWP
- SharePoint: Extending the DVWP – Part 34: Using Icons for Form Action Links
- SharePoint: Extending the DVWP – Part 35: Putting it All Together
- SharePoint: Extending the DVWP – Bonus: Fixing the Insert Form Action When "No Matching Items"
- SharePoint: Extending the DVWP – Bonus: Creating a Title Based on Dropdowns with jQuery


You da man, Jim Bob. Excellent series!
M.
Thanks, Marc! Couldn’t have done it without you.
Blessings,
Jim Bob
Reallly great article. The most complete article I have found that takes me through step-by-step on DVWP and SharePoint Designer. Just what the dcotor ordered!
Glad it helped!
Blessings,
Jim Bob
Questions wrt to saving the web part and rehydrating it later.
1) I assume that you have to refer to th underlying lists by name, as opposed to by GUID, if you want to be able to reuse the web part on any site? Is that true? If so, where do you have to replace the GUID?
2) If you add a workflow, will the workflow be asved as part of the web part?
3) When you save the web part with SP 2007, can you the rehydrate the web part in SharePoint 2010?
1) Good question, Marcel. I haven’t done that. I only created this webpart to be reused on pages within this solution.
2) No, workflows (at least pre-2010) are not easily portable. You can move them, but you have to step through them to reconfigure them.
The form action workflows though, are reusable within the same site. Even though multiple (by the time you’ve created all of the tabbed pages for the solution) webparts access them, the same workflow knows which webpart it is working with and works just fine.
3) That I don’t know. We haven’t migrated to 2010, yet. ;)
Blessings,
Jim Bob
1) If you export the Web Part and then import it elsewhere, it’ll probably need some fix up, regardless. I think that this is all great stuff, but you’ll probably not want to use it in multiple places exactly the same way.
2) Workflows are associated with lists (generally), not Web Parts.
3) You can always copy out the XSL and reuse it in SP2010. DVWPS are basically the same.
M.
Hi Jim Bob -
Great article.
A question.
Is there a way to add column filtering to columns not contained in the basic table layout? I created 5 additional columns. 4 are check boxes and one is a text column.
Looking at the code I see that the xsl:call-template block is not available for these custom columns created in SPD and no xPath variable is available.
Thank you very much in advance. Have a great day.
Jackie
Thanks, Jackie.
So, if no xPath is available for these fields, where are they being stored?
The filtering templates actually redraw the page with the items sorted according to filter/sorting settings, so they’re pulling from the datasource. If your new columns aren’t in that datasource, filtering/sorting on them is going to be a challenge. If they are in the datasource, there will be an xPath for them and you can co-op an existing template to sort/filter on that column as well.
If you want to explore this further, post further details in Stump the Panel and we can talk out what you’re trying to do (and post the link here so others can follow the discussion as well).
Blessings,
Jim Bob
excellent post!!
Thanks, John!
Hi Jim Bob. Thanks for your prompt response.
I have a document library which has content approval turned on. Group 1 is an editor Group 2 is the approver of documents uploaded to this document library. Once documents are approved within this document library Group 3 is notified to take an action.
Group 3 requires the ability to add additional information against items uploaded to this document library for their own process purposes.
It doesn’t make sense to grant Group 3 edit permissions to the document library as the status of the document in the document library will change and also the date modified.
I thought that creating a data connection to a dvwp to this document library, adding additional columns and granting editor permissions to Group 3 would suffice, but I haven’t been succesful.
What I would like to have is a dynamic list linked to a document library. Within that list would exist a hyperlink to the actual document (for viewing purposes) and also within this list would be the ability to add, edit columns and save the data (data is of type boolean and text). Updates to the list should not affect the original data source.
Could you please point me in the right direction. Thank you very much in advance. Have a great day.
Thanx for your good article.
How can i make some columns read only in list/view.?
ie,
I want to enter all the columns of the list, but end user can enter data only some columns.All the remaining should be read only for end user.
Look back at Part 28, where I created an alternate edit template to handle deletes more gracefully. There, I show an easy method for making fields read-only.
http://www.endusersharepoint.com/2010/08/17/sharepoint-extending-the-dvwp-%e2%80%93-part-28-massage-the-remove-template/
Blessings,
Jim Bob
I have a list for example ‘work’ in sharepoint 2007.
This work list contain 4 fields SI No,Job No,Technician,Start Date. I want to create some propertice of this list as follows,
The fields SI No and Job No are filled by me and the remaining columns are filled by some other user. The first 2 fields (SI no and Job No) should be read only for other user. Moreover they can enter data in each row only once in their filds.
Stump the Panel is a great place to talk out project specifics. Come on in; the water’s fine:
http://www.EndUserSharePoint.com/STP
Blessings,
Jim Bob
Hi,
I have 2 lists Employee and Project. Employee list contain empno,empname,address.
Project list contain project no,empno,project name.
I want create a search option. ie when giving empno, I want to get the empname,address,project name.
Is it possible without using sharepoint designer?
Dear Jim Bob Howard,
I have an application software in my PC.
can i work this software in sharepoint 2007?
i.e. open this software and work in sharepoint web part ?