
SharePoint: Extending the DVWP – Bonus: Fixing the Insert Form Action When “No Matching Items”
 Author: Jim Bob Howard
Richard asked a great question: "Have you had any trouble getting the insert link to work on the no matching items template?"
Yes, I’ve run into that same issue with the DVWP. Definitely a bug that wipes out the appropriate template call when the list is empty.
In the SPD Design pane, the work around is to check the “Show sample data” box, which tells SPD to simulate having data. This allows you to work with the link, at least. In the actual rendered page, it’s a bit more complicated once it’s been wiped out. Sounds like an addendum to the series that I need to write. ;)
I’ll do that.
Think I’ll start now.
Under the Hood
Turning on the edit and insert templates is as easy as checking a couple of boxes. But, SharePoint Designer (SPD) makes major changes in the underlying XSL: adding variables and parameters, changing the values of existing variables, adding new templates and conditional formatting, etc.
Variables
dvt_1_automode is a variable that tells the DVWP whether to draw the edit and/or delete links. 0 = no; 1 = yes. Turning on edit and/or delete sets it to 1.
If the edit template is turned on, a new parameter is created: dvt_1_form_editkey. If the insert template is turned on, dvt_1_form_insertmode is created. These two correspond to ParameterBindings that are passed into the page when the edit or insert link, respectively, is clicked.
<xsl:variable name="dvt_1_automode">0</xsl:variable>
…becomes…
    <xsl:param name="dvt_1_form_editkey" />
    <xsl:param name="dvt_1_form_insertmode" />
    <xsl:variable name="dvt_1_automode">1</xsl:variable>
Within the main template, dvt_1, the IsEmpty variable is also modified to be true not only when dvt_RowCount = 0, but also when RowLimit = 0.
<xsl:variable name="IsEmpty" select="$dvt_RowCount = 0" />
…becomes…
<xsl:variable name="IsEmpty" select="$dvt_RowCount = 0 or $RowLimit = 0" />
Design
The first design change SPD makes is to allow the column headers to wrap by emptying the nowrap attribute of the th tags.
    <th class="ms-vh" nowrap="nowrap">Location</th>
    <th class="ms-vh" nowrap="nowrap">Group</th>
    .
    .
…becomes…
    <th class="ms-vh" nowrap="">Location</th>
    <th class="ms-vh" nowrap="">Group</th>
    .
    .
The next design change is to check a condition to determine which template to call. If we’re not in insert mode, it will call dvt_1.body, passing it a set of rows to display. Then dvt_1.rowinsert, passing it dvt_1_form_insertmode, which determines whether to draw the fields for inserting data or just the insert link.
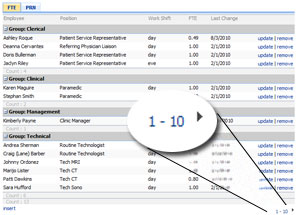
And then it adds the X – Y paging link to the footer, by passing ShowNavigation and ShowFormActions to the dvt_1.commandfooter template.
    <xsl:with-param name="ShowNavigation">
        <xsl:if test="not($dvt_1_form_insertmode = '1')">1</xsl:if>
    </xsl:with-param>
    <xsl:with-param name="ShowFormActions">
        <xsl:if test="($dvt_1_automode = '0' and $dvt_1_form_insertmode)">1</xsl:if>
    </xsl:with-param>
Consequently, these two params are also added to the dvt_1.commandfooter template and adds relevant elements to display them if needed.
New Template
In the default DVWP, the dvt_1.body template loops through all of the rows returned to it, calling the dvt_1.rowview template for each one and that’s it.
In the updated version, it still rolls through all of the rows, but checks each one to see if dvt_1_form_editkey matches the ID of that row. If it does, the dvt_1.rowedit template is called, passing it the position of the of the row. For all other rows, dvt_1.rowview is used.
<xsl:call-template name="dvt_1.rowview" />
…becomes…
    <xsl:choose>
        <xsl:when test="$dvt_1_form_editkey = ddwrt:EscapeDelims(string(@ID))">
            <xsl:call-template name="dvt_1.rowedit">
                <xsl:with-param name="Pos" select="concat('_', position())" />
            </xsl:call-template>
        </xsl:when>
        <xsl:otherwise>
            <xsl:call-template name="dvt_1.rowview" />
        </xsl:otherwise>
    </xsl:choose>
Of course, the edit template (dvt_1.rowedit) is also added to the page. (For more information on working with the edit template, see Part 26 of the Extending the DVWP series: Modifying the Edit Template.) So is the insert template. It will look something like this:
<xsl:template name="dvt_1.rowinsert">
    <xsl:param name="IsInsertMode" />
    <xsl:variable name="Pos">_new</xsl:variable>
    <tr>
        <xsl:choose>
            <xsl:when test="$IsInsertMode = '1'">
                <xsl:if test="$dvt_1_automode = '1'" ddwrt:cf_ignore="1">
                    <td class="ms-vb" width="1%" nowrap="nowrap">
                        <xsl:call-template name="dvt_1.automode">
                            <xsl:with-param name="KeyField">ID</xsl:with-param>
                            <xsl:with-param name="KeyValue" select="ddwrt:EscapeDelims(string(@ID))" />
                            <xsl:with-param name="Mode">insert</xsl:with-param>
                        </xsl:call-template>
                    </td>
                </xsl:if>
                <td class="ms-vb">
                    <SharePoint:FormField runat="server" id="ff1{$Pos}" ControlMode="New" FieldName="YourField" {code} />
                    <SharePoint:FieldDescription runat="server" id="ff1description{$Pos}" FieldName="YourField" ControlMode="Edit" />
                </td>
                <td class="ms-vb">
                    //The next column
                </td>
                .
                .
                .
            </xsl:when>
            <xsl:otherwise>
                <td class="ms-vb" colspan="99">
                    <a href="javascript: {ddwrt:GenFireServerEvent('__cancel;dvt_1_form_insertmode={1}')}">insert</a>
                </td>
            </xsl:otherwise>
        </xsl:choose>
    </tr>
</xsl:template>
Notice on line 486 that the IsInsertMode variable determines whether data controls are drawn, or just the insert line.
Further Modifications
In SPD, when we first add columns to our DVWP, we’re given a link to set the display text if no matching items are found.

SPD link to Data View Properties dialog
Clicking it brings up the same dialog box we used to modify the inline editing options. The link has the added feature of checking the Display text if no matching items are found box and filling in some default text.
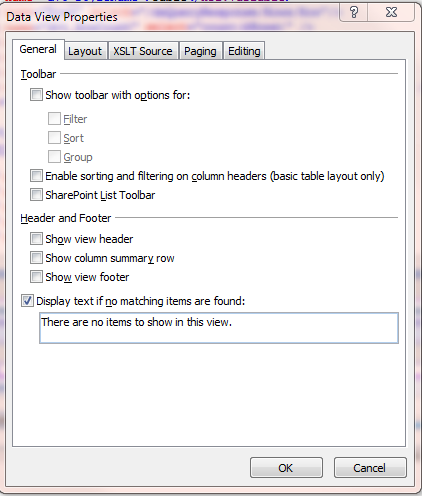
The checkbox and text are set by default when the dialog is opened from the SPD shortcut link
But, this is where we run into trouble.
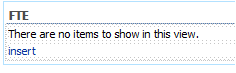
When SPD adds the text above, it bypasses the insert template which draws the insert link.

Oops. The insert link is gone!
Back Under the Hood
So, let’s see what it did and determine if we can fix it.
The first thing SPD does is create another variable, dvt_IsEmpty and sets it true if dvt_RowCount = 0. The very next thing is it wraps an xsl:choose block around the main table in the dvt_1 template.
    <table border="0" width="100%" cellpadding="2" cellspacing="0">
    .
    .
    .
…becomes…
    <xsl:variable name="dvt_IsEmpty" select="$dvt_RowCount = 0" />
        <xsl:choose>
            <xsl:when test="$dvt_IsEmpty">
                <xsl:call-template name="dvt_1.empty" />
            </xsl:when>
            <xsl:otherwise>
                <table border="0" width="100%" cellpadding="2" cellspacing="0">
                .
                .
                .
In other words, if the list is empty, the main table is not drawn; just the dvt_1.empty template, which looks like this:
<xsl:template name="dvt_1.empty">
   <xsl:variable name="dvt_ViewEmptyText">There are no items to show in this view.</xsl:variable>
   <table border="0" width="100%">
      <tr>
         <td class="ms-vb">
            <xsl:value-of select="$dvt_ViewEmptyText" />
         </td>
      </tr>
   </table>
</xsl:template>
The insert template is bypassed along with everything else. Not exactly what we want.
The Fix
This is SharePoint. There’s more than one way to accomplish our goals.
But one thing we have to do is make sure when the list is empty and we’re in insert mode that SharePoint will let the insert form be drawn. When the insert link is clicked, dvt_1_form_insertmode is set to 1, so that’s what we’ll check for.
<xsl:when test="$dvt_IsEmpty">
…becomes…
<xsl:when test="$dvt_IsEmpty and not($dvt_1_form_insertmode = '1')">
Now, how do we display the insert link?
Option 1. Since the empty template is being called, we could simply add the insert link to that template as well. In an STP discussion with Richard, Matt Bramer suggested adding the link below the dvt_ViewEmptyText.
<xsl:template name="dvt_1.empty">
   <xsl:variable name="dvt_ViewEmptyText">There are no items to show in this view.</xsl:variable>
   <table border="0" width="100%">
      <tr>
         <td class="ms-vb">
            <xsl:value-of select="$dvt_ViewEmptyText" />
         </td>
      </tr>
      <tr>
         <td class="ms-vb">
            <a href="javascript: {ddwrt:GenFireServerEvent('__cancel;dvt_1_form_insertmode={1}')}">insert</a>
         </td>
      </tr>
   </table>
</xsl:template>
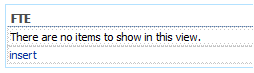
Option 1: Add the insert link in a new row below the empty list message
Option 2. Instead of a separate row, you could simply tack it on to the end of dvt_ViewEmptyText.
<xsl:template name="dvt_1.empty">
   <xsl:variable name="dvt_ViewEmptyText">There are no items to show in this view.</xsl:variable>
   <table border="0" width="100%">
      <tr>
         <td class="ms-vb"><xsl:value-of select="$dvt_ViewEmptyText" /> Be the first to <a href="javascript: {ddwrt:GenFireServerEvent('__cancel;dvt_1_form_insertmode={1}')}">insert a list item</a>.
         </td>
      </tr>
   </table>
</xsl:template>

Option 2: Append insert link to the end of the empty list message
Option 3. A little more involved option would be to break out the call to the insert template so that it falls outside the xsl:choose block and runs every time.
<xsl:choose>
    <xsl:when test="$dvt_IsEmpty and not($dvt_1_form_insertmode = '1')">
        <xsl:call-template name="dvt_1.empty" />
    </xsl:when>
    <xsl:otherwise><table border="0" width="100%" cellpadding="2" cellspacing="0">
        <tr valign="top">
            <xsl:if test="$dvt_1_automode = '1'" ddwrt:cf_ignore="1">
                <th class="ms-vh" width="1%" nowrap=""></th>
            </xsl:if>
            <th class="ms-vh" nowrap="">Your Field</th>
            .
            .
        </tr>
        <xsl:if test="not($dvt_1_form_insertmode = '1')"><xsl:call-template name="dvt_1.body">
            <xsl:with-param name="Rows" select="$Rows"/>
            <xsl:with-param name="FirstRow" select="1" />
            <xsl:with-param name="LastRow" select="$LastRow - $FirstRow + 1" />
        </xsl:call-template></xsl:if>
        <xsl:call-template name="dvt_1.rowinsert">
            <xsl:with-param name="IsInsertMode">
                <xsl:if test="$dvt_1_form_insertmode = '1'">1</xsl:if>
            </xsl:with-param>
        </xsl:call-template>
    </table>
    <xsl:call-template name="dvt_1.commandfooter">
            .
            .
    </xsl:call-template></xsl:otherwise>
</xsl:choose>
…becomes…
<xsl:choose>
    <xsl:when test="$dvt_IsEmpty and not($dvt_1_form_insertmode = '1')">
        <xsl:call-template name="dvt_1.empty" />
    </xsl:when>
    <xsl:otherwise><table border="0" width="100%" cellpadding="2" cellspacing="0">
        <tr valign="top">
            <xsl:if test="$dvt_1_automode = '1'" ddwrt:cf_ignore="1">
                <th class="ms-vh" width="1%" nowrap=""></th>
            </xsl:if>
            <th class="ms-vh" nowrap="">Your Field</th>
            .
            .
        </tr>
        <xsl:if test="not($dvt_1_form_insertmode = '1')"><xsl:call-template name="dvt_1.body">
            <xsl:with-param name="Rows" select="$Rows"/>
            <xsl:with-param name="FirstRow" select="1" />
            <xsl:with-param name="LastRow" select="$LastRow - $FirstRow + 1" />
        </xsl:call-template></xsl:if>
    </table>
    <xsl:call-template name="dvt_1.commandfooter">
            .
            .
    </xsl:call-template></xsl:otherwise>
</xsl:choose>
<table border="0" width="100%" cellpadding="2" cellspacing="0">
    <xsl:call-template name="dvt_1.rowinsert">
        <xsl:with-param name="IsInsertMode">
            <xsl:if test="$dvt_1_form_insertmode = '1'">1</xsl:if>
        </xsl:with-param>
    </xsl:call-template>
</table>
Notice that lines 240-244 in the first block have been moved outside the xsl:otherwise block (lines 246-250 in the second code block). But, they’ve also been wrapped in table tags because those were included inside the xsl:otherwise and the dvt_1.rowinsert template doesn’t include them.
Option 3: Move template call out of xsl:otherwise block
Option 4. Personally, I like showing the column headers even when the list is empty. So, with any of the options above, you could break the header rows out of the xsl:choose so they’ll show up in every scenario. (I like Option 2, above, so I’ll work from the assumption that the empty template handles drawing the insert link.)
<xsl:choose>
    <xsl:when test="$dvt_IsEmpty and not($dvt_1_form_insertmode = '1')">
        <xsl:call-template name="dvt_1.empty" />
    </xsl:when>
    <xsl:otherwise><table border="0" width="100%" cellpadding="2" cellspacing="0">
        <tr valign="top">
            <xsl:if test="$dvt_1_automode = '1'" ddwrt:cf_ignore="1">
                <th class="ms-vh" width="1%" nowrap=""></th>
            </xsl:if>
            <th class="ms-vh" nowrap="">Your Field</th>
            .
            .
        </tr>
        <xsl:if test="not($dvt_1_form_insertmode = '1')"><xsl:call-template name="dvt_1.body">
            <xsl:with-param name="Rows" select="$Rows"/>
            <xsl:with-param name="FirstRow" select="1" />
            <xsl:with-param name="LastRow" select="$LastRow - $FirstRow + 1" />
        </xsl:call-template></xsl:if>
        <xsl:call-template name="dvt_1.rowinsert">
            <xsl:with-param name="IsInsertMode">
                <xsl:if test="$dvt_1_form_insertmode = '1'">1</xsl:if>
            </xsl:with-param>
        </xsl:call-template>
    </table>
    <xsl:call-template name="dvt_1.commandfooter">
            .
            .
    </xsl:call-template></xsl:otherwise>
</xsl:choose>
…becomes…
<table border="0" width="100%" cellpadding="2" cellspacing="0">
    <tr valign="top">
        <xsl:if test="$dvt_1_automode = '1'" ddwrt:cf_ignore="1">
            <th class="ms-vh" width="1%" nowrap=""></th>
        </xsl:if>
        <th class="ms-vh" nowrap="">Your Field</th>
        .
        .
    </tr>
    <xsl:choose>
        <xsl:when test="$dvt_IsEmpty and not($dvt_1_form_insertmode = '1')">
            <xsl:call-template name="dvt_1.empty" />
        </xsl:when>
        <xsl:otherwise>
            <xsl:if test="not($dvt_1_form_insertmode = '1')"><xsl:call-template name="dvt_1.body">
                <xsl:with-param name="Rows" select="$Rows"/>
                <xsl:with-param name="FirstRow" select="1" />
                <xsl:with-param name="LastRow" select="$LastRow - $FirstRow + 1" />
        </xsl:call-template></xsl:if>
        <xsl:call-template name="dvt_1.rowinsert">
            <xsl:with-param name="IsInsertMode">
                <xsl:if test="$dvt_1_form_insertmode = '1'">1</xsl:if>
            </xsl:with-param>
        </xsl:call-template>
        <xsl:call-template name="dvt_1.commandfooter">
                .
                .
        </xsl:call-template></xsl:otherwise>
    </xsl:choose>
</table>
Notice, though, that the table tag didn’t encompass everything inside the xsl:choose. So we need to take a quick look at the templates involved to make sure the nesting still works the way it should.
- dvt_1.empty wasn’t inside the table and now it is. We’ll need to remove its table tag so that its tr’s will fall inside the main table.
- dvt_1.commandfooter also was outside the table and now it’s in. We’ll do the same thing with it.
<xsl:template name="dvt_1.empty">
    <xsl:variable name="dvt_ViewEmptyText">There are no items to show in this view.</xsl:variable>
    <table border="0" width="100%">
        <tr>
            <td class="ms-vb"><xsl:value-of select="$dvt_ViewEmptyText" /> Be the first to <a href="javascript: {ddwrt:GenFireServerEvent('__cancel;dvt_1_form_insertmode={1}')}">insert a list item</a>.            </td>
        </tr>
    </table>
</xsl:template>
…becomes…
<xsl:template name="dvt_1.empty">
    <xsl:variable name="dvt_ViewEmptyText">There are no items to show in this view.</xsl:variable>
    <tr>
        <td class="ms-vb" colspan="99"><xsl:value-of select="$dvt_ViewEmptyText" /> Be the first to <a href="javascript: {ddwrt:GenFireServerEvent('__cancel;dvt_1_form_insertmode={1}')}">insert a list item</a>.        </td>
    </tr>
</xsl:template>
We need to add colspan="99" to the td so that it spans the entire table created by the header row.
<xsl:template name="dvt_1.commandfooter">
    <xsl:param name="FirstRow" />
    <xsl:param name="LastRow" />
    .
    .
    <table cellspacing="0" cellpadding="4" border="0" width="100%">
        <tr>
            <xsl:if test="$ShowFormActions = '1'">
                <xsl:call-template name="dvt_1.formactions" />
            </xsl:if>
            .
            .        </tr>
    </table>
</xsl:template>
…becomes…
<xsl:template name="dvt_1.commandfooter">
    <xsl:param name="FirstRow" />
    <xsl:param name="LastRow" />
    .
    .
    <tr>
        <xsl:if test="$ShowFormActions = '1'">
            <xsl:call-template name="dvt_1.formactions" />
        </xsl:if>
        .
        .    </tr>
</xsl:template>

Option 4: Include the column headers (also uses Option 2 for the insert link).
So, with a little massaging, you can overcome the default functionality of SharePoint that hides the insert link when the list is empty.
Author: Jim Bob Howard
Jim Bob Howard is a web designer / webmaster in the healthcare industry. He has been working with SharePoint since March 2009 and enjoys sharing what he has learned. He is a moderator and frequent contributor to Stump the Panel, and answers SharePoint questions on Twitter (@jbhoward) and via email ([email protected]).
- SharePoint: Extending the DVWP - Part 1: Layout Enhancement - Rearranging Columns - Default and Edit Templates
- SharePoint: Extending the DVWP - Part 2: Layout Enhancement - Rearranging Columns - Insert Template
- SharePoint: Extending the DVWP – Part 3: Getting it All on One Line - DVWP Function Action Links
- SharePoint: Extending the DVWP – Part 4: Turning DVWP Action Links into Buttons
- SharePoint: Extending the DVWP – Part 5: Doing Stuff Before Save on Submit - PreSaveAction()
- SharePoint: Extending the DVWP – Part 6: Examining the Form Action Links
- SharePoint: Extending the DVWP – Part 7: Creating a Form Action Workflow
- SharePoint: Extending the DVWP – Part 8: Creating a Form Action Workflow - The After Math
- SharePoint: Extending the DVWP – Part 9: Oops! Failed Setting Processor Stylesheet
- SharePoint: Extending the DVWP – Part 10: Passing Workflow Variables to a Form Action Workflow
- SharePoint: Extending the DVWP – Part 11: Getting More Form Fields to the Workflow
- SharePoint: Extending the DVWP – Part 12: Adding More Form Fields from the Data
- SharePoint: Extending the DVWP – Part 13: Putting PreSaveAction() to Work – Creating Variables
- SharePoint: Extending the DVWP – Part 14: Putting PreSaveAction() to Work with jQuery
- SharePoint: Extending the DVWP – Part 15: User-Managed Dropdowns with Site Columns
- SharePoint: Extending the DVWP – Part 16: User-Managed Dropdowns - Loading Data
- SharePoint: Extending the DVWP – Part 17: User-Managed Dropdowns – Creating a Relationship list
- SharePoint: Extending the DVWP – Part 18: User-Managed Dropdowns – Loading the Relationship list – Part 1
- SharePoint: Extending the DVWP – Part 19: User-Managed Dropdowns – Loading the Relationship list – Part 2
- SharePoint: Extending the DVWP – Part 20: Cascading Dropdowns - Applying the jQuery
- SharePoint: Extending the DVWP – Part 21: Cascading Dropdowns - Three-tier Cascade
- SharePoint: Extending the DVWP – Part 22: Creating Title Based on Other Fields with jQuery
- SharePoint: Extending the DVWP – Part 23: Creating Title Based on Other Fields with a Workflow
- SharePoint: Extending the DVWP – Part 24: A Note to Readers
- SharePoint: Extending the DVWP – Part 25: Using an Audit Trail by Creating List Items with SPServices
- SharePoint: Extending the DVWP – Part 26: Modifying the Edit Template
- SharePoint: Extending the DVWP – Part 27: Adding an Alternate Edit Template to a DVWP
- SharePoint: Extending the DVWP – Part 28: Massage the Remove Template
- SharePoint: Extending the DVWP – Part 29: Modifying Form Action Workflows on the remove Template
- SharePoint: Extending the DVWP – Part 30: Using EasyTabs with Filtered DVWPs to Make Data Manageable
- SharePoint: Extending the DVWP – Part 31: Filling in Default Data on the insert Template with jQuery
- SharePoint: Extending the DVWP – Part 32: Filling in Default Data on the insert Template with Multiple DVWPs
- SharePoint: Extending the DVWP – Part 33: Modifying Total and Subtotal Row Layouts in DVWP
- SharePoint: Extending the DVWP – Part 34: Using Icons for Form Action Links
- SharePoint: Extending the DVWP – Part 35: Putting it All Together
- SharePoint: Extending the DVWP – Bonus: Fixing the Insert Form Action When "No Matching Items"
- SharePoint: Extending the DVWP – Bonus: Creating a Title Based on Dropdowns with jQuery


Hi Jim,
Thank you for your help. This solved the problem.
Richard
Excellent!! I’ve very glad to hear it, Richard.
Blessings,
Jim Bob
Hi Jim,
Is this series of posts going to be packaged into a single PDF downolad?
It is a great resource, but painful navigating through the posts!
Just wondering.
Cheers,
Bob
Bob – Yes, we are working on getting it all wrapped up. It will be in the EUSP eBook Store within the next week or two. Thanks for asking. — Mark
Where is the EUSP eBook Store?
Hi Keith,
The eBook store is on the right side about half way down the page next to the SPTechCon banner. Jim Bob’s e-Book isn’t ready yet but will be soon.
Thanks,
Natasha