
How to Expand/Collapse Web Parts in SharePoint Using jQuery
 Guest Author: Brandon Anderson
I was recently challenged with creating a web part zone in a page layout in which for every web part added to it, that web part took on expand/collapse functionality. The idea is that on the home page for this particular SharePoint site, users can add RSS feeds. Each of the RSS feeds is a web part, and each has many individual feed items. With the number of feeds and feed items open for modification, the information architect thought it best to collapse each feed web part by default and allow the user to expand and collapse the feed web parts as they desire.
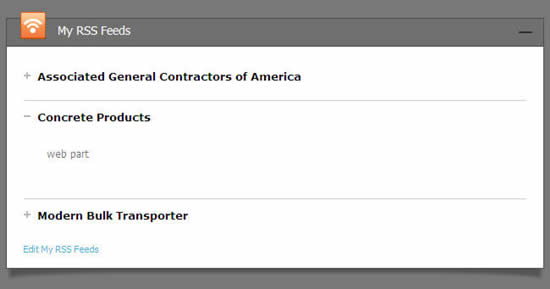
To do this I needed to understand the HTML structure of web parts in SharePoint 2010 and write jQuery and CSS that would add the functionality and look-and-feel we were looking for. Here is the result:
Below is the jQuery script I wrote for the web part expand/collapse (or accordion) functionality.
function expandCollapseWebPartsInZone() {
$(".expandCollapseWebPartsInZone td.ms-WPHeaderTd").addClass("expandCollapseHead");
$(".expandCollapseHead").parent().parent().parent().parent().parent().parent().parent()
.addClass("expandCollapse");
$("table.expandCollapse .ms-WPBody").parent().parent().addClass("expandCollapseBody");
$(".expandCollapseWebPartsInZone .expandCollapseHead").click(function() {
var headParentRow = $(this).parent().parent().parent().parent().parent();
if($(headParentRow).next("tr.expandCollapseBody").hasClass("expanded")) {
$(this).removeClass("expanded");
$(headParentRow).next("tr.expandCollapseBody").removeClass("expanded");
}
else {
$(this).addClass("expanded");
$(headParentRow).next("tr.expandCollapseBody").addClass("expanded");
}
return false;
});
}
This article was originally published on the Ironworks Consulting blog Fit & Finish.
Guest Author: Brandon Anderson
Brandon Anderson is a SharePoint user interface and look-and-feel specialist. He brings over 10 years experience with front-end web development to SharePoint implementations requiring customized branding. For the past 3 years, Brandon has worked extensively with the UI customization of SharePoint properties, both public and restricted-access, for clients of various sizes and industries. Brandon is the lead Microsoft SharePoint front-end developer for Ironworks Consulting (www.ironworks.com) and hosts the blog SharePoint Putty (sharepointputty.com), where he writes about the user interface customization of SharePoint.

i did use your code for creating rounded corner webparts, but was stuck with the following problem where the images dont expand with the webpart, here the link to the images
http://www.freeimagehosting.net/uploads/953984426b.jpg
http://www.freeimagehosting.net/uploads/fa9d7a3cc1.jpg
This has something to do with the css, i could not figure out, can you please help !
and also can you please provide the neccessary supporting files for your expand and collapse webpart that you created, it looks great.
Thanks in advance
Fayaz, the images look to be cutting off because the images are not wide enough to fit the web part width you have. It looks like your web part is set to be 100% width of the page, and the page is a liquid layout where it gets its width from the width of the browser window. I bet that if you reduce the width of your browser that this problem goes away. If that’s true, and you need to allow the web part to be that wide, you’ll need a wider background image for the web part title. You can simply take the image you have now and stretch it in a graphics editor. Others have used paint.net.
Fayaz, the only assets you need are the image files for the plus (+) and minus (-) graphics. Unfortunately, I can’t post images here. However, it is easy to recreate these icons using a graphics editor, where you can create them to your own taste. Best of luck.